Saturday, 26 July 2014

Have you tried PXE booting yet?

Nearly all modern computers support Network Booting (aka PXE booting).
You may have seen the option to boot from the network listed in the BIOS boot options of a BIOS Setup menu.

Tutorial #76 on my RMPrepUSB site describes how to set up SERVA which is an incredible Windows utility which can set up any Windows system to function as a PXE server (as well as a normal PC).

Normally, you would need to have access to the network DHCP server (the one that dishes out IP addresses to all the computers on the network) in order to configure PXE booting. The unique thing about SERVA is that you don't need to fiddle with the network DHCP server at all. This is a real boon for home users who usually use their router as the DHCP server. It is also a boon for companies who have a multi-server network and don't allow or want their employees to fiddle with the servers.


The home site for SERVA is here and it has lots of documentation on how to boot loads of different OS's - see here for a list of non-Windows payloads that you can network boot (includes Fedora, Ubuntu, Kali linux, Debian, android x86, GParted and even FreeDos for performing a BIOS upgrade).
To install Windows across the network, it is necessary to ensure that the OS you are booting to has the necessary network drivers included, because once it boots to the Windows PE environment, it will need to pull the install files across the network from the SERVA PC to copy onto the systems hard disk.
SERVA was featured in PC WELT recently (Issue 5 - pg.55)

The free 'Non-Supporter' home-trial version of SERVA can be used to install Windows across the network. The 'Supporter' version is 29.99 and has more features and is used by many companies - see here for a list.

Something to try during the Summer holidays perhaps?

Please tick 'funny' 'interesting' or 'cool' or add a comment to let me know which posts you most enjoy.

Friday, 25 July 2014

Add a Cold Boot Attack to Easy2Boot

Jamil recently contacted me and asked how to get the Cold Boot Attack (video) (skip to the 3 minutes point to save time) code 'scraper.bin' to work on an Easy2Boot USB drive. This allows you to capture the contents of a computer's memory onto a USB drive (even if it has been switched off for several seconds!). The idea is that the computers memory may still contain un-encoded AES encryption codes, passwords, etc. which can be deciphered later, once the memory's data has been safely captured.
Note that scraper.bin also displays the last key presses from the keyboard buffer too!

The idea that we came up with for getting this to work with Easy2Boot is now available for all to use, so check out Tutorial 124!

The following scenario of retrieving data from a system that is switched off seems rather far fetched however and may be something that you would only see Tom Cruise doing in Mission Impossible!:


1. User shuts down PC and walks away
2. Tom approaches system from the ceiling and takes it apart
3. Tom uses freezer spray on the internal DIMMs
4. Tom removes the DIMMs and keeps them cold on top of a frozen cold pack or a small flask of liquid Nitrogen which he has in his utility belt
5. Tom replaced the DIMMs with identical ones which he happens to have with him and leaves the building
6. Tom takes the DIMMs to another system in his lab which takes the same sort of memory
7. Tom quickly fits the DIMMs to his PC and his E2B+'scraper' USB drive and switches on the system - all data from the DIMMs are saved to the USB drive
8. Tom analyses the data, gets all the encryption keys and saves the world!

Please tick 'funny' 'interesting' or 'cool' or add a comment to let me know which posts you most enjoy.


How to add Floppy Disk Images to Easy2Boot

Floppy disk images usually have the .ima or .img file extension.

You can just add these to your E2B USB drive in the usual way by drag-and-drop to any suitable menu folder (e.g. \_ISO\MAINMENU or \_ISO\DOS or \_ISO\UTILITIES or even \_ISO\LINUX, etc.).

Most people will want to boot to DOS (either FreeDos or MS-DOS) in order to run a DOS utility such as a BIOS update utility or a DOS utility such as HWInfo.

The RMPrepUSB Tutorial 33 includes details on how to make such Floppy Disk Images.

When Easy2Boot boots from a .ima or .img image, the USB drive will be mapped as a floppy disk device (i.e. A:). Any hard disks that are present in the system will appear as C:, D:, etc. but of course, the files on them will only be accessible to DOS if they are FAT16 or FAT32, unless you also have a DOS NTFS driver loaded. The whole floppy disk image is loaded into memory so that you cannot change the files in the image file accidentally (note: if you wish to boot directly so that you can change the contents, use a .IMArw file extension as in v1.54 and later versions).

For instance, you can download the DOS version of HWInfo from here and add it to a floppy disk image as follows:

1. Download the latest DOS version of HWInfo and unpack it fully.
2. Download the FREEDOS_288.zip file from Tutorial 33 and unpack it to obtain the FREEDOS_288.ima file.
3. Mount the .ima file using WinImage or ImDisk.
4. Copy the two HWInfo files (.exe and .dat) to the floppy disk image.
5. Quit WinImage/ImDisk and save the changes.
6. Copy the .ima file to your E2B USB drive and give it a suitable name - e.g. \_ISO\MAINMENU\HWInfo.ima


When you boot from the image, type HWINFO at the A: DOS prompt to run the program.
If you prefer, add HWINFO to the bottom of the \fdauto.bat file to make it run automatically.

A ready-made payload file HWINFO.IMA.GZ is available in the Alternate Download - Other Files areas. There is also a CPUINFO.IMA.GZ too.

You can add BIOS utilities in the same way.

If you use the .ima file extension, the USB drive will be accessible from DOS as the first hard disk in the system. Any internal hard disks will be the 2nd, 3rd, 4th etc. Of course, FreeDOS will normally only be able to access them if they are FAT16 or FAT32.

Larger 'floppy' images
If you need a larger image, use ImDisk to create a Dos.img file of whatever size you want as a virtual drive. 
Copy your files onto the virtual drive and then 'Remove' the virtual drive. 
Then copy the Dos.img file to \_ISO\MAINMENU. 
If you like, you can use the contents of RMPrepUSB's FREEDOS_USB_BOOT folder as a source for your bootable FreeDos files (press F3 in RMPrepUSB to see the folder).

Use E2B's FreeDOS floppy image

Here is an easy way to run most DOS-compatible software just by copying the files onto your USB drive.

1. Download HWINFO for DOS and extract the files to a new folder on your E2B USB drive.
Keep the folder name within 8 characters (I used \HWINFO).
You can use the first NTFS partition of the E2B USB drive, but if you have a FAT32 partition on your USB drive, this you will not need to load the NTFS driver (which is a bit flakey!).
2. Now Legacy boot to the E2B DOS menu and run the FreeDOS floppy image.
3. Choose the NTFS option if your files are on the first partition.
4. Now run the program (this assumes the C: drive is the volume with the \HWINFO folder)

C:
cd \HWINFO
HWINFO


Tuesday, 22 July 2014

Re-install linux onto your Asus EeePC using a USB drive

I have added Tutorial 123 to the RMPrepUSB site for anyone wanting to re-install linux onto their Asus EeePC 701 from a USB drive using the 900MB EeePC 701 ISO download.

The larger EeePC downloads (e.g. v1.7  1.9GB) include images for many more EeePC models which can be run Live or can be installed. These larger ISOs can simply be added to your E2B USB drive as .ISO files. See  Tutorial 123 for more details.


Add 64-bit android for x86 Intel Architecture to your E2B USB drive

You can download various versions of 64-bit android for different Intel platforms from here.

Note that these are Betas and so I would recommend you do not try to install it onto your working Windows system! Luckily, most images contain a Live boot option so we can test it out without installing it.

The downloads are in the form of .zip files and contain a disk image which can only boot via UEFI.

To add these to your E2B drive you need to:
  1. Use 7zip or WinRar, etc. to find the live.img payload file which will be inside the .zip download file, e.g. android-4.4.2_r1-ia1-haswell_generic-userdebug.zip has a live.img file under \out\target\product\haswell_generic. I picked this one for my Z87 Haswell system.
  2. Extract  the live.img file from the .zip file file to a temporary folder (e.g. C:\temp\live.img).
  3. Drag-and-Drop the C:\temp\live.img file onto your MPI_FAT32 Desktop shortcut to automatically create a .imgPTN file
  4. Copy the new live.imgPTN file to your E2B USB drive (e.g. to the \_ISO\MAINMENU folder or \_ISO\LINUX folder) and rename it to something more meaningful (e.g. android_x64_442r1.imgPTN)
Now you can boot in MBR mode (or use QEMU or VBOX) and select the new .imgPTN file to swap over the E2B drive to the new partition image and then go and UEFI-boot it from the correct Intel Platform (e.g. a Haswell-based system in my case). 

Note that UEFI booting from VBox will probably fail as it will refuse to boot from an incorrect CPU\chipset platform.


Sunday, 20 July 2014

How to add Android x86 + Persistence to your Easy2Boot multiboot USB drive

You can run android x86 on an Intel\AMD x86 system from an ISO with persistence directly from your E2B drive.

The steps are:

1. Download a suitable version of Android x86 as an ISO file. Note that you can obtain versions to match different systems (e.g. eeePC, etc.). Using the wrong version on some systems may result in problems with the mouse or touchscreen, etc.
  • android-x86-4.0-r1.1-asus_laptop.iso  for ASUS Laptops/Tablets 
  • android-x86-4.0-r1-amd_brazos.iso     for AMD Brazos platform 
  • android-x86-4.0-r1-eeepc.iso          for ASUS Eee PC family 
  • android-x86-4.0-r1-s103t.iso          for Lenovo S10-3t tablet
  • android-x86-4.0-r1-tegav2.iso         for Tega v2(Atom N455)
  • android-x86-4.0-r1-thinkpad.iso       for IBM thinkpad tablet
  • android-x86-4.0-r1-tx2500.iso         for HP tx2500
2. Copy the ISO file to a MNU folder on your E2B USB multiboot drive (e.g. \_ISO\MAINMENU\MNU or \_ISO\LINUX\MNU).

3. Copy the android_x86_Persistent.mnu file to the same folder as your Android ISO file.

Then Edit the .mnu file so that the ISO filename matches your ISO filename.

4. Create an ext2 file in the E2B root (top level folder) using the RMPrepUSB - Create ext2 FS button - the file name should be \android-rw, but the volume name and size can be whatever you like.

You can instead use Make_ext.exe which is already on the E2B drive. (\_ISO\_Make_Ext.bat).

5. Make all files contiguous using RMPrepUSB - Ctrl+F2.

You can find the android .mnu file in the Alternate Downloads area (link on this page) or in later versions of E2B in the \_ISO\docs\Sample mnu files folder (1.54 or later).

Note that for persistence, we must specify the linux drive name in the kernel parameters. The .mnu code tries to calculate this, but you can override it by typing in the correct letter if it guesses wrongly.

For instance, if you boot from your E2B USB drive on a laptop containing a single HDD, the .mnu file will guess that the USB drive will be 'sdb' once android boots - if this is incorrect, and it will actually be 'sdc' then just type c followed by the [ENTER] key when you are prompted by the E2B menu. If you don't type anything within 2-3 seconds then it will just use the calculated value. If the drive letter is wrong, you just won't get persistence!

Tip: You can tell what drive letter the E2B USB drive is as android boots.

In this case it was a  (sda)

If your mouse is not working in android x86, use the TAB, ESC and ENTER keys as well as other keys to navigate the menus and icons.

Note: I had a few problems booting some of the ISOs in 'Resident' mode on some systems, but the Guest mode seemed to work. Android_x86 also did not seem to like VBox virtual machines much!

See also this video.

UEFI-booting

It seems that the .iso files do not work well with UEFI-booting and there is a separate .img download for UEFI-booting. Simply drag-and-drop one of the EFI .img files onto the MPI_FAT32 desktop shortcut (after installing the MPI Tool Kit), and create a .imgPTN file. This should now UEFI-boot (but won't MBR boot!)

You can also try the E2B Grub2 menu system which can boot to PhoenixOS via UEFI&MBR 32&64 and remix via UEFI&MBR 64-bit.

Please tick 'funny' 'interesting' or 'cool' or add a comment to let me know which posts you most enjoy.

Thursday, 17 July 2014

Booting Windows8.1ToGo from a 'Removable-type' of USB Flash drive

I was recently contacted by 'JFL' about getting Windows8ToGo working on his 64GB SanDisk Extreme flash drive.

He was using Windows 8.1 Enterprise as the source and was following my earlier blog here.

The problem was that although he could install Windows OK, it would not boot.

His SanDisk Extreme was listed as being of the Removable type in RMPrepUSB and it was suspected that this may have been the problem because I found some comments from madscye and creosotechris here which sounded suspiciously like something has changed in Win8.1!

Now, in the past, I have had Win7ToGo booting from a USB removable flash drive OK many times. I have also booted Win 8 in the past on a removable USB Flash drive and that had worked OK.

Experiment 1
I already had a  21GB Win8.1ToGo.imgPTN file which I made earlier on my E2B USB HDD and I copied that onto my 32GB USB 3.0 Corsair GT E2B Removable-type drive (after deleting some ISOs to make room!).
I switched partitions using E2B and then I ran BCDBOOT on it to set the BCD correctly to boot from the different drive.
Result: it booted fine under VBox (which treats the USB drive as an HDD) but NOT on my Acer laptop (ever-lasting spinning circle of dots!).

So I did another experiment...

Experiment 2 - fresh install
1. Using DISM, Install Win8.1 Enterprise onto a 16Gb Lexar JumpDrive USB 2.0 which appears as a Fixed Disk (install took about an hour!)
2. Boot from the Lexar USB drive on an Acer Aspire 7741G laptop - go through user setup to Desktop (again very slow!).
3. Reboot and check boots from USB drive OK - all was working fine.
4. Use Bootit.exe to Flip the Bit so the USB drive is now a Removable drive
5. Boot from it on the Acer laptop again
Result: FAIL! (ever-lasting spinning circle of dots)

Experiment 3
1. I re-ran BootIt.exe and flipped back to a Fixed Disk type again
Result: The Lexar boots just fine!

So proof that Win 8.1 ToGo must be run from a Fixed-disk type of  USB drive!

[Update] Win10 (first release) also has same issue. It can be overcome by booting from a VHD file containing WindowsToGo.
Windows 10 Creator now allows us to use Removable or Fixed disk USB drives for flat-file booting - hurrah!
Please tick 'funny' 'interesting' or 'cool' or add a comment to let me know which posts you most enjoy.


Wednesday, 16 July 2014

E2B Updates

In the last few days there have been a few small changes to E2B.

E2B v1.53 - has TRAD_CHINESE language added (thanks to Andrew :-). It also has a bugfix to the Make_E2B_USB_Drive.cmd script which used the wrong version of grub4dos to install code to the MBR of the E2B USB drive (reported by JF-L). This did not cause a problem unless you tried to boot a .imgPTN file - then you would get an error from E2B Qrun.g4b complaining about 'No Grub4dos installed to the MBR of this drive!' I have now changed the script and also changed Qrun.g4b so any version of grub4dos MBR code can be used. If you have seen this error message, it can be fixed by using RMPrepUSB to reinstall grub4dos to the MBR of your USB drive (recommended) or by updating your E2B USB stick to v1.53.

Info: The version of grubinst.exe used in RMPrepUSB has been modified by me to make it more boot-compatible on a wider range of systems than the standard grubinst.exe (the standard version is called grubinst_new.exe in RMPrepUSB). The boot code in the standard grub4dos MBR does not boot on some systems due to some BIOSes detecting what they think is invalid boot code. The special version of grubinst.exe in RMPrepUSB is limited to installing grub4dos to drives numbered 0-9 only, but fixes this problem, so that these few weird systems will also boot to grub4dos. That is why I recommend you always prepare your E2B USB drive using RMPrepUSB or the Make_E2B_USB_Drive script (and for other reasons too, like FAT32 writes are up to 10% faster on a flash drive if you use RMPartUSB to format them!).

The other update is to the MPI Tool pack - MPI_Tool_Pack_Plus_CloverLite_035. This has been updated to version 035a. It has the latest version of ImDisk now. Also, there was a problem if you tried to run  'RestoreE2B (run as admin).cmd' from Windows Explorer by using right-click+Run as Admin AND if you had not installed RMPrepUSB into it's default location on your Windows system (reported by Anderson - thanks!) - this is fixed in the new version.

P.S. No more language files have been sent to me yet - why not achieve some small amount of fame and world gratitude by translating the E2B strings.txt file into your own language?  Instructions are in a previous blog post here. You can even use Google Translate to do most of the grunt work! If you are German or Spanish speaking, please can you check the existing STRINGS.txt files as there are probably some errors as I used Google Translate to make them!


Thursday, 10 July 2014

Another E2B language and @DED-LEGO@

Mr TSAI has kindly sent me a Traditional Chinese language file.

The latest languages will always be in the E2B_LANGUAGE_PACK.zip file located in the Easy2Boot Alternate Download areas.

These are now:
Chinese Simplified
Chinese Traditional
English
German (Beta)
Spanish (Beta)

Memoarfaa has confirmed that the @DED-LEGO@ GFX menu package works with E2B - see the reboot forum posts starting here. You will need to increase the default number of entries from 15 however by re-compiling the file (why not try 100?).

@DED-LEGO@ showing the E2B menu with walking penguin and animated clock, etc.

Please note: E2B does not fully support GFX Menus or @DED-LEGO@/RIPPER menus and I am only willing to spend a few minutes on any issues/questions you may have concerning these.

Wednesday, 9 July 2014

Easy2Boot v1.52 includes SPANISH, GERMAN and CHINESE support

The Spanish and German STRINGS.txt files probably need some corrections. If you see any problems please just modify the STRINGS.txt file and send me the new version.

Tuesday, 8 July 2014

Sprechen sie Deutsche?

I have tried to convert E2B into German even though I failed my German O-Level!

If you speak German, please you can check my translation by downloading the German STRINGS.txt file and copying the STRINGS.txt file to your Easy2Boot    \_ISO    folder. This file is already in v1.52.

I expect there are some issues - if so please just edit the STRINGS.txt file and test it.
Then email me the corrected version! Use E2B v1.52 to test it.

Don't forget to test the XP, Vista and Win8 installs to (you can use a dummy ISO file).

Note: first version had a $$STRl1x1 problem when loading Windows Install menu - please re-download the corrected version if you have the old version.

To make a STRINGS.txt file in your own language, see the previous blog for instructions.


Thanks
Steve

Monday, 7 July 2014

Please send me your own language files!

Mr Lin has translated E2B v1.51 into Chinese. The new STRINGS.txt file is available on the E2B Downloads page and will be added into the next version of E2B.


If you would like to translate E2B into your own language, just make a new STRINGS.txt file.

Please send me your new STRINGS.txt file and I will add it to E2B and your fame will be immortalised!

Here is the best way to do it. First make an E2B USB stick if you don't have one already, then...

1. Copy the \_ISO\e2b\grub\ENG\STRINGS.txt file to the E2B drive's  \_ISO folder - always use latest BETA version of E2B (do not use an earlier version).

2. For test purposes - ensure that there are ISO files in all E2B menu folders - the ISO file can be just a one-byte dummy file (e.g a small .txt file renamed to dummy.iso). It is easier to use dummy files because they won't boot and will just return back to the E2B menu again.

Place a dummy ISO file in each of these folder:
\_ISO\ANTIVIRUS, AUTO, BACKUP, DOS, LINUX, MAINMENU, UTILITIES, UTILITIES_MEMTEST, WIN and WINPE folder.
Also add an ISO to each of the folders under the \_ISO\WINDOWS folder so that the Windows menus will appear. Ensure there are two or more ISO files in the XP folder (if only one ISO then it will be automatically selected by E2B and you may not see all the dialogue strings).

3. Boot from the E2B stick using an emulator\VM - if using RMPrepUSB and QEMU - use CTRL+SHIFT+F11  (not the F11\QEMU button) - if using VBOX - do not use DavidB's VMUB.
This allows you write access to the USB drive without needing to quit the emulator/VM each time you make a change.

4. Load the \_ISO\STRINGS.txt file into your favourite text editor (e.g. Windows NotePad) - ensure that it supports UTF-8 format so you can save non-ASCII characters.

5. Edit the English text on the right-hand side of all the $$STRxxx= keywords and change it into your own language.

Tip: You may find it quicker to upload the English Strings.txt file into Google Translate and cut and paste the translated text back into your STRINGS.txt file.
You can use FIXLANG.cmd to tidy up the mess that Google Translate makes of it as follows:
  • 1. Paste the English text into Google Translate and select your language
  • 2. Cut and paste the new translated text into a STRINGS.txt file on a folder on you Windows disk
  • 3. Download the FIXLANG.zip file and extract the files that are in it into the same folder as your STRINGS.txt file
  • 4. Double-Click on the FIXLANG.CMD file to fix the errors. A NEW.txt file will be made and then loaded into NotePad. You can re-save it as STRINGS.txt if it looks better.
FIXLANG.cmd will fix many of the problems caused by Google translate but you will still need to check each line carefully. I recommend using WinMerge to compare the new NEW.TXT file with the original English STRINGS.txt file.

To replace strings in more than one file, I recommend 'Find and Replace' (FNR.exe). FNR is a standalone .exe. It allows you to preview results before you change any files.


6. Save the file (don't quit the text editor)

7. Hit F9 in the E2B emulation session to reboot E2B - the new changes should now be visible.

8. Go through all the menus and also all the XP and Windows Vista and Windows 8 install screens (you can use a dummy ISO file for these).

9. GOTO STEP 5 and repeat until it is all perfect!


Tweaking

This is the hardest and most time-consuming part!

You will need to check each line carefully, especially any \n  syntax and file paths such as \\_ISO\\AUTO. Check all $$STR keywords and any $[0104] colour strings have not been corrupted.

Also, any question which requires a Yes/No answer must keep the same letters because E2B will expect either the 'Y' or 'N'  key to be pressed - e.g.  Ja/Nein (Y/N)  is correct, but Ja/Nein (J/N) may not work because E2B is expecting 'Y' not 'J' for Yes.

Hotkeys
Any string that starts with a ^hotkey symbol must not be translated - e.g.

$$STRm016=^Ctrl+A ANTIVIRUS-Menü                    [Strg+A]\n Antivirus-Dienstprogramme

because grub4dos hotkey names are coded keywords. You can change the letter from A to something else but don't change ^Ctrl+.

Underlined headings

Some headings are underlined using  ===== , e.g.

This is a heading
=========

The number of = characters must match the number of characters in the heading - e.g.

$$STRb001=XP-Installation - Schritt 1 \n===========================\n\n$[0104]WICHTIG: Du musst wieder von einem USB-Laufwerk starten und danach Schritt 2 durchführen! \n

The heading (XP-Installation - Schritt 1) has 27 characters and so there must be 27 = signs for the underline.


Finally - contact me and let me know what language and locale it is (e.g. Spanish, Catalan, Portuguese-Spanish, etc.). I will reply by email so you can email me the new files.

Also you can translate the F1.cfg file too if you like!

Sunday, 6 July 2014

What's eaten up all my disk space?

Tip: The best free utility I have found for seeing what files take up what space is Sequioaview

Really easy to see what is taking up the space on a disk and easy to use too.

WinDirStat is a derivative of this

Saturday, 5 July 2014

E2B v1.51a (with XP bugfix) and method for adding multiple background bitmaps to E2B


  • I have had three reports from users recently complaining about the Step 2 XP Install stage not working. When I looked at the XPStep2.g4b file, I found that I had accidentally commented out the line that loads the XP ISO into memory! The bug existed in all versions between v1.32 and v1.51! This has now been fixed in v1.51a. This probably explains why there have been some complaints (it is not always necessary to load the ISO into memory, but in helps in cases where XP does not contain compatible USB drivers and so cannot access the ISO file when it boots to XP).
  • I have now documented how you can have multiple wallpaper background bitmaps here.
    You can have one bitmap displayed whilst E2B is enumerating files and another for the Main menu. You can also have different bitmaps for each sub-menu. Here is a demo...
Note: MyE2B.cfg needs 'call Fn.70 3' so you can see the background during file enumeration.

\_ISO\MyE2B.cfg
=============
!BAT
call Fn.70 3


\_ISO\Mybackground.bmp.gz (first 'blue' image)

Read more: http://www.easy2boot.com/configuring-e2b/multiple-backgrounds/

See the YouTube video on how to set up multiple menu backgrounds by Liu Evan here.

To update E2B, download the non-DPMS zip file and extract the files onto your E2B USB drive - you don't need to download the large DPMS zip file even if your previous version was with the DPMS drivers. Then use the \Update_E2B_Drive.cmd file to update your E2B drive.


New GEGeek Tech Toolkit released

In case you missed by previous blog about the GEGeek Tech ToolKit here, I just thought I would mention that a new version is now available from the GEGeek website.

It is a hefty 1.7GB download but worth adding to your USB Flash drive as it contains hundreds of useful Windows tools and utilities. Click on the GEGeek Tech Toolkit link to get to the download.

Friday, 4 July 2014

Easy2Boot v1.51 now available


v.1.51 2014-07-03
  1. .imgPTN is now equivalent to .imgPTNLBAa (use .imgPTNna for old .imgPTN behaviour)
  2. \_ISO\BACKUP_LINUX folder deleted
  3. Small changes to English STRINGS.txt
  4. Bugfix aroung CONTIG.ISO and source ISO file size detection (failed size check if >2GB)
  5. Small code/message changes
  6. English strings.txt file is now always loaded after primary language.
The main change is Item #1 - so that you do not have to rename .imgPTN files to the more compatible/reliable files extension of .imgPTNLBAa, I have now made these two file extensions both behave as .imgPTNLBAa did (i.e. both file extensions now modify the partition parameters for LBA access and set the partition as Active).

If you don't want the partition set to Active and you don't want LBA parameters to be used (i.e. the 'old' .imgPTN behaviour) then use the new file extension of .imgPTNna (na=non-active).

Change #6 - This ensures that if a $STRxxxx string is missing from the chosen language file, then the English version will be used instead. Thus, if a new $STRyyyy string is added at some later date to the ENG\STRINGS.txt file, the old Spanish strings.txt file (which will not have the new $STRyyyy string) will not report an error but will just show the English translation if the Spanish translation is missing. i.e. the 'fallback' string translation will be English as I can always keep this up to date.

Say No! to the European 'Right to be forgotten' rule

You may have read recently that the European Court of Justice passed a ruling that search engines should not return any results that are inaccurate, inadequate, irrelevant or excessive (see here for the details).

Note: if someone asks for a search result to be removed because it is 'irrelevant', then surely it cannot actually be irrelevant because is it was irrelevant then they wouldn't be asking for it to be removed! i.e. Catch 22!

The original case was about a Spanish man...
1) What is the case about and what did the Court rule? 
In 2010 a Spanish citizen lodged a complaint against a Spanish newspaper with the national Data Protection Agency and against Google Spain and Google Inc. The man complained that an auction notice of his repossessed home on Google’s search results infringed his privacy rights because the proceedings concerning him had been fully resolved for a number of years and hence the reference to these was entirely irrelevant. He requested, first, that the newspaper be required either to remove or alter the pages in question so that the personal data relating to him no longer appeared; and second, that Google Spain or Google Inc. be required to remove the personal data relating to him, so that it no longer appeared in the search results.

and their decision was...

While the Court ordered Google to delete access to the information deemed irrelevant by the Spanish citizen, it also emphasised that the content of the underlying newspaper archive should not be changed in the name of data protection (paragraph 88 of the Court’s ruling). The Spanish citizens’ data is still accessible but is no longer ubiquitous. This is enough for the citizen’s privacy to be respected. 

So a Citizen can deem some piece of information about himself is 'irrelevant', it is perfectly OK for the information to be present as an article on the web, it is not breaking any law, but we (the public) are not allowed to search for it! Because of the data protection act, the source should not be changed, but the Search sites which can find the source sites should be changed. Surely this is circumventing the data protection act?

Recently a British journalist queried why some of his article 'hit results'  were removed by Google after receiving a letter from Google telling him that they would be omitted in future due to the ECJ ruling and a request from 'some 3rd party' to do so. In other words, someone just filled in a form provided by Google and they removed the search results. They recently reversed this decision (see here).

I simply cannot understand why the entire world internet population (and Google) has not objected to this? The ruling says that even if the 3rd party provider (e.g. Google) has servers outside Europe, the rule still applies as long as the 'service' is made available to Europeans.

The fine for not removing these results is pretty massive (up to 2% of annual worldwide turnover - note the word turnover - not profit or net income but turnover!). And that is just for 1 result being returned when it shouldn't be.

So Google 'detects' a European I.P address and censors our results (if using google.co.uk for instance). So we can look forward to loads of non-European server sites acting as Google proxies for Europeans who want to do Google searches and see ALL results. Apparently, Google have had over 50,000 'please forget me' requests so far!

Note: There is a way around this, use Google.com instead of your default Google (e.g. google.co.uk). If you go to the main Google page, the URL will be changed to your local country page automatically - however you can use google.com by clicking on the bottom-right 'Use Google.com' link:


OR just use DuckDuckGo which is also anonymous and does not take into account who you are or what you have been searching for recently.

Here is another more local case of why this ruling is insidious (and doesn't even achieve it's objective anyway) from my local press! So you can get past crimes that you committed just 8 years ago 'expunged'.

Hypothetical Example:

If a man was taken to Court in 1979 for child abuse but was found innocent (or even guilty!), could he later (how much later?) get the search results for that Court case removed? What if 20 different children or adults accused that same person of abusing them over a 20 year period between 1978 and 1998 but no further action was taken due to lack of evidence - could he also get these results removed by Google and the other search engines? According to the ECJ, he could as they are 'irrelevant'.

Now what if your child accused that man of abusing them yesterday and you did an internet search and either,
a) found nothing
or
b) found dozens of articles about the same man involved in similar situations

How would that affect your decision about whether to believe your child and whether your child and other children were in danger from this man and whether to go to the Police?

What message is this sending to society? Go out into the world and commit crimes, disappear for a year or so, get the crimes removed from all the search engines and no one will know. You are then free to commit more crimes and only when you are caught by the Police (or your employer bothers to do a Criminal Records Bureau check) will they realise you had former convictions.

Surely this ECJ ruling has been taken too far? If it is allowed to go on, then we can no longer rely on Google to give us accurate web search results. In that case, maybe we should start using a different search engine that doesn't respect the ECJ ruling (or rather, is not afraid of being fined by it)?

If a web site is hosting some dubious content, and it is proved to be breaking the law, then the host site should be prosecuted not the search site - i.e. 'don't shoot the messenger'!


Sunday, 29 June 2014

Add AntiX + Persistence to your E2B USB drive


The following allows you to boot from an ISO with root persistence (or home persistence) for AntiX 13 and 14 (not tested on 15). For Antix 15 with Root+Home persistence see blog post here.

If you download an Antix LiveCD ISO file, you can add persistence as follows:

1. Copy the ISO file e.g. antiX-13.2_x64-full.iso, to a sub-folder under one of the E2B menu folders - e.g. \_ISO\LINUX\MNU.

2. Use RMPrepUSB's Create ext2 FS button to create a file on your E2B USB drive - name=antix, volume name=antix, size=128 (or 256 or 500 or whatever you like)

3. Copy the AntiX_13.2_Persistent.mnu file (available in the E2B site Download area or in E2B v1.51 and later in the usual place under \_ISO\docs\Sample mnu files) to the same folder as the ISO file. You should now have these files on the E2B drive:

Thursday, 26 June 2014

Easy2Boot v1.50 Beta available


  • All sub menus headings, menu entries, user information and prompts in a single STRINGS.txt file
  • Compatible with previous versions (except for user added .mnu files)
  • 500MB CONTIG.ISO included in download (compressed)
  • Memtest86+ updated
  • If running an .imgPTN file, just press [ENTER] (no need to type Y)
  • Few minor display positioning issues fixed
  • Sample_MyE2B.cfg updated
  • Sample .mnu files updated
  • Many files in the \_ISO\e2b\grub\ENG folder now moved up into grub folder
  • \_ISO\e2b\grub\ENG now just contains STRINGS.TXT file
  • User can add \_ISO\STRINGS.txt file to override any other strings.txt file
  • Small changes to Theme Templates
This is a very new version and there has been a lot of 'behind the scenes' changes due to the use of the new STRINGS.txt feature.
  • Download v1.50 DPMS BETA version from here (30.6MB)
  • Download v1.50 non-DPMS BETA version from here (7.2MB)
This new E2B version uses a STRINGS.txt file to define menu headings, help text, user prompts, etc.

About 90% of  all text is now in the STRINGS.txt file and so you can easily modify these or translate them to a different language. STRINGS.txt is a UTF-8 file and so will support non-ASCII languages.

Most strings are now replaced by $$STRxxxx keywords (where xxxx can be any four characters) - these keywords are replaced with the correct string automatically by E2B when the menu is loaded into memory.

So to change any of the text, messages, headings, etc. in E2B, this is what you do:
  1. Copy the \_ISO\e2b\grub\ENG folder contents to a new folder - e.g. \_ISO\e2b\grub\STEVE
  2. Add a \_ISO\MyE2B.cfg file (you can copy the \_ISO\Sample_MyE2B.cfg file)
  3. Edit the \_ISO\MyE2B.cfg file to set the new 'language' - e.g. set LANG=STEVE
  4. Add a \_ISO\MyBackground.bmp.gz bitmap (optional)

e.g. a simple \_ISO\MyE2B.cfg file could be:

!BAT
set LANG=STEVE
set pwd=steve
set HEADING=\x20                       STEVE'S MENU  (%VER%)                       \x20
set HELPTEXT=HDD0 [F7]   Back [F8]   Reboot [F9]   Power Off [F10] www.steve.com

Now you can edit the \_ISO\e2b\grub\STEVE\STRINGS.txt file to change anything you like - here are a few lines from the STRINGS.txt file:

$$STRm004=\x20                  Windows Boot Menu                     \x20      
$$STRm019=\x20                       DOS Menu                         \x20

You may notice that .mnu and .txt files now use these new $$STRxxxx strings - e.g.

iftitle [if "%GFX%"==""] $$STRh0F8
debug 0
if exist (bd)/_ISO/e2b/grub/menu.lst configfile (bd)/%grub%/menu.lst 
if not exist (bd)/_ISO/e2b/grub/menu.lst set MFOLDER=/_ISO/MAINMENU && configfile (md)0xA000+0x50
boot

If you want to create new .mnu files, you don't use $$STRxxxx keywords (unless you want to), just use normal text in place of the $$STRxxx keyword.

Note: If you have already updated your E2B drive and have an old MyE2B.cfg file which defined new menu headings, you may find that it no longer works, add this line to your MyE2B.cfg file and it should work as before:

set ASTRINGS=

Also, if you used any of the .mnu files from the \_ISO\docs\Sample mnu Files folder, they may need updating with the new version from the docs folder in E2B v1.50 (basically remove the /%LANG% portion wherever it is used in a .mnu file).

It is also possible to modify the MyE2B.cfg file so you can ask the user which language he wants to use.

If you place the STRINGS.txt file in the \_ISO folder, it will override any LANG settings and will always be used.

This means that to have a 'Chinese Skin' or 'Spanish Skin', you can apply it simply by copying it to the \_ISO folder, e.g.:
  • \_ISO\MyE2B.cfg
  • \_ISO\STRINGS.txt
  • \_ISO\NewWallpaper.bmp.gz
In the future, I hope that we can build up a library of STRINGS.txt files in different languages.

To test it, it is best to make a new (reformatted) USB drive - you can add it to your existing E2B drive by overwriting the existing version, but there may be old (unused) copies of various files left on the USB drive.

As there will probably be a few small bugs, don't start trying to translate ALL the STRINGS.txt file strings immediately but please report any problems you find ASAP. Also if you have used it a lot and have found no bugs, please also let me know so that I can 'officially' release it and remove the 'beta' status from it.


Tuesday, 24 June 2014

Improved language support for E2B is coming!


I am working on a new version of E2B that will have a STRINGS.TXT file which will contain all the words displayed by E2B batch files and menus, etc.

This will mean that to change language, you just need to add the one language folder to your E2B drive and add a \_ISO\MyE2B.cfg file

e.g. To convert E2B to Spanish you would
Add a \_ISO\e2b\grub\SPANISH folder (which contains a STRINGS.txt text file)
Add a \_ISO\MyE2B.cfg file (which sets the language and the Main heading, etc.)

There will be no need to change the standard grub4dos batch files or .mnu files or .txt files that are already in E2B.

This will make it much easier for anyone to translate E2B into other languages as they just need to edit the file in a new language folder + create a MyE2B.cfg file.

This will take a week to do and test, but then I hope to encourage people to submit new language STRINGS.txt files to me, so I can add them to E2B.

It will support Chinese and other non-ASCII languages.

e.g. The STRINGS.TXT file will contain lines of words/phrases displayed to the user by E2B. You would just need to change these into your own language - e.g.

$$STRb001=XP INSTALL - STEP 1\n===================\n\nIMPORTANT: You must boot from USB drive again and run STEP 2 after this!\n
$$STRb002=64-bit XP ISO detected!\nYou will need to press F6 to load 64-bit Firadisk driver
$$STRb003=ISO detected as Windows %OSTYPE% (use 'XP', '2K3' or '2K' in ISO filename if incorrect)
$$STRb004=If this is incorrect, please type xp 2k or 2k3 now: 
$$STRb005=Will look for Windows %OSTYPE% drivers only
$$STRb006=DPMS2 Options (32-bit only)\n===========================\n1=SRS Driver+FiraDisk            - default=FiraDisk  + OEM drivers\n2=SRS Driver+FiraDisk+WinVBlock  - default=FiraDisk  + OEM drivers
$$STRb007=3=SRS Driver+WinVBlock+FiraDisk  - default=WinVBlock + OEM drivers (>512MB only)
$$STRb008=Auto-Detect SATA/AHCI/RAID 32-bit Mass Storage Drivers ([Y=2]/N/1/2/3) : 
$$STRb009=Auto-Detect SATA/AHCI/RAID 32-bit Mass Storage Drivers ([Y=2]/N/1/2) : 
$$STRb010=PLEASE NOTE: If booting from a USB-HDD, say YES to the next question....
$$STRb011=Load XP ISO into memory (recommended) ([Y]/N) : 

Monday, 23 June 2014

Easy2Boot 1.42a now in Chinese!

Thanks to 'Mr Lin', we now have a version of E2B in Chinese!

Mr Lin's Megasystem Setup!

Once you have made your E2B USB drive, simply download and extract the E2B_LANGUAGE_ZH_CN_1.42a.zip file and overwrite the English E2B files.

Note that this download contains a \_ISO\MyE2B.cfg file which will replace your MyE2B.cfg file (if you have made one). The MyE2B.cfg file ensures that the \_ISO\e2b\grub\ZH_CN folder is used.

The download is now available from the Downloads page.


Saturday, 21 June 2014

Add multiple Hirens ISOs to Easy2Boot

Introduction

Because Hirens/UBCD4WIN ISOs (e.g. HBCD, DLCD, FalconFour, etc.) contain a mix of DOS applications, linux and Windows, they can be difficult to add to a multiboot USB drive.

Note: E2B v1.90+ includes support for WinBuilder-based ISOs - just keep the file extension as .ISO.

FalconFour's UBCD 4.61 MiniXP Desktop

There are instructions on the Easy2Boot website for adding the ISOs and also some sample .mnu files.

If you just want to boot to Mini-XP, you can try just renaming the Hirens ISO with a .isowinvh file extension. E2B v1.78 also supports the .isoHW file extension. This can be used for DLC\DLCD versions which have XP and Mini7/8/10. For Mini7/8/10 the E2B USB drive must be a removable type (or use a Helper USB flash drive).

Another way to run a single Hirens ISO with the minimum amount of issues and workarounds is to extract some or all of the files from the ISO file and run it as a 'flat file' installation directly from the USB drive.

If your E2B USB drive is formatted as NTFS then you will need to select the DOS NTFS driver when running the DOS applications. As the NTFS driver uses DOS memory, some of the DOS applications won't run if the NTFS driver is also loaded into memory, so even if you extract the ISO files, it does not run very well on an NTFS USB drive and, of course, you can't extract multiple versions to the same E2B USB drive, because they will overwrite each other!

Note: E2B includes special instructions for extracting FalconFours's F4UBCD ISO file - see the \_ISO\docs\Sample mnu files folder for a special F4  .mnu file.

Here is a table for some of the most common Hirens ISOs when using both Removable USB flash drives and Fixed-disk type USB drives and running as an ISO file or as a FAT32 partition image:


DLC.Boot.2015.iso is also 64-bit UEFI bootable if converted to FAT32 .imgPTN (for Mini Windows 8 64-bit).

Strelec ISOs

For ISO use .isofira01 for 32-bit x86 WinPE and apps - or convert the ISO to a FAT32 .imgPTN file for MBR32/64 and UEFI64-booting.

x64 WinPE booting from ISO can be made to work as follows:
  1. Find the Strelec ISO on the E2B drive once you have booted to Strelec x64 Desktop (ignore errors)
  2. Right-click on ISO - mount with ImDisk as any drive letter
  3. Run Start Menu - MinstAll
  4. Run X:\Windows\System32\MInstLink.exe to add all Desktop icons and a fully populated Start Menu.

Strelec .imgPTN

If you get a 'Windows cannot find \SSTR\Mist\Minst.exe' error when using a .imgPTN file - use the Disk Management Desktop shortcut on the Strelec desktop to add a drive letter to the Easy2Boot USB drive volume.

For UEFI32 booting see here

Recommended method - use a FAT32 .imgPTN file

If you use the Windows E2B MakePartImage tool, making multiple Hirens/DLCD/FalconFour, etc. payload files to add to your (FAT32, NTFS, exFAT or ext2/3/4) E2B USB drive is very easy:
  1. Drag and drop the .ISO file onto the Windows Desktop MPI_FAT32 shortcut (or MakePartImage shortcut).
  2. (if prompted) Answer Y to merge\combine the menu.lst file with the E2B CSM menu.lst file.
  3. Copy the new .imgPTN file to your E2B USB drive menu folder (e.g. \_ISO\MAINMENU).
  4. Run WinContig or \MAKE_THIS_DRIVE_CONTIGUOUS.cmd to make the .imgPTN file contiguous.
If you are not prompted to merge the menu.lst files by the MPI tool, then you will probably get an extra CSM menu item which will then load the HBCD menu.

If you find any problems with linux menu entries, try converting the ISO using the MakePartImage Desktop shortcut instead of the MPI_FAT32 shortcut and do NOT auto-correct the menu entries when prompted. If the ISO was designed to be run from a USB drive, the menu entries will not require any 'corrections' to be applied.

In the case of FalconFour's 4.6 ISO, the MPI tool will merge the \menu.lst menu into the CSM menu. I then changed the \menu.lst file after the image was switched in E2B to make the menu box larger by changing a few lines in \menu.lst as shown in red below:

# ----- MENU POSITION ---
# wordspacing linespacing borderwidth tophelp numberofitemsinmenu topstart menuwidth rightstartposofmenu
# tophelp=topstart+noitems for menuhelp text just under menu box
set wdspace=0
set lnspace=0
set topstart=5
set rstart=4
set noitems=22
set menuw=66
set bdwidth=1
set tophelp=27


Some versions of Hirens have a problem with KonBoot in that it only works from a CD but not if booted from a USB drive (it just reboots back to the USB drive again), it can be made to work correctly if you modify the Hirens menu.lst file however (add the lines in red).

title Kon-Boot v1.1 (32/64-bit)\n\nLog into Windows XP with blank password; bypass login without breaking it
map (hd0) (hd1)
map (hd1) (hd0)
map --mem /F4UBCD/Images/konboot.img (fd0)
map --floppies=1
map --hook
chainloader (fd0)+1
rootnoverify (fd0)
boot

Kon-Boot 1.1 was the free version that only works for XP. The latest version works with Windows XP through to Win 8.1 and is just $15 to buy. OR you can add the free PassPass software to your E2B drive and get into any Windows local user account without needing a password for free!

Note: Some Hirens ISOs may support UEFI booting but most do not. I recommend the Strelec builds which are updated regularly (see this blog for adding UEFI32).

Remember, it is illegal to use some of the OS's and apps in HBCD unless you own a licence for them.

Tip: www.rmprepusb.com has a list of useful external links (see the 'Useful External Links' page).

Thursday, 19 June 2014

Cheap 'upgraded' USB Flash drives for sale on eBay - again!

Why do eBay allow this ad?

TITLE: 64gb Pink Crystal USB Flash Mermory Stick with FREE Keyring


So it says  (with my highlighting and colouring of the text)...
_________________________


64GB Reformatted/Upgraded USB Flash Memory Stick
The product is labelled based on the memory chip(s) it contains.
It is also marked as a reformatted/upgraded USB stick so they may vary in speed and capacity (4GB to 64GB), though they are able to store up to 64GB of data hence the low and competitive price.
These USB sticks vary in capacity and this is explained in the second paragraph of this listing which has been taken exactly as it is printed on the rear of the packaging.
THESE USB STICKS HAVE BEEN UPGRADED USING THE VERY LATEST COMPRESSION TECHNOLOGY. THIS MEANS THAT EVEN THOUGH IT MAY SHOW 64GB AVAILABLE THE ACTUAL CAPACITY WILL VARY AND CAN RANGE FROM 4GB RIGHT THROUGH TO 64GB AND ONCE THIS LIMIT HAS BEEN REACHED OLD DATA WILL BE OVERWRITTEN OR NEW DATA WILL NOT BE SAVED. THIS IS THE SAME WILL ALL CHEAPER MEMORY STICK ON EBAY BUT MANY SELLERS DO NOT TELL YOU THIS HENCE THE VERY LOW PRICE. THESE ARE ADVERTISED AS 64GB AS THIS IS WHAT WILL SHOW AS THE AVAILABLE MEMORY WHEN IN USE.

THESE ARE BEING SOLD AS UPGRADED USB STICKS HENCE THE VERY LOW PRICE.
_________________________

Why do they allow this seller to sell these suspect sticks as 64GB when he states in the small print that they may not be? Why does he say it has a 'very low price' when it is in an auction!

There is a 14-day refund on these USB drives with 'buyer pays return postage' - but how many people will realise they are buying defective USB drives within 14 days of using them?

He mentions a compression technology???? Well if he has a compression technology that can store 64GB of all kinds of data on just 4GB, why is he wasting his time selling dodgy USB drives on eBay when he could make a fortune selling the compression technology!

'The product is labelled based on the memory chip(s) it contains.' - so therefore it MUST contain 64GB of chips right?
He says 'they are able to store up to 64GB of data' and 'Minimum consumer-usable memory capacity is approximately 62.2GB.'  These are clear, unambigous statements - but then he says 'ONCE THIS LIMIT HAS BEEN REACHED OLD DATA WILL BE OVERWRITTEN OR NEW DATA WILL NOT BE SAVED'!!!!!

How about I sell a '22 carat 40g Gold ring' on eBay and then say in the small print that 'it looks like gold, smells like gold and has 22ct stamped on it but may be 0.001 carat gold or may be gold-plated or may be just brass - hence it is advertised as 22 carat gold'

If you buy any USB flash drives or SD cards, please test them with FakeFlashTest and then H2TESTW before you use it!

More...

I emailed the seller
You say in your ad that 'The product is labelled based on the memory chip(s) it contains'. From the picture, it is labelled as 64GB - so does it contain 64GB of memory chips?

Their reply was:
No its has been previosly 64gb (62.4gb) but due to its reformatting it has a different capacity depending on the uses software or device, the sticks have to be formatted using exfat and can hold anything between 8 and 64, they have to be filled using 4gb transfers at a time but depending on how they are used it is possible to get max capacity, i cannot stress though this isnt always the case hense the low price. i hope the information was useful.


Monday, 16 June 2014

Add Panda Cloud AV to your E2B USB drive

Windows Panda Cloud AntiVirus software is free (the Pro version is a 30-day trial version).
Disclaimer: I have no knowledge of the efficacy or otherwise of this software and so cannot personally recommend it or not recommend it. It is rated here.

The full bootable ISO can be downloaded from here which you can make a .imgPTN file from using the MPI_FAT32 shortcut.


It has an option to create a bootable USB rescue disk (instructions are here). Once you have made the USB Flash drive (which supports English and Spanish), you can make an Image Partition (.imgPTN) file from it, simply by dragging and dropping the Windows drive icon onto the MPI Auto Desktop shortcut.

The Panda Cloud rescue installation does not however seem to support UEFI booting so you will need to boot in MBR mode. I also don't know if it supports GPT disk format or not (as it is supposed to work on Windows 8, it should).

As it seems to boot from an ISO file which is present on the USB Flash drive, here is a way to add the same ISO file to your E2B USB drive...

1. Download and install Panda Cloud AV onto your Windows system (be sure to untick the Panda Security Toolbar and the other option(s) to avoid unwanted alterations!).

2. Choose either the Basic version of the Pro version - it will then download and install the latest version from the internet.

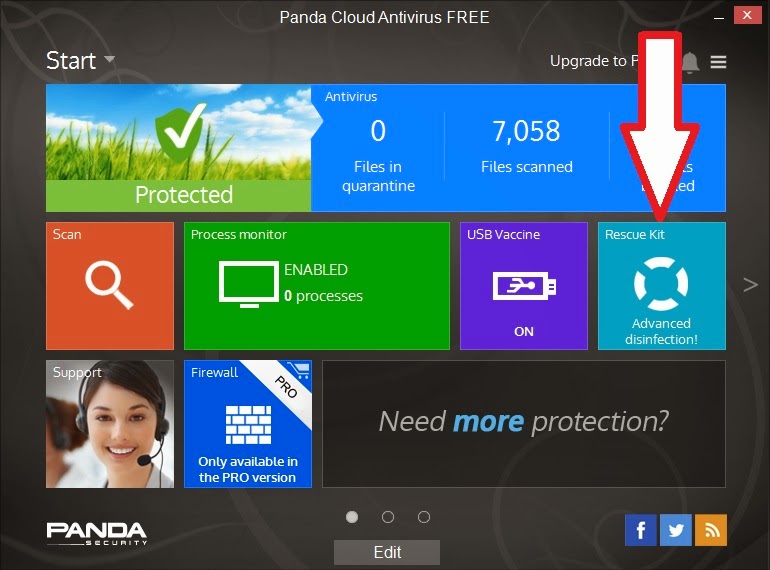
3. Insert any old spare USB flash drive (64MB or larger - yes, I mean 64MB!), format it as FAT32 and then choose the Rescue Kit option (see arrow below).


4. Follow the prompts to make a Rescue Flash drive (the 13MB .iso file and other files, will be downloaded from the internet and copied to your USB flash drive - syslinux will be installed onto the flash drive PBR sector and the partition will be made active).

Note: At this point you could simply drag-and-drop the USB drive letter onto the MPI_FAT32 Desktop icon (after installing the MPI Tool Kit) and make a Panda.imgPTN file (use Syslinux v4 if prompted).  Or continue as follows...

5. Copy the whole \PandaCloudCleaner folder from the USB flash drive to the root of your E2B drive. The USB Flash drive is now no longer needed and it can go back in the junk drawer!

6. Move the \PandaCloudCleaner\PandaCloudCleaner.iso file to a suitable E2B menu folder (e.g. to \_ISO\ANTIVIRUS\PandaCloudCleaner.iso).

You should now be able to boot directly from the PandCloudCleaner ISO file using E2B.

To check that it is working correctly, here is what should happen when you boot from the ISO file...

1.  Choose a language

2. Press Enter

Check that you see the 'Setting up the PC...' message.
  • This is where it alters your Windows installation and copies itself to the hard disk so that it auto-runs Panda when you reboot to Windows.
  • If the PandaCloudCleaner folder is not present on the E2B USB drive then you won't see this message and it won't work!

If it patched Windows successfully, you should now see this message. 
It may also prompt you to remove your USB drive and then automatically reboot.

Now when your system reboots to Windows from your hard disk, it will auto-run Panda Cloud Cleaner under Windows...


After accepting the licence agreement, it will check the internet for the latest definitions (if an internet connection is available) and download new ones if required before starting a scan of your system.


Note: I cannot vouch for the effectiveness of this software (indeed the Pro version seemed to cause problems on my Win 8.1 64-bit system which already had Windows Defender running).

You can now un-install Panda Cloud AV from your Windows system if you wish.


Please tick 'funny' 'interesting' or 'cool' or add a comment to let me know which posts you most enjoy.

Saturday, 14 June 2014

New Easy2Boot Forum

I have added a primitive User Forum to the Easy2Boot site.
E2B users can use this to ask for help from other E2B users or offer hints and tips, etc.

No login is required. Any 'inappropriate' posts will be removed without mercy! Please use it responsibly or I will remove the whole User Forum.

P.S. Checkout Frettts-Freeware for lists and descriptions of free software.


Please tick 'funny' 'interesting' or 'cool' or add a comment to let me know which posts you most enjoy.

How to boot Ubuntu via UEFI with persistence from Easy2Boot

You can fully-install many linux distros to a .imgPTN file (see blog post here), however I was asked recently how to boot Ubuntu 14.04 64-bit from an Easy2Boot USB HDD when using partition image files (.imgPTN files) so that you can UEFI boot with persistence.

Note: 14.04 and many later versions of Ubuntu (and linuxmate based on Ubuntu) have a bug! They do not fully boot and give an initramfs error if you use a casper-rw partition. It works OK with a casper-rw file, but not a partition. Sometimes it may work if the ext partition is located after the FAT32 partition - but this depends on the order of the two files (xxxx.imgPTN and xxxx.) so using a casper-rw partition cannot be guaranteed to always work! See later bog post here.