Tuesday, 26 July 2016

How to activate Windows 8/10 automatically


You can use the following cmd script to get the OEM key which has been programmed into the BIOS by the manufacturer and then activate Windows with it automatically. Of course, the OS must match the OEM key (e.g. Windows Home OS <> Windows Home Product Key).

AutoActivate.cmd  (run as admin)

@echo off
pushd "%~dp0"
set PKEY=
get_win8key.exe > WINKEY.txt
set /p PKEY=<WINKEY.txt
if not "%PKEY%"=="" (
echo Activating using key %PKEY%
cscript //NoLogo %systemroot%\system32\slmgr.vbs /ipk %PKEY% > act.log
cscript //NoLogo %systemroot%\system32\slmgr.vbs /ato >> act.log
type act.log
)
popd

get_win8key.exe can be obtained from here. It also works on Windows 10 systems.

P.S. after downloading get_win8key.exe - right-click on the file - Properties - and tick UnBlock. Otherwise Windows Powershell may refuse to run it.

How to automate the installation of Windows and Lenovo drivers using SDI_CHOCO

Here is how I modified SDI_CHOCO on my E2B drive so that instead of using Snappy to install generic drivers, it installs all the correct official Lenovo drivers and applications.

New user files are created by the end user to modify the install behaviour, so updating E2B to the latest version will not delete these new files because only the original E2B files are updated.

If you have several different models of PCs and Notebooks to install, then the XML file and SDI_CHOCO folder structure should be duplicated, renamed and modified accordingly, for each different model.


Monday, 25 July 2016

Easy2Boot v1.82SDIf Beta now available

Version 1.82f does not install any choco applications by default now (i.e. Google Chrome and TeamViewer are not installed by default).

I think that v1.82 is getting good enough for release now, so please test and provide feedback.
I am still waiting for a grub4dos bugfix though.

Sunday, 24 July 2016

E2B v1.82SDIe Beta with WSUS Offline Update support

This new version includes support for the WSUS Offline Update utility.

You can download and extract WSUS Offline Update to the \_ISO\WINDOWS\INSTALLS\wsusoffline folder of your USB drive and then run updategenerator.exe - pick the OS's you want to support - e.g. Win 8.1 x86 & x64, Win 10 x86 and x64 - and then download the updates (this may take quite a while!).

Easy2Boot v1.82SDId Beta available

The v1.82d Beta version has a few new XML files added for Windows 8 and 10 ISO installs:

  • Win10_Choose_a_key_SDI_CHOCO.xml
  • Win8_Choose_a_key_SDI_CHOCO.xml
These allow you to do a manual install of any Win8/10 ISO and choose the Product Key that you want to use (i.e. the same as the default Option 0 choice, but it also runs the SDI_CHOCO install, so it will install drivers and applications). These two new XML files do not contain any other configuration settings and are not 'automated'.

There is also a new E2B feature for Windows 8 and Windows 10 (and 2016) installs from an ISO. 

Saturday, 23 July 2016

E2B v1.82SDIc Beta now available

This new version just has a few changes to improve the SDI_CHOCO.cmd script if you want to use WiFi instead of Ethernet to connect to the internet during installation.

If anyone has tried the new Snappy+Chocolatey XML files yet, please let me know how you got on!

Have you discovered the surprise yet (clue: you will need to test using a notebook or PC with speakers!)?

Friday, 22 July 2016

E2B 1.82 SDI Beta b version now available (Snappy+Chocolatey)

This is a new, slightly tweaked version of the previous SDI+Choco version. It is available in the Alternate Downloads Areas as usual. Read the previous blog post for how to get it working.

It now includes sample XML files for Win 8.1 Pro, Win 8.1 Home, Win 10 Pro and Win 10 Home for both USA and English International versions of the ISOs.

  • For 'English' ISOs use the 'US' XML file
  • For 'English International' ISOs use the 'UK' XML file

You can remove the E2B USB drive when you see the CAPS LOCK and SCROLL LOCK LEDs lit.
I have added better logging and tidied up the cmd scripts a bit.

There is a little surprise added too - leave a comment when you find out what it is!

Note: If you have modified any of the original E2B files in the \_ISO\WINDOWS\INSTALL folder (naughty, naughty!), then when you update E2B with this new version, it will obviously overwrite your modified files. So rename any folders you want to keep first. if you have some Driverpack downloads in the SNAPPY folder, they will not be affected when you update.

Thursday, 21 July 2016

E2B is Snappy and Chocolatey!

E2B v1.82SDIa_Beta is available for download in the Alternate Download Areas.

Once you have downloaded and added the driverpacks, you will be able to perform a fully automated install of Windows with all drivers and any apps you want too, using an unmodified MS ISO and one of the xxxxxxx_CHOCO_SDI.XMl files on your E2B USB drive.

Wednesday, 20 July 2016

E2B progress report

I recently received a nearly new pre-owned Lenovo 300 IdeaPad i5 2TB 8GB notebook. It was a refurbished laptop which I won on eBay (exdemolaptops if you are interested). One of the main requirements for me was a bottom hatch that allows me to quickly swap the hard disk and of course, USB ports!
It has one USB 3 port and two USB 2 ports. I swapped over the 1TB spinny-thing for a 120GB SSD so that I could do Windows Installs as quickly as possible for testing the new Snappy+Choco version of E2B. A completely automated Win10Pro install, including installing 19 drivers and 2 applications takes under 15 minutes.

Thankfully, CSM and UEFI-booting are easily selectable (via Fn+F12) and booting to E2B is really fast on the USB 3 port too!


Sunday, 17 July 2016

Automatically install drivers with Snappy Driver Installer

Today I discovered Snappy Driver Installer (SDI). It has been around for a while but I had not heard of it before.

If you don't have all the DriverPacks it needs, SDI will download them via torrents, but it can take a while...

You can download this utility to a USB drive and just run it from any Windows system (XP->Win10, 32-bit or 64-bit). It will look at your hardware and current Windows drivers and then search for a better driver within it's Driverpacks and then install it. The downloads are in 'Driver Packs'. A full download will take 13GB of drive space if you want all the driver packs, or it can be asked to download just the ones you need.

The nice thing about SDI is that you can also run it from the command line and it can be automated.

So using SDI and a few scripts, I added some new folders to my Easy2Boot USB drive.

The folder structure on the E2B USB drive is currently:

\_ISO\WINDOWS\INSTALLS
      \APPS - contains installers and scripts to execute them
      \DRIVERS\904HA\WIN1032 - contains scripts and special drivers to copy to HDD
      \SNAPPY    - contains the SDI files
      \CONFIGS - contains main .cmd file specified in RunOnce portion of XML file

Thursday, 14 July 2016

Add post-install files to a Windows Install (using an unaltered MS ISO)

I have added a bottom section to my previous blog here, detailing how you can inject files and folders automatically into a Windows Install (7/8/10) by using an entry in an XML file. The .iso file is not modified at all. All files are copied from the E2B USB drive.

This means that as well as a fully automated install using an unattend.xml file, we can also cause it to transfer over any files we like (e.g. drivers, apps, registry tweaks, etc.) from the E2B Removable USB drive, without needing to modify the original MS ISO in any way.

It also allows us to add in a \Windows\Setup\Scripts\SetupComplete.cmd file, if required and even run a StartUp.cmd file for first user logon.

The next version of E2B will include a test sample XML file (\_ISO\WINDOWS\WIN10\Auto_WipeDisk0_Win10ProUK_setupcomplete_demo.xml), with some dummy .cmd files which happen to be in \_ISO\e2b\firadisk, so you can test and modify it for yourself if you wish.

This means you can use the same ISO to install different models of PCs with different drivers and applications just be selecting the correct XML file. Your E2B drive can contain folders for machine-specific drivers and different folders for applications, so that you can copy over only those folders that you need.

Of course, how you install the drivers and apps from a cmd file is usually the tricky part, but I leave this up to you!

Add Gentoo + Persistence to E2B

Here is how to boot from a Gentoo ISO file with persistence.


I used the livedvd-x86-amd64-32ul-20140826_gentoo.iso download.

The cheat code needed is in the form aufs=/dev/sdX3  where X is the USB drive.

Since the USB drive number will vary from system to system, we have to try to guess what Gentoo will assign the USB drive as!

Instructions

Tuesday, 12 July 2016

Bug in E2B v1.81 - Please update to v1.81A (bugfix in MAKE_E2B_USB_DRIVE (run as admin).cmd script)

A bug was reported in the v1.81 MAKE_E2B_USB_DRIVE (run as admin).cmd script which causes it to prematurely abort if  C:\bootmgr is not found. After copying over the files, the script checks the size of bootmgr and then copies it to the E2B drive if it is a compatible version - unfortunately if C:\bootmgr does not exist then the script just aborts, and so it does not install grub4dos, leaving you with an unbootable E2B USB drive ('bootmgr is missing' error).

This is now fixed in E2B v1.81A.

The E2B menu will still display "v1.81" because only the make script is affected.


Sunday, 10 July 2016

Easy2Boot v1.81 is now released


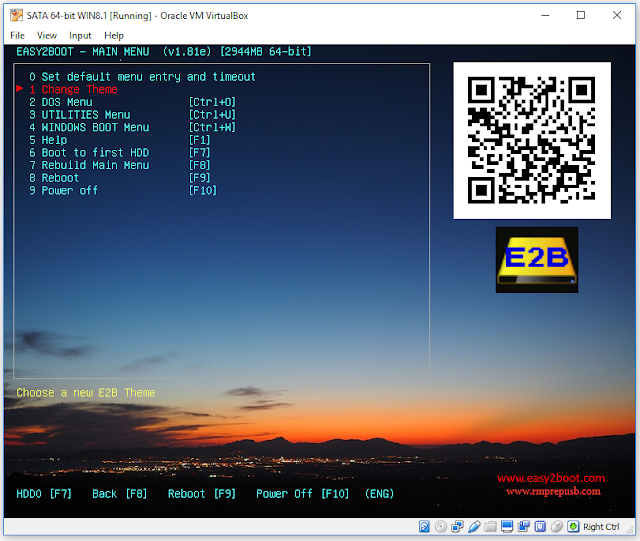
QR code contains the URL of 'List of tested payload' page on E2B website.

Version 1.81 contains 3 bugfixes (in bold) and a few tweaks...

As always, just download and extract E2B to an empty folder and run the \UPDATE_E2B_DRIVE.cmd file to update all your E2B drives.


v1.81 2016-07-09
  • New grub4dos \grld 0.4.6a 2016-07-04 (grub4dos USB driver may now work better?)
  • $$AddWin2Main.mnu bugfixes for direct booting of Windows Install ISOs from Main menu. 
  • Bugfix for .isope path problems and + make work if iso on 2nd partition (note: .isoPExxx extensions only work correctly on Removable Flash drives, otherwise convert to .imgPTN files). 
  • SWITCH_E2B.exe v1.0.12 bugfix for syslinux booting (also supports .imgptn*2* as well as .imgptn*23* extension for special users - .imgptn*2* is NOT supported by E2B though!).

Saturday, 9 July 2016

Which USB 3.0 SATA disk drive enclosure is best for E2B (six enclosure shoot-out)?

USB 3.0 controllers are designed to operate at fast speeds, so it makes sense to buy a USB 3.0 drive enclosure, even if you are going to connect it to a USB 2.0 port. Because I do a lot of work with USB drives, I mostly use a USB 3.0 drive caddy containing an SSD hard disk for maximum speed. I also use a UASP HDD enclosure to get the best possible speed with an SSD drive under Windows.

However, for booting a wide range of systems with E2B, a UASP HDD drive may not be the most compatible option...

Tuesday, 5 July 2016

Creating fully unattended XML answer files for Windows 10 Install ISOs for E2B

I detailed in a previous blog here, how to create and modify an XML file to fully automate the installation of Windows 7 and 8.

The process is identical for Windows 10. You need to specify a Product Key in the XML file (same as Win8), although not all ISOs may need it (e.g. some MSDN or Volume Licence ISOs).

The process is:

Sunday, 3 July 2016

Adding 'multiboot' WinPE ISOs (such as GeekSquad MRI_5_10_2.ISO) to E2B

If you have an ISO file which contains bootmgr and boots to WinPE, then you can use it with E2B by renaming the file extension to .isoPE or .isoPE01. This only works if you have a Removable E2B USB drive (you should convert the ISO file to a .imgPTN file if your E2B USB drive is of the 'fixed disk' type).

Note: There was a bug in previous E2B versions when using .isoPE and .isoPE01 file extensions (the blue LOADISOPE.cmd console window stopped with an error and the ISO was not loaded). You will need a recent version - e.g.  E2B v1.81 Beta from the Alternate Download Areas (see side bar).

However, if you use the .isoPE file extension, it will cause E2B to immediately load and run bootmgr and so the ISO will boot straight to WinPE and you won't see the non-Windows boot menu, if one was present inside the ISO.

Friday, 1 July 2016

Make a basic Easy2Boot MyE2B.cfg configuration file.

If you already have an E2B USB drive, you can easily update it by downloading the latest version of E2B and then run the UPDATE_E2B_DRIVE.cmd script.

Newer versions of E2B have a new version of the MAKE_E2B_USB_DRIVE (run as admin).cmd script, so that when you make a new E2B USB drive, it also asks you some questions about how you want to configure E2B - e.g. language, keyboard, if you want the file extension to be displayed in the menus and if you want the rotating E2B logo to be displayed (with Boiler Plate or QR code).

If you have already made your E2B USB drive, you can run the same script to create a new \_ISO\MyE2B.cfg file by running the \_ISO\docs\Make_E2B_USB_Drive\Make_MyE2B.cfg.cmd script. It will ask you to select a USB drive and then will run through the same questions that MAKE_E2B_USB_DRIVE (run as admin).cmd asks.

QR code in E2B v1.81f

E2B v1.81f will allow you to add a QR code 'STAMP' to the menu wallpaper when you run \MAKE_E2B_USB_DRIVE (run as admin).cmd to make a new E2B drive.

The QR code contains the URL for the E2B website's 'List of tested ISOs/payloads' page, so you can use your mobile phone's QR reader to quickly look up the recommended way to add any payload to your E2B drive if your first attempt did not work!

If your mobile phone does not already have a QR reader, there are many free apps that support QR code scanning. Try it out on the screenshot below now...


Wednesday, 29 June 2016

Directly boot to .VHD, .VHDX and .WIM (NT6) files with E2B

E2B can directly MBR-boot to dozens of .VHD, .VHDX and .WIM (NT6) files. Just copy them to one of the standard E2B boot folders (e.g. \_ISO\WIN) and boot to E2B. They do not need to be contiguous either.

E2B uses chenall's NTBOOT.MOD grub4dos scripts to modify a BCD file which is copied to a virtual floppy disk in memory, so that it contains the correct path to point bootmgr at the boot file.

There are a few caveats however:
  1. A compatible version of bootmgr is required.
  2. There must be no spaces in the filename or path.
If you use the \MAKE_E2B_USB_DRIVE (run as admin).cmd script to make your E2B drive, it will copy bootmgr from your Windows system to the E2B drive. If you did not use the script, then you will need to ensure that you copy the bootmgr file to the \_ISO\e2b\grub\DPMS\NTBOOT.MOD folder yourself.

Until recently, I thought that only Windows 10 versions of bootmgr were incompatible, but I have now tested over 20 different versions (renamed to show what symptom I got with each one when booting a VHD):

Thursday, 23 June 2016

RMPrepUSB v2.1.731 and grub4dos 0.4.6a

RMPrepUSB v2.1.731 will install grub4dos 0.4.6a when you use the 'Install grub4dos' button.

Under some circumstances, you may hit the grub4dos 0.4.6a bug where it does not like a certain partition on one of the drives in your system and fails to boot to grub4dos. This is the same issue as you may sometimes get when you boot to E2B and get a E2B.cfg file missing error.

The solution is to use an older 0.4.5c version of grub4dos.

In the case of RMPrepUSB, simply copy the required 0.4.5c version of grldr to the RMPrepUSB folder (press F3 in RMPrepUSB and it will open the correct folder). For E2B, replace the \grldr file.

I suggest you use the 2015-05-18 version of grldr 0.4.5c (I have not validated later versions of 0.4.5c, so they may have bugs).

Note that 0.4.5c has some missing features.

Version 0.4.6a has:
  • A fast USB 2.0 rd/wr driver
  • .jpg image file support for backgrounds
  • ext3/4 support
  • Better ISO, Joliet and UDF support
  • Can boot from non-contiguous files (if not too fragmented) using map command
  • Large font support
  • Stamp and Animated graphics support
  • Many bug fixes, incl. NTFS file write bug fix
  • Better debugging
  • Extra commands
The bug in 0.4.6a is difficult to reproduce, but we won't find it by using 0.4.5c all the time. If you find a system which shows the problem, please try to narrow down which partition it is that is causing the problem (e.g. change the partition type to 0 - then see if you can boot to grub4dos - repeat for each partition until you find which one is causing the issue, then make an image of the bad partition and send me or the developers the image + the MBR .bin file so that we can reproduce the problem). The bug is reported here.

How to pre-activate all your Win7/8 systems for Windows 10 without actually installing Windows 10 (even after 2016-07-29)!

Time is running has run out! However, you can still activate Windows 10 using a Windows 8 or Windows 7 Product Key even though the 'upgrade' deadline has expired!

Note: This will probably not work after 2017-12-31 - see here.

Microsoft have said that Win10 will probably be their last version of Windows, because they will release continuous updates for Win10.

So even if you don't like Windows 10 now, you may like Windows 10 a lot more in 6 months time or in 3 years time. Unless you activate and register each system now, you will have to pay for it later!

If you are still running Win7, you should definitely upgrade to Win8.1 or Win10 because Win7 has reached 'end-of-life'. Manufacturers are no longer releasing peripherals with Win7 drivers, so any new peripherals you purchase may not run on Win7 if it requires a special driver.

Tip: You can check the Windows version by running 'winver' from the Start - Run box.

As I have mentioned before in previous blogs, you don't have to install Win10 onto a system's internal hard disk in order to get it registered with Microsoft for Windows 10. All you need to do is boot the Win7/8 system from a USB drive which has Windows 10 To Go on it. Here are the steps:

Monday, 20 June 2016

New versions of E2B, MPI_Tool Pack, RMPrepUSB available

The fix for SWITCH_E2B.exe is now added and seems to work.
I also found a small bug in my code which also affected RMPartUSB, so I have re-released RMPrepUSB (which contains RMPartUSB).

  • SWITCH_E2B v1.0.11 - bugfix to adjust hidden sectors
  • E2B v1.81c - has new RMPartUSB v2.1.731 and new SWITCH_E2B.exe v1.0.11
  • MPI Tool Pack + Clover Lite 0.066 - has new SWITCH_E2B v1.0.11
  • RMPrepUSB v2.1.731 - new RMPartUSB 2.1.731
New versions are in the Alternate Downloads Areas (see side bar).

If you already have made .imgPTN files and they have been booted at least once using the E2B menu system, then you don't need to update them.

Sunday, 19 June 2016

SWITCH_E2B.exe bug found!

For a number of months now I have been experiencing odd issues with .imgPTN files, especially with syslinux-bootable images. Sometimes they worked fine and I could MBR-boot to syslinux using the first MBR-Boot option and also the other 1 or 2 syslinux boot options, but on other occasions, when I made a new .imgPTN file, I found they would only boot via the syslinux PBR option (#2) and not the default boot option #1 or the syslinux PBR.BIN backup file option #3.

Menus #1 and #3 may not work until you use grub4dos to select the .imgPTN file instead of SWITCH_E2B.exe.

Whilst setting up the slackware+persistence tests in the previous blog, I came across this behaviour again and I have finally found out what is going on (after nearly going crazy)!

I realised that if I used SWITCH_E2B.exe to switch to a new .imgPTN file that had never been booted via grub4dos and E2B, then I had this boot problem in the CSM menu. However, if I switched to that .imgPTN file (once!) using the E2B grub4dos menu, then from then on it would work using SWITCH_E2B.exe and using the E2B menu system.

The reason for this is that the E2B menu uses grub4dos and the partnew command which modifies the partition boot record hidden sector values (at locations 001C-001F if you are curious). SWITCH_E2B.exe does not do this.

So you must always use the E2B menu system first to switch in your .imgPTN. You only need to do this once - after that you can use SWITCH_E2B.exe if you wish.

Also, if you 'move' the .imgPTN file's position on the E2B disk (e.g. defrag it or copy it), it will obviously not alter the hidden sector values inside each .imgPTN file. So you will need to boot using the E2B menu (once) to make them work.

I will look at fixing SWITCH_E2B.exe so that it also modifies these hidden sector values.

P.S. SWITCH_E2B_v1.0.11.zip is now available from the Alternate Downloads area and has the hidden sector update fix.

Add Slackware+persistence to E2B

Slackware will use either a \persistence folder or a \persistence.img file (by default) for persistence.

However, it appears that this needs to be in ext4 format.

I could not find a way of pointing the LiveCD ISO to the persistence file when booting directly from an ISO, so here is how I went about adding Slackware with persistence to my E2B USB HDD.

1. Drag-and-drop the slackware64-live-mate-current.iso file onto the MPI_FAT32 Decktop shortcut to make a slackware.imgPTN file - when prompted for a size, add enough for your persistence requirements - e.g. add 500MB (max. you should add is 4GB because we are using FAT32 for the partition so we cannot create a persistence.img file larger than 4GB in step 5 below).
2. Copy the slackware.imgPTN file to your E2B drive (e.g. \_ISO\LINUX folder)
3. Switch to the slackware.imgPTN file (e.g. by booting to the E2B menu).
Do NOT use SWITCH_E2B.exe to switch to the slackware.imgPTN file for the first time as it can cause problems with syslinux booting. Once you have booted via E2B once, you can use SWITCH_E2B.exe afterwards.
4. The files in the new partition should now be accessible to Windows.
5. Run RMPrepUSB - Create Ext2 FS and create a new persistence file on the USB partition called persistence.img   (note: case sensitive). Make the size as big as any remaining free space on the partition (e.g. approx 500MB). Any Volume name will do.
6. Now boot to slackware (to the CSM menu) by choosing boot option #2 (the #1 entry may not work unless you are using SWITCH_E2B.exe v1.0.11 or later) and boot to slackware.
7. Log-in as root (pwd=root) and run a terminal window
8. Type the following commands:


  mkfs.ext4 /mnt/livemedia/persistence.img
  tune2fs -m 0 -c 0 -i 0 /mnt/livemedia/persistence.img


9. Now when you next boot, persistence should be working.

Tip: Use CTRL+S during booting when you see the 'SLACKWARELIVE:' text, to check that the persistence.img file has been found (CTRL+Q to resume):


Note: Slackware would not boot from my USB HDD  UASP drive caddy (e.g. Inateck FE2005) on my Z87 PC. It reported it could not find the 'livemedia' during booting. Using fdisk -l  , it did not list the E2B USB hard disk. If I removed and re-inserted it, it did not allocate a device name, but if I inserted a USB 3 Flash drive, it reported sdd1 was found. I conclude from this that slackware does not contain a UASP driver, so you cannot MBR-boot from USB 3 UASP drives/caddies (I tried both USB 2 and USB 3 ports).

10. I recommend you take a backup (at least of the persistence.img file) in case of later boot problems!

UEFI-Booting

You should also be able to UEFI-boot via Clover or your system firmware in UEFI-boot mode.


How to add Phoenix OS+persistence to E2B

Here is how to add Phoenix OS to E2B with an ext2 persistence file (data.img)

New Desktop folder 'Steve' is persistent.

You will need to extract the contents of the downloaded PhoenixInstaller exe file. I used 7Zip on PhoenixOSInstaller-1.0.7-beta.exe.

E2B drive added files:
\phoenix\initrd.img
\phoenix\kernel
\phoenix\data.img
\phoenix\(other files from ISO)
\_ISO\LINUX\Phoenix_Persistent.mnu

 Then you need to use the Phoenix_Persistent.mnu file as below.

# Extract PhoenixInstallerxxxx.exe contents to \phoenix folder on E2B drive
# Use RMPrepUSB to create ext2 or ext3 data.img file and move to \phoenix\data.img
# Copy this .mnu file to any E2B menu folder (e.g. \_ISO\LINUX)
# file/folder names are case-sensitive!
# On first boot - 'system initializing, please wait...'

title Phoenix OS with persistence\n Boot to android Phoenix OS
kernel /phoenix/kernel root=/dev/ram0 androidboot.hardware=android_x86  DATA=/phoenix vga=788 SRC=/phoenix quiet
initrd /phoenix/initrd.img
boot

Create a data.img file using RMPrepUSB and move it to the \phoenix folder.
Note that paths are case sensitive.

If the data.img file becomes corrupted, Phoenix OS may not boot until you delete or remake it.

Alternative (image a flash drive)


  1. Use the PhoenixOSInstaller (e.g. PhoenixOSInstaller-v3.6.1.564-x64.exe) and make a bootable USB flash drive (FAT32 partition is required by the installer).
  2. Drag-and-drop the Flash drive letter icon (e.g. D:) onto the MPI_FAT32 Desktop icon (MPI Tool Kit)
  3. The suggested size can be used which should be approx. 4GB. I used Syslinux 5 and AUTO-convert (defaults).
  4. Name the file as .imgPTN23 so it can be used with E2B+agFM. Persistence should work and well as UEFI64 booting (UEFI32 untested). Note: It does not seem to UEFI-boot under VirtualBox but does on a real system.


Saturday, 18 June 2016

All in One System Rescue ISO (Paul Vreeland)

Paul Vreeland has made available his 682MB Rescue ISO for all to use.

The LiveCD part is based on Ubuntu 64-bit and so is not suitable for 32-bit systems. It contains a few useful utilities (all legal to use by businesses), but the most useful part appears to be the Windows utilities that are within the ISO.

You can use the ISO directly in E2B (e.g. name it .iso64 so you don't try to use it on 32-bit systems), or make a .imgPTN64 file from it with the MPI ToolKit for 64-bit MBR and UEFI-booting.
The most useful part comes if you can mount the ISO in Windows (or switch to an .imgPTN image containing the ISO contents) and then you can run AiO-SRT.exe to start the GUI. This means you will often need to download and install the utilities onto the same Windows system that you are trying to fix.

     The AIO System Rescue utility changes the Windows Desktop background and runs a GUI.

See here for a list of utilities. An internet connection seems required for many of the utilities. Some apps require .Net to be downloaded and installed. Many of the buttons just lead to a website where you need to download and install the application onto the system (if it is not too infected!).

He has plans for a Lite version with 100% scripted automated task too (and hopefully a 32-bit LiveCD version?).

P.S. Use the torrent link for a download if possible and don't forget to donate to his site!

Happy Birthday to E2B!

According to the E2B Version History page here, after many Beta versions, E2B v1.00 was finally released to the world on 2013-06-18, so that means that E2B is 3 today - so Happy Birthday E2B!

Yes, believe it or not, the idea for developing Easy2Boot first started on the reboot.pro forum over three years ago! If you are really interested (or suffer from insomnia or are just plain nosey), you can study the progress of the various E2B Betas and how Sambul61, cdob, Scooby, Wonko the Sane, Rootman, DanialCollinet, halikus, libranco, h3xl3y and many others, contributed to it's development here.


Warning: Old joke alert!


A small boy was walking with his parents in London, just as an old man was being released through the main prison gates of Wormwood Scrubs, having just finished an 18 year(!) sentence. The old 'lag' was naturally exuberant and he ran up to the family shouting 'HURRAY, HURRAY, I'M FREE, I'M FREE', to which the small boy replied 'So what mister, I'm four!'.


Family story #1 (true story)!
Many years ago in the early 60's, when they were a young married couple with two small boys, my parents ran two supermarkets, two post-offices, two off-licences, a taxi service and a grocery delivery service. They worked really hard, 18 hours a day, every day. Every day that is, except for Sundays, when they had a well-deserved 'lie-in' in the morning. 

So my younger brother and I knew that hung on my parent's firmly-shut bedroom door every Sunday morning, was a large but invisible sign that said 'Do not disturb - on pain of death!'.

My brother and I generally got on quite well with each other, but early this one particular Sunday morning when our parents were 'resting', we got into an argument in our bedroom, which led to a loud shouting match, and then soon afterwards, to actual fisticuffs!

On hearing this unholy racket, my father was forced to leave my mother in their matrimonial bed and attend to the matter. He stormed into our bedroom and grabbed us both, gripping the back of our small necks tightly in each of his huge hands. My brother and I could tell from his expression that he was not at all pleased at being 'disturbed' and that we were probably going to get a good walloping, very soon!
My father turned to me and asked me angrily 'What do you think you're doing?', and I replied...'fighting'.

He then turned to my younger brother and said to him even more angrily, 'and what do you think you are doing?'
My brother looked up at my father and replied tentatively, 'Helping him?'.

There was a pause... I could hear my mother giggling from their bedroom across the landing. My father's mouth almost broke into a smile and we escaped a spanking that morning - thanks to my little brother!


Family story #2 (true story)!
Our family house has an all-glass and PVC steel conservatory (i.e. no brick walls) and we had just adopted a lovely little black kitten named Jemima, which was currently using a litter tray in the corner of the conservatory to perform her somewhat smelly ablutions.
I turned to my father and said 'Hey Dad, how can we make a cat flap in a glass conservatory?'
He looked up at me, and with a twinkle in his eye replied, 'Easy son, just kick it up the ass!'.

Well, it was funny at the time...

Friday, 17 June 2016

Cracking BIOS passwords (Dell, HP, Fujitsu, Compaq, Insyde, Phoenix, Sony, Samsung)

Many old BIOSes have a preset but secret backdoor password.

But I happened to stumble across this page today.

It describes how to crack the BIOS password on those systems which print a code if you enter the wrong password too many times. It also offers a range of Windows executables (.exe files) for each model which can translate that code into the original BIOS password!

Fujitsu-Siemens BIOS pwd cracker

From the user comments, it appears to work for many systems (I have not tried it 'for real' myself).

This seems like a useful addition to a Techies toolkit (the exe files need .NET and a Windows OS), especially if the customer has forgotten their BIOS password and you need to change the settings.

There is also a simple 'unlocker' web page here which contains the same code but for all types of system (obviously needs internet access and a browser).

Another useful web page (with unlocker script which doesn't seem to work for me?) is here.

Wednesday, 15 June 2016

Install OpenBSD from Easy2Boot

You can download and install OpenBSD by adding the cd59.iso network install ISO to E2B.

OpenBSD 59 Desktop

However, if you want to use the non-network installer, install59.iso, you will find that OpenBSD installer script/wizard will not be able to find the installation files (which are, of course, hidden inside the ISO).

Tuesday, 14 June 2016

Add Mepis antiX MX-15 with persistence to E2B

MX-15 ISOs can be booted straight from E2B - just copy the ISOs to the E2B drive (e.g. \_ISO\LINUX folder), make them contiguous (run \MAKE_THIS_DRIVE_CONTIGUOUS.cmd) and boot.


Monday, 13 June 2016

More Frettt's Themes for E2B (en & de)

It seems to be a 'Themes' week!

Frettt has sent me his latest English and German E2B themes which I have uploaded to the Alternate Downloads sites (Themes folder) as a .zip file.

You can view all 16 (8 English + 8 German) on the Gallery page on his site. Here is one of them (German version)...


Sunday, 12 June 2016

Add TechUSB and tuxpe to E2B

TechUSB

This Knoppix-based product is sold by RepairTech. It is part of their TechSuite. YouTube video here (TechUSB starts here).

FYI - I have no connection or affiliation with them.

Their TechUSB_Creator.exe utility creates a bootable USB flash drive.

To add this to E2B, simply drag-and-drop the drive letter icon of the TechUSB flash drive onto the MPI_FAT32 desktop shortcut (after installing the MPI Tool Kit) - then make a TechUSB.imgPTN file.

Note: If you want to add personal storage, then increase the default size of the .imgPTN file by at least 200MB.


Laura's E2B themes

If you haven't visited Laura's site for a while (like me!), you will be pleasantly surprised to see she has added even more lovely E2B menu examples.


She has used both grub4dos and GFXBoot Menu themes for both her E2B menus and for the CSM menus inside .imgPTN files. No doubt they took quite a bit of work!

To cycle through the different menu screenshots, just click on one of the screenshots on her site and use the arrow markers.

You can download some of her themes here.

I have also slightly tweaked the T2-MAINMENU theme (the one which does not use GFXBoot) and uploaded it to the 'Themes' folder in the Alternate Download Area.

Laura's T2 MainMenu Theme (slightly-modified)

Note: Some of Laura's GFXBoot menus seem to overflow if you have too many menu items...

Laura has a 'Contact Me' form if you need (free) help and advice on making your own E2B themes, and she can speak English, Spanish and German.

P.S. Laura is working on a PDF which contains the easy2boot.com site information but written in German.

Saturday, 11 June 2016

E2B v1.81a Beta available

I have uploaded E2B 1.81a. The changes are fairly minor:
  • Alternate Power off sample .mnu file added for systems where F10 does not turn off the system.
  • Change Admin detection test in MAKE_E2B_USB_DRIVE script so does not rely on a Windows exe file. 
  • Improve MOVE_IMGPTN script.
  • Improve windows install from ISO for XML path specification and check /autounattend.xml is not empty. Either full path or just the filename can be used to specify the XML file. Now updates Helper Flash drive (if present) with XML file contents.
The file is available in the Alternate Download Areas as usual.

Note: v1.81b has an extra bugfix in QRUN.ISO for .isoPE and .ISOPE01 file extension causing the LOADISOPE.cmd file to error.

Thursday, 9 June 2016

www.easy2boot.com and the new Ezoic page layout

As I mentioned in a previous blog post, the www.easy2boot.com domain is now routed through Ezoic.

These guys reformat the original site layout for me (for free) and add more AdSense and other adverts which increases the ad revenue that the site earns and this helps towards the site costs (due to the large bandwidth load, the E2B site costs me £200 a year and many people use AdBlock to block the adverts on the site).

Ezoic experiment with different site layouts to find the 'optimal' layout. So one person may see a different site layout from another person (try Chrome 'Incognito' and you will get a different layout!). The first time you load an easy2boot.com page from Ezoic, it stores a cookie in your computer's browser cookie folder so that you will always get the same format each time you visit the site.

10% of new users will receive the original site layout. This is so that Ezoic can compare the original site performance with the new layouts.

A few users (who don't use AdBlock - thanks!) have complained about the misleading ads (e.g. 'Download Now' buttons).

You can use AdBlock to stop the ads, but you will still get the same 'Ezoic' layout and you will not see the original page layout.

A few people have been generous by donating and I am very grateful to them. If the new site layout annoys you and if you have donated £5 or more (or have contributed in other ways), please contact me for instructions on how to view the original site pages which have less ads and the original page layout. 

Tuesday, 7 June 2016

Adding Lenovo Maintenance Utilities (IBM DOS-based) to E2B

Some Lenovo (ex-IBM) maintenance utilities make an IBM-DOS bootable USB flash drive.

These USB flash drives are formatted with a FAT12 volume which boots to IBM DR-DOS via IBMBIO.com. Typically, they are in floppy diskette format (i.e. no partition table).

Under grub4dos, it is possible to boot from a FAT12 drive using:
chainloader --pcdos /ibmbio.com
However, if you convert the Lenovo USB flash drive to a FAT32 .imgPTN file and try to boot from it using E2B, you will find that it does not boot. The reason for this is that, unfortunately, IBM DR-DOS does not seem to boot from a FAT32 volume.

The IBM DOS boot chain is:

IBMBIO.COM -> IBMDOS.COM -> COMMAND.COM

We can fix this by using FreeDOS boot files in the .imgPTN partition image or by making an image .IMA file...

Saturday, 4 June 2016

SanDisk Extreme USB 3.0 64GB for just £17 (UK)

If you are fed up waiting for your E2B USB stick to boot or for your large .ISO, .imgPTN or .VHD files to be copied across, why not treat yourself to one of these?

SanDisk Extreme 64GB USB 3.0 - up to 245MB/s read speed and up to 190MB/s write speed. I have recommended these drives for about 2 years now and they routinely come out top in most USB Flash drive reviews for speed+value.

The cheapest I have found is from Tesco Direct here for £17 (+£3 P&P). Note: Looks like the price has now gone up to £22!!!

Note that very old versions of this drive were of the 'Fixed Disk' type, but all versions for the last year or so should be of the 'Removable' type.

Download official Microsoft Windows ISOs

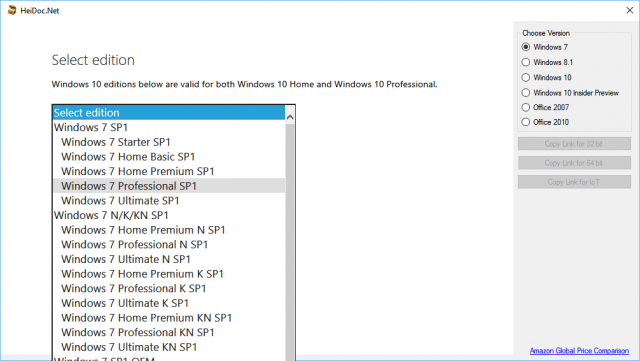
I just saw an article on Dave's Computer Tips about a utility that will download official MS Windows Install ISOs + Office. Looks very handy! Why not subscribe too whilst you are there...


Note: 'English'  = American (USA)
          'English International' = English (UK)   !!!


Friday, 3 June 2016

Add Anvi Rescue Disk, Sophos Bootable AV, Trend Micro AV and Panda AV to your E2B drive

Note: None of the AV utilities below contain EFI boot files.

Anvi Rescue Disk 11

This is a free 100MB download from AnviSoft here. It supports several languages (see screenshot below).


Tuesday, 31 May 2016

E2B $$AddWin2Main.mnu bugfix!

If you want to directly run a Windows 8 or 10 Install ISO from the Main Menu and specify an XML file, you may find that it does not work!

Nikki reported that when using the $$AddWin2Main.mnu with a Win10 ISO and when setting the XML variable, a "Windows could not parse or process unattend answer file [D:\autonattend.xml]. The answer file is invalid" error was produced.

It turns out that the $$AddWin2Main.mnu file example was incorrect!

For Vista\Win7, you need to specify the XML variable with the full path of the XML file, but for Win8\10, you should only specify the XML filename (not the full path)!

The new $$AddWin2Main.mnu file is here.

I am very sorry if anyone has been tearing their hair out trying to get this to work for Win8/10!

I have also updated the web page documentation here and E2B v1.81 will work with the XML variable containing either a full path or just the XML file name for both Win7 and Win8/10 and also will now work if using a USB Helper Flash drive + E2B HDD USB drive too.

Thursday, 19 May 2016

Two new E2B themes from Frettt (English and German)

I have uploaded two new themes provided by Frettt (thanks!) to the Alternate Download Areas - Themes folder and also added some screenshots to the Gallery page of E2B. There is a German and English MyE2B.cfg file for each wallpaper.


Wednesday, 18 May 2016

UEFI Grub2 PTN2 menu system - Beta 3 now available (Release Candidate?)

Beta 3 is now in the 'Other Files' folder in the 'Alternate Downloads' areas.
Full documentation is here.
Just in case you are new to this grub2 menu system, it's main purpose is that it allows you to boot some ISOs via UEFI that will not-UEFI boot using .imgPTN files because those ISOs do not contain EFI boot files (grub2 gets around this).
  • Over 60 ISOs supported
  • fix AVG booting in MBR mode
  • systemrescuecd can now UEFI-boot (but startx may not work in EFI64)
  • archassault menu bugfix - now works on NTFS 64-bit, but not on FAT32 for some reason!
  • blackarchlinux x64 now works on NTFS (ISO too big for FAT32)
  • opensuse (4.5GB) works on NTFS
  • Excel spreadsheet updated
  • All xxx_extracted.grub2 menu files have been removed from the menu folders and placed in the \_ISO\docs\Sample mnu Files folder on partition 2. This speeds up the grub2 Main menu loading. Anyone who wants these 'extracted' menus will need to copy the correct .grub2 file to the correct menu folder.
  • Some menu bugfixes
  • Some .cmd scripts improved/updated

Tuesday, 17 May 2016

Fedora + persistence using grub2

In Tutorial #67 on the RMPrepUSB.com website, I describe how to get Fedora booting as a flat-file configuration with persistence.

I decided to try this using the new grub2 menu system, and here is the final menu:

Sunday, 15 May 2016

New grub2 menu system, UEFI_GRUB2_PTN2 Beta2 Tool Kit now available

This Beta 2 toolkit allows you to UEFI-boot and then directly boot from a range of ISO files (and some .img and EFI files) by selecting any of the payloads from a grub2 menu system. The files do not need to be contiguous and you can add your own grub2 menus and files too.

The .xls spreadsheet showing all the payloads that have currently been tested is here (also in download).
[Edit] Forgot to include Kaspersky in the spreadsheet, You can EFI and MBR boot using the extracted files (see readme.txt in \rescue folder). You can also have persistent updates if you re-make the .imgPTNLBAa23 file as a 400MB file.

Note: It is possible, using this system, to UEFI-boot from many linux ISOs, even if they do not contain any UEFI boot files (e.g. UEFI-boot to Zorin, Kaspersky, etc.)!

In Beta2, 95%+ listed payloads have been tested on FAT32 and are working.

Instructions

Follow the instructions on the E2B page here (full details are also on this page). Screenshots, etc. are in my previous blog post here.

Basically,
1. Download the .7z file here and extract it to an empty folder on your Windows system
2. Create a 2nd Primary FAT32 partition on your E2B USB HDD
3. Copy the xxxx.imgPTNLBAa23 file to your E2B drive's first partition at \_ISO\MAINMENU
4. Copy the contents of the PTN2 folder to the root of the second partition (you should see a \_ISO folder at the root of the second partition)
5. Add your ISOs, etc. to the second partition (see .XLS spreadsheet for details of what name you need to use for each file)
6. If you want to be able to run the same ISOs from the E2B menu, copy the five .mnu files provided to the \_ISO\MAINMENU folder on the first partition of your E2B drive.
7. Now boot to E2B and select the new .imgPTNLBAa23 Beta 2 file and have fun!

If you already have Beta 1, I suggest you delete all *.grub2 files from the second partition, and then run the .\PTN2\COPY_ALL_GRUB2_FILES_TO_USB_DRIVE.cmd script which will copy all the .grub2 files over. If you have purposefully deleted any of the .grub2 files on the second partition (for faster booting), then use the UPDATE_GRUB2_FILES_ON_USB_DRIVE.cmd script.

Most of the payloads should work with a NTFS partition on partition 2 but I have not tested many of them on NTFS yet. FAT32 is more compatible, but you cannot boot from ISOs that are over 4GB.

The grub2 menu system does not need the ISOs to be contiguous, but the E2B grub4dos menu system does.

There are probably at least two more Betas to release before I can think about a full release yet, but it is getting there. if you see any ISOs missing from the spreadsheet that you need, please let me know.

Please feedback any comments, suggestions or problems!


Saturday, 14 May 2016

A lesson for us all - why bigger is not always better (or diagnosing a 'non-booting' system)!

If you read my blog regularly, you will know that 2 years ago I built my own system. That previous blog post described how I went about it.

Now over the last few months, I have noticed that this Z87 PC did not always boot when I switched it on. In fact, although the fans whirred a bit, I did not get the familiar 'beep' from the mainboard on these occasions. When this happened, I would just turn it off at the PSU mains rocker switch, wait a minute or so and then turn it on again and it would usually work. That is, until this afternoon,,,

This afternoon, I shut down the PC in order to do a clean boot from a USB HDD (as I have done literally hundreds of times before) and I got the 'no display, no beep' symptom yet again. But this time there was no persuading my Haswell Z87 PC to boot!

Diagnosing a 'dead' system

Now the Asus Z87 mainboard is fitted with a number of diagnostic LEDs soldered to the PCB. These include:

New Gandalf WinPE x64 Win10 TH2 with SysWow

Friday, 13 May 2016

How To's and Gotchas in grub2 menus

These are my notes below, which may be of interest to those of you writing grub2 (or even grub4dos) menus.

Most of these are concerned with directly booting from a linux ISO file using 'cheat codes'.

If that does not interest you, then don't read any more.

Note: I have been learning and experimenting with grub2 for a week now, so I am by no means an expert!

Thursday, 12 May 2016

Easy2Boot website now routed via ezoic

I have now signed up with ezoic.com who will re-format the easy2boot.com pages and place ads on the pages for me automatically.

You may experience some very weird page layouts on the E2B site in the next few weeks! Ezoic will trial lots of different formats until it finds the 'best' ones - this may take several months!

Note that a cookie is saved on your first visit which determines what layout you see after that. If you delete the site cookie, you may (randomly) get a different layout on refresh (Ctrl+F5).

Ezoic is also used on the www.rmprepusb.com website. I am hoping it doesn't screw-up the easy2boot site as much as it does the rmprepusb site!

E2B v1.80 available

I have released E2B v1.80j as the release version 1.80 today.

Links on the website will still point to 1.79 for  a few days, but 1.80 is available on the Alternate Download sites (Google Drive and OneDrive).