Thursday 26 June 2014

Easy2Boot v1.50 Beta available


  • All sub menus headings, menu entries, user information and prompts in a single STRINGS.txt file
  • Compatible with previous versions (except for user added .mnu files)
  • 500MB CONTIG.ISO included in download (compressed)
  • Memtest86+ updated
  • If running an .imgPTN file, just press [ENTER] (no need to type Y)
  • Few minor display positioning issues fixed
  • Sample_MyE2B.cfg updated
  • Sample .mnu files updated
  • Many files in the \_ISO\e2b\grub\ENG folder now moved up into grub folder
  • \_ISO\e2b\grub\ENG now just contains STRINGS.TXT file
  • User can add \_ISO\STRINGS.txt file to override any other strings.txt file
  • Small changes to Theme Templates
This is a very new version and there has been a lot of 'behind the scenes' changes due to the use of the new STRINGS.txt feature.
  • Download v1.50 DPMS BETA version from here (30.6MB)
  • Download v1.50 non-DPMS BETA version from here (7.2MB)
This new E2B version uses a STRINGS.txt file to define menu headings, help text, user prompts, etc.

About 90% of  all text is now in the STRINGS.txt file and so you can easily modify these or translate them to a different language. STRINGS.txt is a UTF-8 file and so will support non-ASCII languages.

Most strings are now replaced by $$STRxxxx keywords (where xxxx can be any four characters) - these keywords are replaced with the correct string automatically by E2B when the menu is loaded into memory.

So to change any of the text, messages, headings, etc. in E2B, this is what you do:
  1. Copy the \_ISO\e2b\grub\ENG folder contents to a new folder - e.g. \_ISO\e2b\grub\STEVE
  2. Add a \_ISO\MyE2B.cfg file (you can copy the \_ISO\Sample_MyE2B.cfg file)
  3. Edit the \_ISO\MyE2B.cfg file to set the new 'language' - e.g. set LANG=STEVE
  4. Add a \_ISO\MyBackground.bmp.gz bitmap (optional)

e.g. a simple \_ISO\MyE2B.cfg file could be:

!BAT
set LANG=STEVE
set pwd=steve
set HEADING=\x20                       STEVE'S MENU  (%VER%)                       \x20
set HELPTEXT=HDD0 [F7]   Back [F8]   Reboot [F9]   Power Off [F10] www.steve.com

Now you can edit the \_ISO\e2b\grub\STEVE\STRINGS.txt file to change anything you like - here are a few lines from the STRINGS.txt file:

$$STRm004=\x20                  Windows Boot Menu                     \x20      
$$STRm019=\x20                       DOS Menu                         \x20

You may notice that .mnu and .txt files now use these new $$STRxxxx strings - e.g.

iftitle [if "%GFX%"==""] $$STRh0F8
debug 0
if exist (bd)/_ISO/e2b/grub/menu.lst configfile (bd)/%grub%/menu.lst 
if not exist (bd)/_ISO/e2b/grub/menu.lst set MFOLDER=/_ISO/MAINMENU && configfile (md)0xA000+0x50
boot

If you want to create new .mnu files, you don't use $$STRxxxx keywords (unless you want to), just use normal text in place of the $$STRxxx keyword.

Note: If you have already updated your E2B drive and have an old MyE2B.cfg file which defined new menu headings, you may find that it no longer works, add this line to your MyE2B.cfg file and it should work as before:

set ASTRINGS=

Also, if you used any of the .mnu files from the \_ISO\docs\Sample mnu Files folder, they may need updating with the new version from the docs folder in E2B v1.50 (basically remove the /%LANG% portion wherever it is used in a .mnu file).

It is also possible to modify the MyE2B.cfg file so you can ask the user which language he wants to use.

If you place the STRINGS.txt file in the \_ISO folder, it will override any LANG settings and will always be used.

This means that to have a 'Chinese Skin' or 'Spanish Skin', you can apply it simply by copying it to the \_ISO folder, e.g.:
  • \_ISO\MyE2B.cfg
  • \_ISO\STRINGS.txt
  • \_ISO\NewWallpaper.bmp.gz
In the future, I hope that we can build up a library of STRINGS.txt files in different languages.

To test it, it is best to make a new (reformatted) USB drive - you can add it to your existing E2B drive by overwriting the existing version, but there may be old (unused) copies of various files left on the USB drive.

As there will probably be a few small bugs, don't start trying to translate ALL the STRINGS.txt file strings immediately but please report any problems you find ASAP. Also if you have used it a lot and have found no bugs, please also let me know so that I can 'officially' release it and remove the 'beta' status from it.




Tuesday 24 June 2014

Improved language support for E2B is coming!


I am working on a new version of E2B that will have a STRINGS.TXT file which will contain all the words displayed by E2B batch files and menus, etc.

This will mean that to change language, you just need to add the one language folder to your E2B drive and add a \_ISO\MyE2B.cfg file

e.g. To convert E2B to Spanish you would
Add a \_ISO\e2b\grub\SPANISH folder (which contains a STRINGS.txt text file)
Add a \_ISO\MyE2B.cfg file (which sets the language and the Main heading, etc.)

There will be no need to change the standard grub4dos batch files or .mnu files or .txt files that are already in E2B.

This will make it much easier for anyone to translate E2B into other languages as they just need to edit the file in a new language folder + create a MyE2B.cfg file.

This will take a week to do and test, but then I hope to encourage people to submit new language STRINGS.txt files to me, so I can add them to E2B.

It will support Chinese and other non-ASCII languages.

e.g. The STRINGS.TXT file will contain lines of words/phrases displayed to the user by E2B. You would just need to change these into your own language - e.g.

$$STRb001=XP INSTALL - STEP 1\n===================\n\nIMPORTANT: You must boot from USB drive again and run STEP 2 after this!\n
$$STRb002=64-bit XP ISO detected!\nYou will need to press F6 to load 64-bit Firadisk driver
$$STRb003=ISO detected as Windows %OSTYPE% (use 'XP', '2K3' or '2K' in ISO filename if incorrect)
$$STRb004=If this is incorrect, please type xp 2k or 2k3 now: 
$$STRb005=Will look for Windows %OSTYPE% drivers only
$$STRb006=DPMS2 Options (32-bit only)\n===========================\n1=SRS Driver+FiraDisk            - default=FiraDisk  + OEM drivers\n2=SRS Driver+FiraDisk+WinVBlock  - default=FiraDisk  + OEM drivers
$$STRb007=3=SRS Driver+WinVBlock+FiraDisk  - default=WinVBlock + OEM drivers (>512MB only)
$$STRb008=Auto-Detect SATA/AHCI/RAID 32-bit Mass Storage Drivers ([Y=2]/N/1/2/3) : 
$$STRb009=Auto-Detect SATA/AHCI/RAID 32-bit Mass Storage Drivers ([Y=2]/N/1/2) : 
$$STRb010=PLEASE NOTE: If booting from a USB-HDD, say YES to the next question....
$$STRb011=Load XP ISO into memory (recommended) ([Y]/N) : 

Monday 23 June 2014

Easy2Boot 1.42a now in Chinese!

Thanks to 'Mr Lin', we now have a version of E2B in Chinese!

Mr Lin's Megasystem Setup!

Once you have made your E2B USB drive, simply download and extract the E2B_LANGUAGE_ZH_CN_1.42a.zip file and overwrite the English E2B files.

Note that this download contains a \_ISO\MyE2B.cfg file which will replace your MyE2B.cfg file (if you have made one). The MyE2B.cfg file ensures that the \_ISO\e2b\grub\ZH_CN folder is used.

The download is now available from the Downloads page.


Saturday 21 June 2014

Add multiple Hirens ISOs to Easy2Boot

Introduction

Because Hirens/UBCD4WIN ISOs (e.g. HBCD, DLCD, FalconFour, etc.) contain a mix of DOS applications, linux and Windows, they can be difficult to add to a multiboot USB drive.

Note: E2B v1.90+ includes support for WinBuilder-based ISOs - just keep the file extension as .ISO.

FalconFour's UBCD 4.61 MiniXP Desktop

There are instructions on the Easy2Boot website for adding the ISOs and also some sample .mnu files.

If you just want to boot to Mini-XP, you can try just renaming the Hirens ISO with a .isowinvh file extension. E2B v1.78 also supports the .isoHW file extension. This can be used for DLC\DLCD versions which have XP and Mini7/8/10. For Mini7/8/10 the E2B USB drive must be a removable type (or use a Helper USB flash drive).

Another way to run a single Hirens ISO with the minimum amount of issues and workarounds is to extract some or all of the files from the ISO file and run it as a 'flat file' installation directly from the USB drive.

If your E2B USB drive is formatted as NTFS then you will need to select the DOS NTFS driver when running the DOS applications. As the NTFS driver uses DOS memory, some of the DOS applications won't run if the NTFS driver is also loaded into memory, so even if you extract the ISO files, it does not run very well on an NTFS USB drive and, of course, you can't extract multiple versions to the same E2B USB drive, because they will overwrite each other!

Note: E2B includes special instructions for extracting FalconFours's F4UBCD ISO file - see the \_ISO\docs\Sample mnu files folder for a special F4  .mnu file.

Here is a table for some of the most common Hirens ISOs when using both Removable USB flash drives and Fixed-disk type USB drives and running as an ISO file or as a FAT32 partition image:


DLC.Boot.2015.iso is also 64-bit UEFI bootable if converted to FAT32 .imgPTN (for Mini Windows 8 64-bit).

Strelec ISOs

For ISO use .isofira01 for 32-bit x86 WinPE and apps - or convert the ISO to a FAT32 .imgPTN file for MBR32/64 and UEFI64-booting.

x64 WinPE booting from ISO can be made to work as follows:
  1. Find the Strelec ISO on the E2B drive once you have booted to Strelec x64 Desktop (ignore errors)
  2. Right-click on ISO - mount with ImDisk as any drive letter
  3. Run Start Menu - MinstAll
  4. Run X:\Windows\System32\MInstLink.exe to add all Desktop icons and a fully populated Start Menu.

Strelec .imgPTN

If you get a 'Windows cannot find \SSTR\Mist\Minst.exe' error when using a .imgPTN file - use the Disk Management Desktop shortcut on the Strelec desktop to add a drive letter to the Easy2Boot USB drive volume.

For UEFI32 booting see here

Recommended method - use a FAT32 .imgPTN file

If you use the Windows E2B MakePartImage tool, making multiple Hirens/DLCD/FalconFour, etc. payload files to add to your (FAT32, NTFS, exFAT or ext2/3/4) E2B USB drive is very easy:
  1. Drag and drop the .ISO file onto the Windows Desktop MPI_FAT32 shortcut (or MakePartImage shortcut).
  2. (if prompted) Answer Y to merge\combine the menu.lst file with the E2B CSM menu.lst file.
  3. Copy the new .imgPTN file to your E2B USB drive menu folder (e.g. \_ISO\MAINMENU).
  4. Run WinContig or \MAKE_THIS_DRIVE_CONTIGUOUS.cmd to make the .imgPTN file contiguous.
If you are not prompted to merge the menu.lst files by the MPI tool, then you will probably get an extra CSM menu item which will then load the HBCD menu.

If you find any problems with linux menu entries, try converting the ISO using the MakePartImage Desktop shortcut instead of the MPI_FAT32 shortcut and do NOT auto-correct the menu entries when prompted. If the ISO was designed to be run from a USB drive, the menu entries will not require any 'corrections' to be applied.

In the case of FalconFour's 4.6 ISO, the MPI tool will merge the \menu.lst menu into the CSM menu. I then changed the \menu.lst file after the image was switched in E2B to make the menu box larger by changing a few lines in \menu.lst as shown in red below:

# ----- MENU POSITION ---
# wordspacing linespacing borderwidth tophelp numberofitemsinmenu topstart menuwidth rightstartposofmenu
# tophelp=topstart+noitems for menuhelp text just under menu box
set wdspace=0
set lnspace=0
set topstart=5
set rstart=4
set noitems=22
set menuw=66
set bdwidth=1
set tophelp=27


Some versions of Hirens have a problem with KonBoot in that it only works from a CD but not if booted from a USB drive (it just reboots back to the USB drive again), it can be made to work correctly if you modify the Hirens menu.lst file however (add the lines in red).

title Kon-Boot v1.1 (32/64-bit)\n\nLog into Windows XP with blank password; bypass login without breaking it
map (hd0) (hd1)
map (hd1) (hd0)
map --mem /F4UBCD/Images/konboot.img (fd0)
map --floppies=1
map --hook
chainloader (fd0)+1
rootnoverify (fd0)
boot

Kon-Boot 1.1 was the free version that only works for XP. The latest version works with Windows XP through to Win 8.1 and is just $15 to buy. OR you can add the free PassPass software to your E2B drive and get into any Windows local user account without needing a password for free!

Note: Some Hirens ISOs may support UEFI booting but most do not. I recommend the Strelec builds which are updated regularly (see this blog for adding UEFI32).

Remember, it is illegal to use some of the OS's and apps in HBCD unless you own a licence for them.

Tip: www.rmprepusb.com has a list of useful external links (see the 'Useful External Links' page).

Thursday 19 June 2014

Cheap 'upgraded' USB Flash drives for sale on eBay - again!

Why do eBay allow this ad?

TITLE: 64gb Pink Crystal USB Flash Mermory Stick with FREE Keyring


So it says  (with my highlighting and colouring of the text)...
_________________________


64GB Reformatted/Upgraded USB Flash Memory Stick
The product is labelled based on the memory chip(s) it contains.
It is also marked as a reformatted/upgraded USB stick so they may vary in speed and capacity (4GB to 64GB), though they are able to store up to 64GB of data hence the low and competitive price.
These USB sticks vary in capacity and this is explained in the second paragraph of this listing which has been taken exactly as it is printed on the rear of the packaging.
THESE USB STICKS HAVE BEEN UPGRADED USING THE VERY LATEST COMPRESSION TECHNOLOGY. THIS MEANS THAT EVEN THOUGH IT MAY SHOW 64GB AVAILABLE THE ACTUAL CAPACITY WILL VARY AND CAN RANGE FROM 4GB RIGHT THROUGH TO 64GB AND ONCE THIS LIMIT HAS BEEN REACHED OLD DATA WILL BE OVERWRITTEN OR NEW DATA WILL NOT BE SAVED. THIS IS THE SAME WILL ALL CHEAPER MEMORY STICK ON EBAY BUT MANY SELLERS DO NOT TELL YOU THIS HENCE THE VERY LOW PRICE. THESE ARE ADVERTISED AS 64GB AS THIS IS WHAT WILL SHOW AS THE AVAILABLE MEMORY WHEN IN USE.

THESE ARE BEING SOLD AS UPGRADED USB STICKS HENCE THE VERY LOW PRICE.
_________________________

Why do they allow this seller to sell these suspect sticks as 64GB when he states in the small print that they may not be? Why does he say it has a 'very low price' when it is in an auction!

There is a 14-day refund on these USB drives with 'buyer pays return postage' - but how many people will realise they are buying defective USB drives within 14 days of using them?

He mentions a compression technology???? Well if he has a compression technology that can store 64GB of all kinds of data on just 4GB, why is he wasting his time selling dodgy USB drives on eBay when he could make a fortune selling the compression technology!

'The product is labelled based on the memory chip(s) it contains.' - so therefore it MUST contain 64GB of chips right?
He says 'they are able to store up to 64GB of data' and 'Minimum consumer-usable memory capacity is approximately 62.2GB.'  These are clear, unambigous statements - but then he says 'ONCE THIS LIMIT HAS BEEN REACHED OLD DATA WILL BE OVERWRITTEN OR NEW DATA WILL NOT BE SAVED'!!!!!

How about I sell a '22 carat 40g Gold ring' on eBay and then say in the small print that 'it looks like gold, smells like gold and has 22ct stamped on it but may be 0.001 carat gold or may be gold-plated or may be just brass - hence it is advertised as 22 carat gold'

If you buy any USB flash drives or SD cards, please test them with FakeFlashTest and then H2TESTW before you use it!

More...

I emailed the seller
You say in your ad that 'The product is labelled based on the memory chip(s) it contains'. From the picture, it is labelled as 64GB - so does it contain 64GB of memory chips?

Their reply was:
No its has been previosly 64gb (62.4gb) but due to its reformatting it has a different capacity depending on the uses software or device, the sticks have to be formatted using exfat and can hold anything between 8 and 64, they have to be filled using 4gb transfers at a time but depending on how they are used it is possible to get max capacity, i cannot stress though this isnt always the case hense the low price. i hope the information was useful.


Monday 16 June 2014

Add Panda Cloud AV to your E2B USB drive

Windows Panda Cloud AntiVirus software is free (the Pro version is a 30-day trial version).
Disclaimer: I have no knowledge of the efficacy or otherwise of this software and so cannot personally recommend it or not recommend it. It is rated here.

The full bootable ISO can be downloaded from here which you can make a .imgPTN file from using the MPI_FAT32 shortcut.


It has an option to create a bootable USB rescue disk (instructions are here). Once you have made the USB Flash drive (which supports English and Spanish), you can make an Image Partition (.imgPTN) file from it, simply by dragging and dropping the Windows drive icon onto the MPI Auto Desktop shortcut.

The Panda Cloud rescue installation does not however seem to support UEFI booting so you will need to boot in MBR mode. I also don't know if it supports GPT disk format or not (as it is supposed to work on Windows 8, it should).

As it seems to boot from an ISO file which is present on the USB Flash drive, here is a way to add the same ISO file to your E2B USB drive...

1. Download and install Panda Cloud AV onto your Windows system (be sure to untick the Panda Security Toolbar and the other option(s) to avoid unwanted alterations!).

2. Choose either the Basic version of the Pro version - it will then download and install the latest version from the internet.

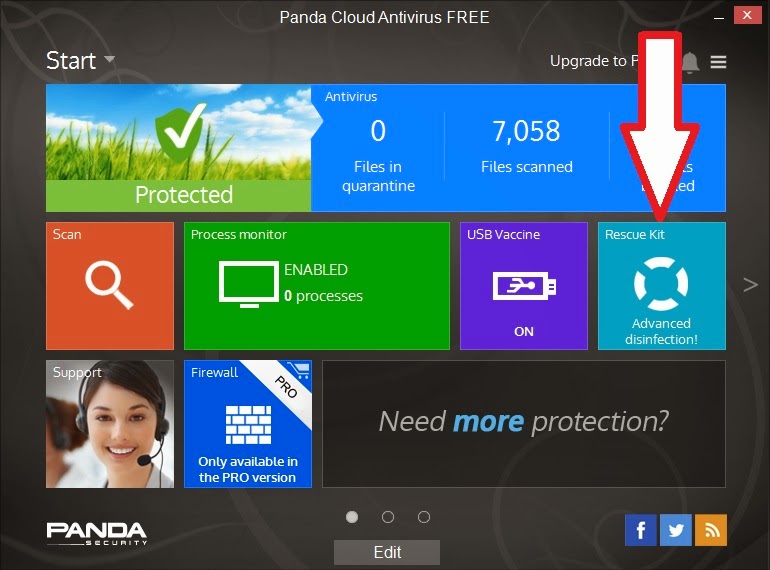
3. Insert any old spare USB flash drive (64MB or larger - yes, I mean 64MB!), format it as FAT32 and then choose the Rescue Kit option (see arrow below).


4. Follow the prompts to make a Rescue Flash drive (the 13MB .iso file and other files, will be downloaded from the internet and copied to your USB flash drive - syslinux will be installed onto the flash drive PBR sector and the partition will be made active).

Note: At this point you could simply drag-and-drop the USB drive letter onto the MPI_FAT32 Desktop icon (after installing the MPI Tool Kit) and make a Panda.imgPTN file (use Syslinux v4 if prompted).  Or continue as follows...

5. Copy the whole \PandaCloudCleaner folder from the USB flash drive to the root of your E2B drive. The USB Flash drive is now no longer needed and it can go back in the junk drawer!

6. Move the \PandaCloudCleaner\PandaCloudCleaner.iso file to a suitable E2B menu folder (e.g. to \_ISO\ANTIVIRUS\PandaCloudCleaner.iso).

You should now be able to boot directly from the PandCloudCleaner ISO file using E2B.

To check that it is working correctly, here is what should happen when you boot from the ISO file...

1.  Choose a language

2. Press Enter

Check that you see the 'Setting up the PC...' message.
  • This is where it alters your Windows installation and copies itself to the hard disk so that it auto-runs Panda when you reboot to Windows.
  • If the PandaCloudCleaner folder is not present on the E2B USB drive then you won't see this message and it won't work!

If it patched Windows successfully, you should now see this message. 
It may also prompt you to remove your USB drive and then automatically reboot.

Now when your system reboots to Windows from your hard disk, it will auto-run Panda Cloud Cleaner under Windows...


After accepting the licence agreement, it will check the internet for the latest definitions (if an internet connection is available) and download new ones if required before starting a scan of your system.


Note: I cannot vouch for the effectiveness of this software (indeed the Pro version seemed to cause problems on my Win 8.1 64-bit system which already had Windows Defender running).

You can now un-install Panda Cloud AV from your Windows system if you wish.


Please tick 'funny' 'interesting' or 'cool' or add a comment to let me know which posts you most enjoy.

Saturday 14 June 2014

New Easy2Boot Forum

I have added a primitive User Forum to the Easy2Boot site.
E2B users can use this to ask for help from other E2B users or offer hints and tips, etc.

No login is required. Any 'inappropriate' posts will be removed without mercy! Please use it responsibly or I will remove the whole User Forum.

P.S. Checkout Frettts-Freeware for lists and descriptions of free software.


Please tick 'funny' 'interesting' or 'cool' or add a comment to let me know which posts you most enjoy.

How to boot Ubuntu via UEFI with persistence from Easy2Boot

You can fully-install many linux distros to a .imgPTN file (see blog post here), however I was asked recently how to boot Ubuntu 14.04 64-bit from an Easy2Boot USB HDD when using partition image files (.imgPTN files) so that you can UEFI boot with persistence.

Note: 14.04 and many later versions of Ubuntu (and linuxmate based on Ubuntu) have a bug! They do not fully boot and give an initramfs error if you use a casper-rw partition. It works OK with a casper-rw file, but not a partition. Sometimes it may work if the ext partition is located after the FAT32 partition - but this depends on the order of the two files (xxxx.imgPTN and xxxx.) so using a casper-rw partition cannot be guaranteed to always work! See later bog post here.

Tuesday 10 June 2014

Easy2Boot 1.42 - now no need to defrag ISO files (sort of)

As I am sure you know, Easy2Boot uses a grub4dos feature which can map an ISO to a partition table so that when linux boots, it sees the partition table as a valid filesystem and thus linux can mount the 'ISO file' and be able to access the files inside it.

This feature uses the partnew command in grub4dos and the partnew command can only map a file as a partition if the file is contiguous (and exists on the same physical drive).

I have added a new feature to E2B v1.42 which will check to see if the ISO file is contiguous and if not, it will copy the contents of the whole ISO file using dd into a pre-existing CONTIG.ISO dummy file which is already contiguous (maximum size 3.999GB).

Note: v1.52+ now has a 500MB CONTIG.ISO file in the download.


To use the new feature, just download and update your existing E2B USB drive with the Easy2Boot_v1.42.zip file contents (available in the Google Drive Alternate Download area here).

The pre-existing file must now be created by you. It must be called \_ISO\CONTIG.ISO and needs to be as big as your largest ISO file (it must NOT exceed 3.99GB due to an issue with grub4dos). To make it, just copy your largest ISO file to the E2B USB \_ISO folder and rename it CONTIG.ISO. Alternatively, you can use the RMPrepUSB - Create Ext2 FS button to make a large empty file and then move and rename that file (it doesn't matter what the contents are inside the file). Once it is made, you must make sure it is contiguous (e.g. by using RMPrepUSB - Ctrl+F2 or DeFraggler, etc.).

Once you have made the CONTIG.ISO file contiguous, you can add your ISO payload files and you won't need to defragment them each time (though it will be much faster if you do!).

This new feature does NOT work for .imgPTN files or Windows Install ISOs and won't work for any .mnu files which use partnew such as linux+persistence menu files.

For ISO files, here are some timings for E2B to copy an entire ISO file to the CONTIG.ISO file using dd - I was using a Pretec USB 3.0 Removable-type Flash drive (write speed approx 17MB/s):

1. EeePC - USB 2.0 port - 25 seconds for 100MB ISO (104 seconds for 390MB ISO)
2. EeePC - USB 2.0 port - using the grub4dos 0.4.6a USB 2.0 driver - 6 seconds for 100MB ISO (23 seconds for 390MB ISO)

As you can see, if you use the grub4dos 46a driver, the time is largely dependent upon the write speed of the USB drive (or approx. 30MB/s for USB 2.0 if the media write speed is faster than 30MB/s).

Therefore, if you have a large ISO which is fragmented, it is probably quicker to first select grub4dos 0.4.6a from the main E2B menu and then select the grub4dos USB 2.0 Driver menu option to load the grub4dos driver first as it seems MUCH faster than the (Asus EeePC) BIOS USB 2.0 driver.

Larger files will obviously take several minutes to copy even if using the grub4dos USB driver. However, at least you can boot a fragmented file if you forgot to make it contiguous first! A USB 3.0 HDD will be faster, a USB 2.0 cheap flash drive will be slower.

If CONTIG.ISO is not present, then it will just behave as before (and warn you that the ISO is not contiguous).

As this change is very new (and I may have broken something - though I have tested it), I have not updated the links on the Easy2Boot download page yet. Please let me know if it works for you (or not)!
Note: a 500Mb CONTIG>ISO is now included in the E2B download zip file as standard!

Tip: To boot to grub4dos 0.4.6a automatically, copy the file from \_ISO\e2b\grub\grldr_046 to the root of the E2B drive and rename it to grldr to replace the 0.4.5c version of grldr - AND/OR - add a \_ISO\MyE2B.cfg file by copying the Sample_MyE2B.cfg file and uncomment the line 'set GRUB_USB=Y' to automatically load the 0.4.6a USB driver when E2B loads.

Please tick 'funny' 'interesting' or 'cool' or add a comment to let me know which posts you most enjoy.

Sunday 8 June 2014

RMPrepUSB v2.1.722 available

Pressing Ctrl+F2 was too much effort to run WinContig each time I added a file to my USB drive, so now I can just right-click on the drive in the RMPrepUSB Drive listbox to run WinContig immediately, or right-click on the Refresh button to run WinContig on the currently selected drive.

I have also updated the versions of WinContig and HashMyFiles.

The new version is here.

Saturday 7 June 2014

Increase the speed of your SD card or Flash drive by up to 10%

Just in case didn't know, if you format your SD card or Flash drive as FAT32  (which is used by many SD cards in cameras), then by formatting it using RMPrepUSB you can increase the write performance by up to about 10%.

This speed increase can only be measured when writing files - many benchmark tests will not show any increase in write speed because they do not write files when they run their tests. However, in real life, we write files to these devices and the files are written in groups of sectors called clusters to the FAT32 filesystem on the drive.

When you format a drive as FAT32 using RMPrepUSB, the clusters are aligned to start on a 1MB boundary. This is important for flash memory because in order to write sectors, a whole page of flash memory has to be erased first. RMPrepUSB ensures these 'erase-pages' are correctly aligned with the clusters to minimise the number of erase cycles that are required. This also has the side-affect of extending the life of your flash memory as it reduces the number of  read-erase-write cycles over it's lifetime.

If you want to read a discussion on reboot.pro about this, click here. The theory for how this works is explained in this post.

So if file-write speed is an issue for you (e.g. the delay after you press the camera button to take a picture or interval between a series of pictures, or when you copy lots of files to a FAT32 USB drive) try formatting the media with RMPrepUSB next time!

Since I 'discovered' this and added this enhancement to RMPrepUSB, it has been copied by a few other people/utilities. For instance, I believe BootIce now uses the same technique now too.


Please tick 'funny' 'interesting' or 'cool' or add a comment to let me know which posts you most enjoy.

Friday 6 June 2014

Add MobaLiveCD.exe to your Easy2Boot USB drive

If you have RMPrepUSB or VirtualBox+DavidB's VMUB utility on a Windows system, you can boot from an E2B USB drive under a virtual machine and 'swap in' any image partition file you wish, so that you can pre-select it before you boot from that same E2B USB drive on a different 'target' system.

MobaLiveCD.exe (1.5MB) is a 'shrink-wrapped' version of QEMU and so will also allow you to boot your E2B USB drive via QEMU (similar to RMPrepUSB's QEMU F11 button in RMPrepUSB). The difference is that MobaLiveCD is designed to be portable and does not need to be installed on a Windows system first. Just copy the .exe file to your E2B USB drive and it is ready to use if you are away from your Windows system or don't have access to a VM (e.g. off-site or at a friends house).


For instance, you may have a server that has a UEFI OS pre-installed and the BIOS is in UEFI mode. You want to UEFI-boot the server from the E2B USB drive but in order to select the correct UEFI-bootable image (say MSDaRT or maybe an HP Utility) you need to boot E2B in MBR\CSM mode first. If you have MobaLiveCD.exe on the E2B USB drive, then there is no need to download and install RMPrepUSB (or QEMU manager or Virtual Box) onto a system...

1. Insert the E2B USB drive into any Windows system's USB port
2. Run MobaLiveCD.exe as Administrator directly from the E2B USB drive
3. Choose the 'Start directly from a bootable USB drive' option
4. Pick the USB drive's drive-letter
5. Say 'No' to the 'Do you want to create a hard disk image for your virtual machine?' question and allow it to boot to the E2B menu.
6. Pick the partition image file from the E2B menu and 'swap in' the new partition
7. Quit QEMU and MobaLiveCD - your E2B USB drive is now  ready for direct UEFI booting

You can also directly boot using MobaLiveCD from an ISO file (32-bit ISOs only).

Note: As an alternative, you can unzip the BOOT_ME_USING_QEMU.zip file from the Alternate Downloads Area to your E2B USB drive and then double-click on the BootUSB.cmd file to boot from the USB drive under QEMU. This should only be used for select .imgPTN files however as it does not create a virtual hard disk, does not lock the drive like RMPrepUSB does and uses a fixed memory size of 500MB.


Please tick 'funny' 'interesting' or 'cool' or add a comment to let me know which posts you most enjoy.

Microsoft is giving away Windows 8.1 for free!

Yes - that's right free! There were rumours that the price was going to drop significantly.

According to this article and recent reports in the Press, Microsoft will be giving device manufacturers 'Windows 8.1 with Bing' for free (sorry - not free for the general public!). I am guessing this will mostly apply to small device manufacturers producing tablets and phablets ('Windows Phones and tablets smaller than 9-inches in screen size'). I am also assuming that the OS will still be locked to the device by a Product Key embedded in the device's non-volatile RAM (usually an EEROM) and so will be pretty much identical to the normal Windows 8.1 core version.

So has Microsoft gone mad? Is android/iOS/ARM such a threat to it? My take is 'No - they haven't gone mad' and 'Yes - android/iOS is a threat'. See here for current usage (and compare with Desktop OS's).

There is a clue to the real reason (I think) in the link I provided above, namely:

'Additionally, as reach expands, the opportunity for developers and their apps also increases.'

This can be interpreted as 'Windows apps and the App Store just hasn't taken off - now maybe it will!'

The problem is one of momentum - if you were an mobile app developer, what platform would you choose to produce your first and seconds versions of  your new app? Not Windows, I am guessing! The reason is that there just aren't enough devices out there. Well, if Microsoft's gamble pays off, now there could be!

Money!

But with MS it's all about money - so how are they going to make money? The answer is hidden in that sentence about developers and apps.

MS make money on every app sold. They also want to make money from selling Office 365 subscriptions (and Office). The more people that have a Windows device, the more 'opportunity' there is to sell apps and Office. Once Windows 8.1 gains a foothold, they can always start charging OEMs for Windows 9!

OEMs

But why should an OEM (device manufacturer) choose Windows 8? Well, there are a few reasons:
  1. It is now cost free
  2. The OEM will get a cut from any apps that they choose to pre-install on each device (and possibly from any future apps bought by the end user via the App Store?)
  3. The product may attract new business customers who value Windows\Office compatibility
But there are some downsides too:
  1. For any current non-Windows OEM, the 'factory systems infrastructure' required to install Windows 8 and have it ready to be activated by the end user may be a cost barrier (the Product Key presumably needs to be embedded in the device which implies BIOS modifications and factory programming on an individual device level which presents a barrier for easy mass-production).
  2. There is still a minimum specification for memory, storage, CPU speed/type and CPU power requirements which may prove challenging for a low-cost device manufacturer.
  3. Would a 'Windows' customer really choose to buy a sub-£100 device with limited memory and storage?
  4. Smaller variety and lower-quality Apps on Windows platform (MS hope this will change!)

Will it work?

If the 'free' offer applies to a wide range of devices, not only low-cost ones but all 'portable' devices, then I think it will work - but maybe not as much as MS hope. In the short term this may also harm MS's profits because their current OEMs that are already producing Windows devices will be switching to the new 'Windows 8.1 with Bing' OS pretty quickly and saving themselves a few $ in the process.

An increase in sales of Windows devices will eventually prompt the other non-Windows device manufacturers to compete and also offer Windows devices. It also means, if you are looking for a Windows device at the moment - I should wait a few months - prices should come down when the 'new' models start to hit the shelves with free Win 8.1. Non-Windows device manufacturers will need to compete with this and so they too should reduce their prices.

Note that before the new 'Windows 8 with Bing' Models start to appear, prices of the current 'Windows 8' stock will be reduced to clear before the new models start to come in. It is up to you whether to be tempted by the reduced price of these models or hold out for the new models (which should have an even lower price).

This move by MS should therefore lead to an increase in sales of x86-compatible CPUs (I am ignoring the RT version here as I think this new 'free' OS will pretty much kill it, if it wasn't already slowly dying) - so maybe time for me to invest in a few Intel shares (currently at time of writing this blog June 2014 - Intel shares = $26)?

Note: Dec 2014 - Intel shares = $36!


Thursday 5 June 2014

Boot partitions and system partitions

The term 'boot' in my mind has always been synonymous with 'bootstrap' - a process where code is pulled up by it's own bootstraps - i.e. loaded in stages, starting with a small piece of code which then loads in a larger piece of code which then loads in an even larger piece of code - etc. etc. until we get to a full Operating System. Many years ago, I used to key in the initial octal bootstrap code using the flip-keys on a PDP 8e, which then read in a bootloader from a paper tape reader which could then read in a programming language (e.g. Algol) which could then read in an Algol program from paper tape which could then read in a whole bunch of data from yet another paper tape and finally number-crunch and draw a nice graph and 'best-fit' curve on a giant pen plotter!


I always find the Microsoft-speak terms 'boot partition' and 'system partition' confusing. Even more so when GPT-partitioned disks came along. The first sector of a bootable hard disk (if an MBR style disk) contains bootstrap code in the Master Boot Record  (note the word 'boot' just appeared twice!) - so surely this is the 'boot partition' not the 'system partition'?

So it made me chuckle to find it in 'black-and-white' that even windows.microsoft.com admits it!

'These terms can be confusing because the system partition actually contains the files used to boot Windows 7, while the boot partition contains the system files.'


Which begs the question - 'if it is so obviously confusing, then why did you choose such stupid 'official' terms in the first place!'

Now bootmgr is what most Windows installations boot to first, and bootmgr is a 'boot manager'; so we have bootstrapped to a 'boot manager' and then the boot manager can load an OS. Therefore the partition containing 'bootstrap' code should be called the 'boot' partition and the partition(s) containing the operating system should be called the Operating System partition(s). 

So how should I refer to these partitions without ambiguity? Maybe I should use the terms 'bootstrap partition' and 'OS partition'? What is your opinion?

Trust MS to totally screw everything up!


Tuesday 3 June 2014

E2B v1.41 available (bugfix)

tacovdveer pointed out that sub-folders under \_ISO\AUTO were no longer enumerated due to a bug I accidentally introduced in v1.40!
Now fixed in v1.41. If you are updating, just download the non-DPMS version and overwrite your existing E2B files.

Saturday 31 May 2014

Add Kali linux v1.0.7 + LUKS encrypted persistence to your E2B USB multiboot drive

Kali is the follow on from BackTrack for penetration testing. It provides a full linux development environment as well as pen-test tools. You can add Kali v 1.0.7 ISOs to your E2B USB drive and boot them with a LUKS encrypted persistence volume.

Thursday 29 May 2014

Kolibri - a successor to MenuetOS

A few weeks ago I mentioned MenuetOS in this blog post. This is an entire OS written in assembler which can fit on a 1.44MB floppy disk. This was discontinued in about 2004 but Kalibri is it's much-improved successor.

You can download either the ISO or .img file from here.
Full FAT12/16/32 support is implemented, as well as read-only support for NTFS, ISO9660 and Ext2/3/4. Drivers are written for popular sound, network and graphics cards and USB 1.0 and 2.0.
It has network drivers, text editor, file browsers and a basic text-only web browser. To run under VBox, I had to turn off VTx CPU acceleration, set a Sound Blaster 16 audio adapter and a linux 32-bit system type.
If you need to boot from a system and get a file from a non-GPT disk very quickly and save it to a FAT32 USB drive, this could be really handy!

Tuesday 27 May 2014

MPI Tool Pack 035 available

Changes are:
  1.  First time you ran the CSM menu you would get a 'syslinux alternative boot' menu entry - now fixed by changing PBR.BIN file which contained the 'SYSLINUX' text string.
  2. Added new menu for NTFS+FAT32 dual partitions

If E2B is on a USB hard disk we can use:

  • Partition 1 = FAT32  - for clover+E2B files
  • Partition 3 = NTFS - for Windows files

When Setup/ WinPE boots, it will be able to access the files on the NTFS partition of the hard disk.

Change #2 allows you to easily make an NTFS partition image from any Windows Vista/7/8 ISO using large install.wim files, and boot to it via Clover in UEFI mode.  This is useful if you have E2B on a Removable USB Flash drive because Windows Setup can only access the first partition on a Removable UFD and so the first partition must be NTFS. Clover needs a FAT32 partition in order to boot, so this is on the 3rd partition.

To make the files you need to:

1. Drag-n-drop the Win7/8 ISO onto the MPI_NTFS Desktop shortcut
2. Drag-n-drop an empty folder onto the MPI_FAT32 shortcut
3. Copy the two files to your E2B USB drive and name the first one with a .imgPTNLBAa file extension and the second one with no file extension (the name should NOT contain a dot) using the same file name for both files - e.g.

\_ISO\MAINMENU\Win81_x64.imgPTNLBAa   - NTFS Windows Install image + MPI+Clover
\_ISO\MAINMENU\Win81_x64                          - blank image containing just MPI+Clover

When loaded by E2B you will have:
  • Partition 1 = NTFS = Windows Install files and MPI+Clover files
  • Partition 3 = FAT32 = MPI+Clover files
It will NOT be able to boot via the UEFI system firmware because the first partition is not FAT32, however it will boot to the grub4dos CSM menu and you can then boot via Clover (which will load from the FAT32 partition as it cannot 'boot' from an NTFS partition) to the \efi\boot\bootx64.efi Windows UEFI boot file and then install Windows in UEFI mode.

This method is very easy to set up as you don't have to swap files around between the two partitions or split the install.wim file if it is larger than 4GB. The downside is that Clover may not run on all hardware (as it is a 'replacement' UEFI BIOS and is quite hardware dependent) - in which case you cannot boot it via the UEFI system firmware.

I have outlined the 4 methods of adding large-file UEFI-bootable Windows installer images here. The most reliable\versatile method is Method 1 where we use a single FAT32 partition and split the install.wim into .swm files (if required).

Monday 26 May 2014

Run OpenElec XBMC 2014 Live from Easy2Boot

I have updated the instructions in my previous blog with instructions for the new 2014 4.0.2 version of OpenElec XBox Media Centre. This can be booted directly from your E2B multiboot USB drive>

I tested it by booting from my Z87 system from a USB 3.0 port and video, internet and audio worked fine (I had to change the Audio device setting first though).

Please see the second part of the blog for 2014 version here for details.

P.S. The latest build from here worked under VBox when booting from Easy2Boot. I actually used OpenELEC-Virtual.i386-devel-20140317134709-r17946-gb27c946.tar. The x64 version runs better than the i386 version under VBox - enable 64-bit and configure multiple CPUs (no video stutter) with Video acceleration for best performance.


To watch Live TV programs such as BBC1/2 and other freeview channels, add TVCatchup. Download the repository zip file to the E2B USB drive and then boot XBMC and load it into XBMC - follow the instructions here. Using this and the VM x64 version of OpenElec, I am able to watch live TV having booted from my E2B USB drive under VBox with no stutter/lag!

Sunday 25 May 2014

MPI Tool Pack 034 - HP Utility ISOs now supported

There were a few issues with HP Utility ISOs and MPI.

First, it seems that even though I install syslinux into the PBR using the correct 3.75 version of syslinux, it will not boot the HP files and you get a 'boot:' message. The ONLY way I could get the files to boot correctly using v3.75 was to install syslinux to use -fm which installs to the MBR and the files had to be in the root of the drive. So instead I have used syslinux 4 and removed the troublesome hpbootxx.c32 module.

More details on reboot.pro here.

The second problem was that EFI booting did not work because it had some .cfg files which referenced \system and the boot files were moved by MPI to \syslinux.

These (hopefully) have now been fixed by keeping the \system folder where it is, using syslinux 4 and changing the syslinux.cfg file to remove hpbootxxx.c32.

I tested with SPP2014020B.2014_0421.2.iso (MBR and UEFI boot) and hpacuoffline-8.75-12.0.iso and both seem to work now when converting straight from an ISO to a FAT32 partition image using the AUTO FAT32 shortcut (although I don't have any HP kit to fully test it on!).

YouTube video here.


Friday 23 May 2014

MPI Tool Pack 033 - Clover now works on Z87 Haswell systems

I changed the Clover config.plist file and now Clover boots on my Asus Z87 Haswell system. MPI Tool Pack v.033 is now updated with this new config file. The old one is called config.plist.ASUS in case you need it for older Asus systems..

The only change I made was to change:
<key>KernelAndKextPatches</key>
<dict>
<key>AppleRTC</key>
<true/>
<key>AsusAICPUPM</key>
<true/>
<key>Debug</key>

to

<key>KernelAndKextPatches</key>
<dict>
<key>AppleRTC</key>
<true/>
<key>AsusAICPUPM</key>
<false/>
<key>Debug</key>

This disables the patch for 'AppleIntelCPUPowerManagament.kext for ASUS Native PM'.
P.S.
I also found that adding
<key>KernelPm</key>
<true/>
to the old config.plist in the same section also worked. KernelPm is 'Kernel Power management'. As this sounded like it might affect other non-Asus systems, I chose to not use this patch.

Thursday 22 May 2014

MPI Tool Pack 032 allows Clover and syslinux

Previous versions would not allow you to boot to Clover (and then UEFI boot from Clover) if syslinux was present in the Partition Boot Record (PBR). This meant that you couldn't use Clover to directly UEFI-boot to linux. This restriction has now been fixed. You can now boot linux distros using Clover as well as other non-linux (syslinux) payloads.

MPI Tool Pack 032

Wednesday 21 May 2014

My PC's Samsung 932GW monitor didn't work this morning!

It started off just as any other normal morning. Last night I switched off my new home-built Win 8.1 PC with dual (Dell+Samsung) monitors as usual, then went to bed as usual, and slept well (not always as usual!). This morning I switched on both monitors, the external speakers and then my PC as usual. When I came back from making a cup of Earl Grey tea (we drink tea in the morning, here in the UK!), there was no display on the Samsung 932GW display (connected via DVI-D) or the Dell monitor (connected to the VGA cable).

After a few panicky moments, I realised that just the Samsung monitor was not working. Even if I disconnected the DVI cable, there was no 'No monitor detected' floating message box like there usually is when the cable drops off! If I switched it off and then on again, I saw an on-screen pop-up box for about a second and then it all went black again.

On further inspection, when I connected it to the DVI cable and PC, I could just see a very faint image of the Windows login background, especially if I used a torch, shone at an angle to the screen.

At this point it looked like the backlight to the display was on the blink/fritz (technical terms for cream-crackered!). Since the backlight did come on for about 1 second immediately on first switch-on, it looked like the high-voltage CCFL inverter was the problem, rather than the high-voltage CCFL bulb(s).

I Googled for 'samsung 932GW backlight' and it led me to some discussion forums about 'bad capacitors'. I also found some 'Capacitor kits' being sold on Amazon.com for this exact model of monitor.

As a computer\electronics engineer, I am very familiar with this issue. As well as seeing bad capacitors on mainboards whilst working for RM, I have seen them in other products too. For instance, over the last 10 years or so I have bought 3 different D-Link routers. All three of them started to play up after a year or so. One seemed to work fine until my ADSL supplier upgraded my line for higher ADSL speeds - after that I kept getting a dropped ADSL connection. I initially blamed my phone company, but when I used an old USB ADSL modem, I had no problem. Sure enough, when I opened up the D-Link ADSL router, there was one large capacitor with a swollen top! I replaced it and the router worked fine from then on. The extra power demand to drive the ADSL line at higher speeds must have been too much for that poor swollen capacitor!

Since companies are selling 'capacitor kits' for this particular Samsung monitor, it leads me to believe that this monitor was built with sub-standard components. This leads to an interesting question. Samsung monitors have a 2 year warranty and mine was out of warranty. However. the Sale of Goods Act states that goods should be of reasonable quality, last for a reasonable time and be free from defect at the time of manufacture. This covers the product for up to 6 years from the time of purchase and is over and above any manufacturers warranty. Since my monitor was about 3 years old and was built with poor-quality capacitors, it could be argued that I am covered by the Sale of Goods act and EEC law to have my monitor fixed or replaced.

Since people are selling 'capacitor repair kits' for this exact model of monitor, surely this is proof that these monitors contained a defect at the time of manufacture? Also 3 years is a reasonable amount of time for a monitor to continue to work. So, I could go to the small claims court and claim against the retailer that I bought it from under the Sale of Goods Act regulations. Read here for more information about this.

In this case however, I just took the monitor apart and looked at the circuit board. You can plainly see that 3 capacitors (circled in yellow) out of the 8 electrolytic capacitors on the board, have tops that are 'buckled'. The tops are deliberately scored when made by the manufacturer, with a cross-cut, so that the tops will split rather than explode when/if the dielectric compound inside breaks down, becomes resistive, gets hot and starts to out-gas.


Electrolytic capacitors should last for many years. I am sure you have old TV sets and other appliances that have lasted for well over 10 years (some for 20+ years like my old Sony Trinitron TV!). So why have these capacitors blown?

The answer appears to be that these are cheap capacitors that are made in either China or Taiwan and the compounds used break down after a few years. In fact it is the power-on-time+heat that destroys the dielectric material, which is why things like monitors and routers suffer the most, rather than washing machines or other appliances that are only used for a few hours a day (most routers are left on 24x7!).

It is a basic rule-of-thumb that for every 10 deg C rise in temperature, the rate of a chemical reaction doubles. This is why manufactures (should) test components at raised temperatures - to increase 'ageing' of the components. Raising the temperature by 30 deg C whilst on, will have the same ageing affect as keeping it running for 8x as long.

Some capacitor manufacturers blame a certain supplier who 'stole a secret recipe' for making the dielectric compound more cheaply than other suppliers and then started to sell the compound as a cheaper alternative. The problem (apparently) was that the recipe they stole was inaccurate\incomplete and the dielectric degraded after a year or so. Other manufacturers copied this recipe too and soon millions of products were built using this compound or near relatives of it (psst.. wanna buy a secret formula?). This caused the infamous capacitor plague (which still seems to be going on even now!). This is why today you may see Power Supply and PC mainboard manufacturers boast that they use Japanese capacitors (rather than Chinese\Taiwanese ones).

One episode is reported to have cost Dell $300m!

Still, I guess every cloud has a silver lining, especially for people selling 'capacitor repair kits', e.g. http://www.badcaps.net.

If you are good with a soldering iron, before throwing away that router or monitor, have a look at the capacitors inside it,  then Google for a 'Capacitor Kit' for it! Follow this link for how to repair a monitor. You can order individual capacitors on eBay (but make sure they are good quality ones from a reputable supplier!). Tip: a pack of 5 capacitors of the same value is often only a few pence more than a pack of one or two.


Tuesday 20 May 2014

MPI Tool Pack 031 with Clover now available

I have now added Clover Lite to the MPI Tool Pack v.031. It only adds 1MB.

If you don't want Clover to be added to your images, edit the MakePartImage.cmd files and add
set NOCLOVER=1
to the top of the file
OR make new .cmd files and add this:

e.g. MPI_No_Clover.cmd
set NOCLOVER=1
call MakePartImage.cmd   %*

or even simpler, just delete or rename the CLOVER folder.

v 031 also now includes a CreateDesktopShortcuts.cmd file which runs a vbs script to automatically add three Desktop shortcuts to your Desktop for drag-and-drop operation. The shortcuts will be set up with the Admin box already 'ticked'.

So just:

1. Download the Tool Pack
2. Double-click on CreateDesktopShortcuts.cmd
3. Install ImDisk

and you are good to go.

Drop an ISO file or folder or USB drive icon onto one of the three new Desktop shortcut icons to start the creation of an image partition file. The  FAT32 and NTFS shortcuts usually work with only 0-2 prompts needed (the .imgPTN file is created in the same folder as the Source).


Monday 19 May 2014

MemTest86 v5.1.0 released by Passmark

Ric alerted me to a new version of Memtest86 now maintained by Passmark. There is a free edition and a Pro edition which has more features.


This will be in the next version of  E2B (with permission from Passmark) when I release it (v1.41). It uses a kernel file and a .mnu file only and so is much smaller than the previous ISO-based version.

The ISO or USB download also supports UEFI booting.

You can also make a .imgPTN partition image file from the ISO, however if you allow MakePartImage to install Syslinux to the Partition Boot Record (PBR), then you cannot boot from it using Clover (it will refuse to run).

I suggest you extract just the \EFI folder to a new folder on your hard disk and run MPI FAT32 AUTO on that folder. The .imgPTN file created will be bootable via Clover (if you added the Clover Pack) on 64-bit systems or you can boot via UEFI Firmware. For normal MBR\CSM booting, you can use the Utilities - Memtest menu entry in Easy2Boot.

This is the UEFI boot screen

P.S. In case you don't know - Passmark make some excellent software and I highly recommend having a look at their main website.

MPI_Clover_Pack_Lite_005 (bugfix)

If you are using two images at the same time, please update to Clover Pack 005 (menu.lst has changed)

There was a problem if using two image files at the same time.

For example:

You can quickly add multiple NTFS image partitions of Windows x64 ISOs   (useful for >4Gb install.wim AIO ISOs) to E2B for UEFI or MBR booting as follows:

1. Create a WINSTUB64 empty folder
2. Use this empty folder as the Source folder to create a FAT32 image partition using MPI  (e.g. WINSTUB64.imgPTN). e.g. drag-and-drop the empty folder onto your MPI AUTO FAT32 shortcut.

Now for each Win7/8 64-bit ISO that you have...

1. Use MPI to create an NTFS image from the ISO - e.g. drag-and-drop the ISO file onto your MPI AUTO NTFS shortcut.

To add these files to your E2B drive

1. Copy the large NTFS image file to \_ISO\MAINMENU (or \_ISO\WIN or \_ISO\AUTO)
2. Remove the file extension - the name must not have a . in it - e.g. change Win8.1.imgPTN to Win8_1
3. Copy the WINSTUB64.imgPTN file to the same E2B folder
4. Change the file name and file extension to .imgPTNLBAa  - e.g. Win8_1.imgPTNLBAa
5. (optional) add a .txt file - e.g. Win8_1.txt with a 'title' entry

e.g.
\_ISO\WIN\Win8_1.imgPTNLBAa      - contains CSM and Clover files
\_ISO\WIN\Win8_1                           - contains image of Win x64 ISO installer
\_ISO\WIN\Win8_1.txt                      - (optional) replacement title

When you boot from the .imgPTNLBAa file to the CSM Menu, it will have a Clover entry and a '3 Boot Windows on 3rd partition (MBR-mode) entry. The '1 BOOT  (MBR mode)' menu entry will not work unless you have also included bootable files in the WINSTUB image.


If you wish, you can edit the \menu.lst file to remove the non-working menu 1 entry by deleting the 20 or so lines below the # --- GENERIC BOOT MENU --- line.

You might also like to change the menu title to whatever is appropriate (e.g. set PAYLOAD=KonBoot and Win8.1 x64 Install).

Instead of the WINSTUB64 file having no payload, you could use any non-Windows Vista/7/8 payload (e.g. Rufus Windows XP flash drive image or KonBoot 2.4). Then the menu  1 BOOT option would boot to Xp install or KonBoot and you could also UEFI-boot to either KonBoot or Win7/8 install via the Clover GUI.

Note that because the Win7/8 install is on an NTFS partition, you cannot boot to it via rebooting from your UEFI system's firmware as that will only 'see' the FAT32 partition.


Why can't I boot from the USB 3.0 ports on my PCI add-in card?

I was asked this question today via email from Guptila. I thought I would share my reply here too.

The short answer is - you cannot boot via the BIOS on any device that is an 'add-in' device, unless it is a PCI card that also contains an option ROM.

BIOS Code

Think about how the BIOS works...

The BIOS knows that it's mainboard contains a certain chipset (it was designed for that chipset).
The BIOS contains the code required to access the registers on that chipset.
The BIOS has to have code which allow the operator to boot from devices connected to the chipset.
If the board has an ABC chipset, then the BIOS will contain code to access an ABC chipset with ABC-type USB registers.

Now you connect a PCI card containing a different (e.g. Renesas) chip. The BIOS will see a XYZ chip connected to the PCI Bus when you switch on the system, but the BIOS does not contain any code to access this XYZ chip - it does not even 'know' that the chip has USB 3.0 ports connected to it. In fact, when the BIOS code was written by the manufacturer, USB 3.0 chips probably did not even exist!

It would be the same even if you connected a USB 2.0 Renesas add-in card - the BIOS only contains code to boot from the chipset on the mainboard, it does not contain code for the 1001 different cards that could possibly be connected to the PCI bus.

So you cannot expect your system to boot from an add-in card... or can you...


So how can you add a SATA Add-in card to a system, and how come it can boot from SATA drives then?
You may well ask this question!

These add-in cards contain an option ROM - a chip that contains extra BIOS code. VGA (graphics) cards also contain these option ROMs so that you can see the BIOS text and setup menu etc when you switch on the computer. 

When the computer is switched on, it scans for Option ROMs and adds the code in the Option ROM to it's own BIOS code. In this way, the BIOS 'knows' about the extra chips that are now in the system.

Unfortunately, I am not aware of any USB 3.0 add-in cards which have their own Option ROMs that allow you to boot from their USB 3.0 ports. There are products such as 
which contain an Option ROM, but this only allows you to boot from the SATA devices and not from the USB 3.0 devices.

You have these options available to you if you have an add-in USB 3.0 card:

1. Get a mainboard\system that has a USB 3,0 chipset and ports
2. Plug your USB 3 devices into your systems USB 2.0 mainboard ports
3. Use a Virtual Machine and connect your USB drive to the add-in card's USB 3.0 port - however anything you boot to will see the USB drive as a non-USB hard disk and not a USB 3.0 drive. It does mean that most things will boot at USB 3.0 speeds in the VM though (see RMPrepUSB - Tutorial 4 and the video).


Also bear in mind that many bootable OS's do not contain support for USB 3.0 chips, so even if you could boot from a USB 3.0 port, once you boot to an OS (e.g. plop, Vista\Win7 and many linux distros) the boot will fail because it cannot access the USB drive on a USB 3.0 port because the OS does not contain any USB 3.0 drivers.