Summary
This security update makes improvements to Secure Boot DBX for the supported Windows versions listed in the "Applies to" section. Key changes include the following:Windows devices that has Unified Extensible Firmware Interface (UEFI) based firmware can run with Secure Boot enabled. The Secure Boot Forbidden Signature Database (DBX) prevents UEFI modules from loading. This update adds modules to the DBX.
A security feature bypass vulnerability exists in secure boot. An attacker who successfully exploited the vulnerability might bypass secure boot and load untrusted software.
This security update addresses the vulnerability by adding the signatures of the known vulnerable UEFI modules to the DBX.
KB5012170
Introduction
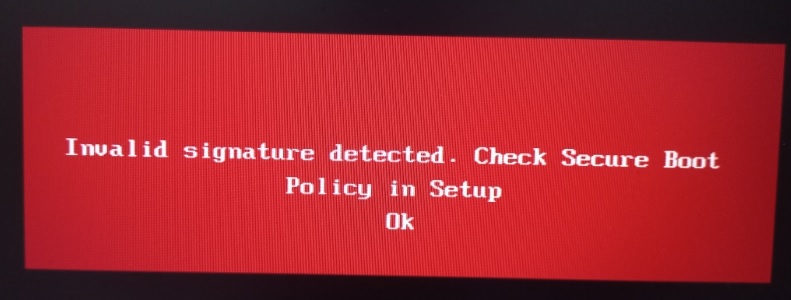
Ventoy (and the 'official Ventoy' .img files used by agFM) use an .EFI file which allows you to add any file or key onto the BIOS DB 'whitelist' by using MokManager. This basically allow you to secure boot to ANY unsigned .efi file and is therefore a very obvious security risk.
agFM uses a signed Kaspersky EFI boot file which has a security flaw because it allows you to load unsigned grub2 modules. The unsigned grub2 module can then disable the secure boot checks and then allow you to load unsigned .efi bot files.
Microsoft have released various Windows Updates which (if you have UEFI-booted to Windows) will add blacklist entries into the DBx non-volatile RAM of your BIOS so that it will now refuse to Secure Boot from the naughty EFIs that Microsoft should never have signed in the first place!
So this leaves us with a problem (that has been seen coming for several years) - how do we load a multiboot loader/manager such as Ventoy or agFM (which use unsigned grub2). Microsoft will not sign any generic grub2 version because they allow you to load other modules or run dd, etc. and thus potentially hack the secure boot mechanism.
Solutions
Ventoy
For Ventoy, we need to disable Secure Boot or go into the UEFI BIOS of the target system and clear (delete) the DBx database to remove the blacklist keys that were added by the Windows Update.
Disabling Secure Boot in the BIOS is only temporary and does no harm - as long as you remember to re-enable it afterwards. But what if you do not know the BIOS password?
You could simply make a FAT32 Partition 3 and copy your Secure Boot EFI payload onto that partition. Then secure UEFI-boot from Partition 3 - however, this is not really a 'multiboot' solution because it is difficult to have more than one extracted ISO on a Partition because they often use the same folders and files and the second one would overwrite the files of the first one.
If you used NTFS for Partition 1 of the Ventoy USB drive, you could place the Rufus signed UEFI_NTFS boot files onto a FAT Partition 3 on your drive and then place the extracted flat-files of your payload/ISO onto Partition 1. Again this is not really a multiboot solution.
Rufus has signed NTFS drivers and a signed .EFI boot loader which loads a signed \EFI\BOOT\BOOTX64.efi file from Partition 1,
This would also work with agFM too.
Note: If the agFM EFI shim is not blocked when Secure booting to agFM, you can always boot to Ventoy from the agFM menu system.
E2B\agFM
However, for E2B and agFM we also have some extra options to multiboot Secure payload files:
1. Create a FAT32 .imgPTN23 file using MakePartImage.
E2B (legacy boot) or agFM (legacy or UEFI) can 'switch-in' an .imgPTN file so that it replaces Partition 1 with the contents of that file.
The partition image file must contain a FAT32 filesystem because only FAT filesystems are supported by default by UEFI BIOSes.
E2B already contains an example of such a file which contains MemTest86 ("\_ISO\UTILITIES_MEMTEST\Passmark Memtest86 (MBR+UEFI).imgPTN23").
You can select this file using the E2B legacy menu system, or the agFM legacy or UEFI grub2 menu system or using the Windows app. SWITCH_E2B.exe ("\e2b\SWITCH_E2B.exe" on Partition 2).
 |
| The Windows app. SWITCH_E2B.exe |
You can easily create your own .imgPTN23 files using the MPI Tool Kit (YT video)
The files in Partition 1 could, in theory, contain bootable UEFI files for any type of UEFI device (x86, x86_64, ARM64, Android, etc.).
Note: Using a file extension of .imgPTN would not keep Partition 2 or Partition 3 (if it exists). So we use an extension of .imgPTN23 so that these partitions are kept on the USB drive after switching in the image file.
However, to restore the original Partition 1 presents a problem because we cannot Secure Boot to agFM on Partition 2 because the Secure BIOS will not allow us to boot to an unsigned or blacklisted grub2 EFI file. There are some solutions however:
1. Boot to Windows and run SWITCH_E2B.exe and click on 'Restore E2B partitions'.
2. Legacy boot on a different system and select the '0 Restore E2B' option in the CSM boot menu.
3. Non-secure UEFI-boot to agFM on Partition 2 from a different system and restore the original partitions from the agFM boot menu.
If you place WinPE boot files on Partition 3 (with \EFI\BOOT\BOOTX64.efi, BCD and boot.sdi files and boot.wim file) or something like Bob Ombs WinPE, then you can Secure Boot from Partition 3 to WinPE and run SWITCH_E2B.exe from WinPE. In this way you can switch in and out any .imgPTN payload file you like into Partition 1 on any Secure Boot system. A minimal 400MB boot.wim which includes SWITCH_E2B.exe can be downloaded - see eBook #3 for details of downloads and passwords:
- SWPEFAT32_eBook_FILES.zi_ (approx. 1GB) - main download for this eBook - contains the files needed to add to your second E2B partition
- SWITCH_X64_ENG_MINSIZE.zi_ - SWITCH_X64.wim file which has English USA language and WoW64 but not much else (400MB).
- SWITCH_X64_ENG_NET_AUDIO.zi_ - SWITCH_X64.wim file which has English USA language, WoW64, .NET, network and audio drivers (550MB).
2. Booting images with >4GB files
The solution above only works if the partition image file was formatted as FAT32, however some ISOs or payloads contain files which are greater in size than 4GB - e.g. some Windows 10/11 ISOs contain very large \sources\install.wim or install.esd files.
In the case of Windows Install ISOs, we could use Split_WinISO.exe which is included in the MPI Tool Kit - this converts the large install.wim/.esd file to smaller .swm files, however there is another solution...
In this case we can use two partition image files and a similar solution used by Rufus,
1. First, we must ensure our E2B drive has three Primary partitions:
Ptn1: NTFS - E2B files/folders
Ptn2: agFM/Ventoy menu files/folders
Ptn2: agFM/Ventoy menu files/folders
Ptn3: NTFS, FAT or FAT32 volume of at least 100MB
Note: If you are using a Partition Tool - make sure it creates a Primary partition 3 not a Logical partition!
2. Next we create our .imgPTN23 file by dragging-and-dropping our ISO file (or volume or zip file) onto the MPI_NTFS Desktop shortcut that was created when you installed MakePartImage.
Note it must create an NTFS image.
3. Copy the resulting partition image file (must have a .imgPTN23 file extension) to any suitable E2B menu folder - e.g. \_ISO\MAINMENU.
There should only be one dot (period) in the name - the one used for the extension.
4. Run "\MAKE_THIS_DRIVE_CONTIGUOUS.cmd" because all partition image files must be contiguous.
5. Now copy the UEFI_NTFS3 file (600K) to the root of Partition 3 of the E2B USB drive and rename the file to have exactly the same filename as the .imgPTN23 file (but with no file extension). This file contains the same signed files used by Rufus.
Note: Instead of adding the file to the root of partition 3, the file can go into a folder which has the same path as the .imgptn23 file - e.g. the Ptn3:\_ISO\MAINMENU folder.
This file contains NTFS drivers for UEFI64, UEFI32 and ARM64. So the signed payloads in your .imgPTN23 file can be one of more of these three types.
6. Run Defraggler on the new file on Partition 3 (after installing Defraggler - right-click on the file and choose Defraggler - Defragment). You can instead run WinContig.exe ("\_ISO\docs\Wincontig\WinContig.exe") if you do not have Defraggler.
7. We should now have - for example:
Ptn1: NTFS - contains \_ISO\MAINMENU\Win10_2004_English_x64.imgptn23
Ptn2: agFM/Ventoy menu files/folders
Ptn2: agFM/Ventoy menu files/folders
Ptn3: NTFS, FAT or FAT32 volume of at least 100MB - contains \Win10_2004_English_x64
You can add more NTFS .imgPTN23 files but each one must have a matching UEFI_NTFS3 file in Partition 3 with the same filename as the image file but with no file extension.
The Win10_2004_English_x64.imgptn23 file can be selected from the legacy E2B boot menu or the agFM menu - if you have a suitable non-secure system available. If you do not have another legacy or non-secure system available, you can run SWITCH_E2B.exe from any Windows system to switch in both images.

Note: If prompted by SWITCH_E2B.exe for a partition type, then for partition 3 type in 0x0C for FAT32 when prompted.
8. After switching in the two images, you should now have these partitions visible in Windows 10/11 Explorer:
Ptn1: NTFS - contents of \_ISO\MAINMENU\Win10_2004_English_x64.imgptn23
Ptn2: FAT32 - agFM/Ventoy menu files/folders (unchanged)
Ptn2: FAT32 - agFM/Ventoy menu files/folders (unchanged)
Ptn3: FAT contents of Win10_2004_English_x64 (UEFI NTFS drivers + boot files)
9. You can now Secure-Boot to Partition 3 and it will then load the signed .EFI boot file from your image in Partition 1 and then the rest of the payload files.
10. Restore the original partitions when finished.
You can restore the original partitions by legacy booting to Ptn1 or non-secure UEFI-booting to Ptn2 or by using SWITCH_E2B.exe under Windows or WinPE.
The easiest Secure-Boot solution?
Of course, the easiest way to avoid these workarounds is to get yourself a device such as the IODD Mini SSD disk emulator or the IODD ST400 SSD/HDD enclosure.
Then you can then simply select any Secure Boot ISO/VHD/IMG and boot straight from it.
Please subscribe if you found this article useful.
No comments:
Post a Comment