Tuesday 5 July 2016

Creating fully unattended XML answer files for Windows 10 Install ISOs for E2B

I detailed in a previous blog here, how to create and modify an XML file to fully automate the installation of Windows 7 and 8.

The process is identical for Windows 10. You need to specify a Product Key in the XML file (same as Win8), although not all ISOs may need it (e.g. some MSDN or Volume Licence ISOs).

The process is:

Sunday 3 July 2016

Adding 'multiboot' WinPE ISOs (such as GeekSquad MRI_5_10_2.ISO) to E2B

If you have an ISO file which contains bootmgr and boots to WinPE, then you can use it with E2B by renaming the file extension to .isoPE or .isoPE01. This only works if you have a Removable E2B USB drive (you should convert the ISO file to a .imgPTN file if your E2B USB drive is of the 'fixed disk' type).

Note: There was a bug in previous E2B versions when using .isoPE and .isoPE01 file extensions (the blue LOADISOPE.cmd console window stopped with an error and the ISO was not loaded). You will need a recent version - e.g.  E2B v1.81 Beta from the Alternate Download Areas (see side bar).

However, if you use the .isoPE file extension, it will cause E2B to immediately load and run bootmgr and so the ISO will boot straight to WinPE and you won't see the non-Windows boot menu, if one was present inside the ISO.

Friday 1 July 2016

Make a basic Easy2Boot MyE2B.cfg configuration file.

If you already have an E2B USB drive, you can easily update it by downloading the latest version of E2B and then run the UPDATE_E2B_DRIVE.cmd script.

Newer versions of E2B have a new version of the MAKE_E2B_USB_DRIVE (run as admin).cmd script, so that when you make a new E2B USB drive, it also asks you some questions about how you want to configure E2B - e.g. language, keyboard, if you want the file extension to be displayed in the menus and if you want the rotating E2B logo to be displayed (with Boiler Plate or QR code).

If you have already made your E2B USB drive, you can run the same script to create a new \_ISO\MyE2B.cfg file by running the \_ISO\docs\Make_E2B_USB_Drive\Make_MyE2B.cfg.cmd script. It will ask you to select a USB drive and then will run through the same questions that MAKE_E2B_USB_DRIVE (run as admin).cmd asks.

QR code in E2B v1.81f

E2B v1.81f will allow you to add a QR code 'STAMP' to the menu wallpaper when you run \MAKE_E2B_USB_DRIVE (run as admin).cmd to make a new E2B drive.

The QR code contains the URL for the E2B website's 'List of tested ISOs/payloads' page, so you can use your mobile phone's QR reader to quickly look up the recommended way to add any payload to your E2B drive if your first attempt did not work!

If your mobile phone does not already have a QR reader, there are many free apps that support QR code scanning. Try it out on the screenshot below now...


Wednesday 29 June 2016

Directly boot to .VHD, .VHDX and .WIM (NT6) files with E2B

E2B can directly MBR-boot to dozens of .VHD, .VHDX and .WIM (NT6) files. Just copy them to one of the standard E2B boot folders (e.g. \_ISO\WIN) and boot to E2B. They do not need to be contiguous either.

E2B uses chenall's NTBOOT.MOD grub4dos scripts to modify a BCD file which is copied to a virtual floppy disk in memory, so that it contains the correct path to point bootmgr at the boot file.

There are a few caveats however:
  1. A compatible version of bootmgr is required.
  2. There must be no spaces in the filename or path.
If you use the \MAKE_E2B_USB_DRIVE (run as admin).cmd script to make your E2B drive, it will copy bootmgr from your Windows system to the E2B drive. If you did not use the script, then you will need to ensure that you copy the bootmgr file to the \_ISO\e2b\grub\DPMS\NTBOOT.MOD folder yourself.

Until recently, I thought that only Windows 10 versions of bootmgr were incompatible, but I have now tested over 20 different versions (renamed to show what symptom I got with each one when booting a VHD):

Thursday 23 June 2016

RMPrepUSB v2.1.731 and grub4dos 0.4.6a

RMPrepUSB v2.1.731 will install grub4dos 0.4.6a when you use the 'Install grub4dos' button.

Under some circumstances, you may hit the grub4dos 0.4.6a bug where it does not like a certain partition on one of the drives in your system and fails to boot to grub4dos. This is the same issue as you may sometimes get when you boot to E2B and get a E2B.cfg file missing error.

The solution is to use an older 0.4.5c version of grub4dos.

In the case of RMPrepUSB, simply copy the required 0.4.5c version of grldr to the RMPrepUSB folder (press F3 in RMPrepUSB and it will open the correct folder). For E2B, replace the \grldr file.

I suggest you use the 2015-05-18 version of grldr 0.4.5c (I have not validated later versions of 0.4.5c, so they may have bugs).

Note that 0.4.5c has some missing features.

Version 0.4.6a has:
  • A fast USB 2.0 rd/wr driver
  • .jpg image file support for backgrounds
  • ext3/4 support
  • Better ISO, Joliet and UDF support
  • Can boot from non-contiguous files (if not too fragmented) using map command
  • Large font support
  • Stamp and Animated graphics support
  • Many bug fixes, incl. NTFS file write bug fix
  • Better debugging
  • Extra commands
The bug in 0.4.6a is difficult to reproduce, but we won't find it by using 0.4.5c all the time. If you find a system which shows the problem, please try to narrow down which partition it is that is causing the problem (e.g. change the partition type to 0 - then see if you can boot to grub4dos - repeat for each partition until you find which one is causing the issue, then make an image of the bad partition and send me or the developers the image + the MBR .bin file so that we can reproduce the problem). The bug is reported here.

How to pre-activate all your Win7/8 systems for Windows 10 without actually installing Windows 10 (even after 2016-07-29)!

Time is running has run out! However, you can still activate Windows 10 using a Windows 8 or Windows 7 Product Key even though the 'upgrade' deadline has expired!

Note: This will probably not work after 2017-12-31 - see here.

Microsoft have said that Win10 will probably be their last version of Windows, because they will release continuous updates for Win10.

So even if you don't like Windows 10 now, you may like Windows 10 a lot more in 6 months time or in 3 years time. Unless you activate and register each system now, you will have to pay for it later!

If you are still running Win7, you should definitely upgrade to Win8.1 or Win10 because Win7 has reached 'end-of-life'. Manufacturers are no longer releasing peripherals with Win7 drivers, so any new peripherals you purchase may not run on Win7 if it requires a special driver.

Tip: You can check the Windows version by running 'winver' from the Start - Run box.

As I have mentioned before in previous blogs, you don't have to install Win10 onto a system's internal hard disk in order to get it registered with Microsoft for Windows 10. All you need to do is boot the Win7/8 system from a USB drive which has Windows 10 To Go on it. Here are the steps:

Monday 20 June 2016

New versions of E2B, MPI_Tool Pack, RMPrepUSB available

The fix for SWITCH_E2B.exe is now added and seems to work.
I also found a small bug in my code which also affected RMPartUSB, so I have re-released RMPrepUSB (which contains RMPartUSB).

  • SWITCH_E2B v1.0.11 - bugfix to adjust hidden sectors
  • E2B v1.81c - has new RMPartUSB v2.1.731 and new SWITCH_E2B.exe v1.0.11
  • MPI Tool Pack + Clover Lite 0.066 - has new SWITCH_E2B v1.0.11
  • RMPrepUSB v2.1.731 - new RMPartUSB 2.1.731
New versions are in the Alternate Downloads Areas (see side bar).

If you already have made .imgPTN files and they have been booted at least once using the E2B menu system, then you don't need to update them.

Sunday 19 June 2016

SWITCH_E2B.exe bug found!

For a number of months now I have been experiencing odd issues with .imgPTN files, especially with syslinux-bootable images. Sometimes they worked fine and I could MBR-boot to syslinux using the first MBR-Boot option and also the other 1 or 2 syslinux boot options, but on other occasions, when I made a new .imgPTN file, I found they would only boot via the syslinux PBR option (#2) and not the default boot option #1 or the syslinux PBR.BIN backup file option #3.

Menus #1 and #3 may not work until you use grub4dos to select the .imgPTN file instead of SWITCH_E2B.exe.

Whilst setting up the slackware+persistence tests in the previous blog, I came across this behaviour again and I have finally found out what is going on (after nearly going crazy)!

I realised that if I used SWITCH_E2B.exe to switch to a new .imgPTN file that had never been booted via grub4dos and E2B, then I had this boot problem in the CSM menu. However, if I switched to that .imgPTN file (once!) using the E2B grub4dos menu, then from then on it would work using SWITCH_E2B.exe and using the E2B menu system.

The reason for this is that the E2B menu uses grub4dos and the partnew command which modifies the partition boot record hidden sector values (at locations 001C-001F if you are curious). SWITCH_E2B.exe does not do this.

So you must always use the E2B menu system first to switch in your .imgPTN. You only need to do this once - after that you can use SWITCH_E2B.exe if you wish.

Also, if you 'move' the .imgPTN file's position on the E2B disk (e.g. defrag it or copy it), it will obviously not alter the hidden sector values inside each .imgPTN file. So you will need to boot using the E2B menu (once) to make them work.

I will look at fixing SWITCH_E2B.exe so that it also modifies these hidden sector values.

P.S. SWITCH_E2B_v1.0.11.zip is now available from the Alternate Downloads area and has the hidden sector update fix.

Add Slackware+persistence to E2B

Slackware will use either a \persistence folder or a \persistence.img file (by default) for persistence.

However, it appears that this needs to be in ext4 format.

I could not find a way of pointing the LiveCD ISO to the persistence file when booting directly from an ISO, so here is how I went about adding Slackware with persistence to my E2B USB HDD.

1. Drag-and-drop the slackware64-live-mate-current.iso file onto the MPI_FAT32 Decktop shortcut to make a slackware.imgPTN file - when prompted for a size, add enough for your persistence requirements - e.g. add 500MB (max. you should add is 4GB because we are using FAT32 for the partition so we cannot create a persistence.img file larger than 4GB in step 5 below).
2. Copy the slackware.imgPTN file to your E2B drive (e.g. \_ISO\LINUX folder)
3. Switch to the slackware.imgPTN file (e.g. by booting to the E2B menu).
Do NOT use SWITCH_E2B.exe to switch to the slackware.imgPTN file for the first time as it can cause problems with syslinux booting. Once you have booted via E2B once, you can use SWITCH_E2B.exe afterwards.
4. The files in the new partition should now be accessible to Windows.
5. Run RMPrepUSB - Create Ext2 FS and create a new persistence file on the USB partition called persistence.img   (note: case sensitive). Make the size as big as any remaining free space on the partition (e.g. approx 500MB). Any Volume name will do.
6. Now boot to slackware (to the CSM menu) by choosing boot option #2 (the #1 entry may not work unless you are using SWITCH_E2B.exe v1.0.11 or later) and boot to slackware.
7. Log-in as root (pwd=root) and run a terminal window
8. Type the following commands:


  mkfs.ext4 /mnt/livemedia/persistence.img
  tune2fs -m 0 -c 0 -i 0 /mnt/livemedia/persistence.img


9. Now when you next boot, persistence should be working.

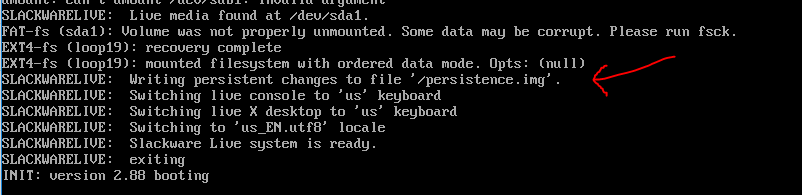
Tip: Use CTRL+S during booting when you see the 'SLACKWARELIVE:' text, to check that the persistence.img file has been found (CTRL+Q to resume):


Note: Slackware would not boot from my USB HDD  UASP drive caddy (e.g. Inateck FE2005) on my Z87 PC. It reported it could not find the 'livemedia' during booting. Using fdisk -l  , it did not list the E2B USB hard disk. If I removed and re-inserted it, it did not allocate a device name, but if I inserted a USB 3 Flash drive, it reported sdd1 was found. I conclude from this that slackware does not contain a UASP driver, so you cannot MBR-boot from USB 3 UASP drives/caddies (I tried both USB 2 and USB 3 ports).

10. I recommend you take a backup (at least of the persistence.img file) in case of later boot problems!

UEFI-Booting

You should also be able to UEFI-boot via Clover or your system firmware in UEFI-boot mode.