Thursday 8 July 2021

How can you check using a Windows batch file what AntiVirus s/w is active?

Windows Defender is the standard Windows Antivirus software that comes with Windows 10 and it does a pretty good job.

However, many people like to install 3rd-party AV and anti-malware software too.

In fact, some people may be running 3rd-party AV software without even knowing it!

For instance, many types of Acronis backup products may also install Acronis Cloud Protect without you even being aware of it.

One way to detect AV software and Services is to trawl through the Windows task list and try to recognise the names of the software products but I wanted to write a small .cmd Windows batch file to show the user what AV software was installed and if it was enabled or not so that I could add the code  into the E2B Make script to warn the user that they have AV s/w installed and it may be blocking write access to their USB drive's boot sector.

Here is what I ended up with...

Tuesday 6 July 2021

Install Windows 11 using E2B and agFM onto any system

 E2B and agFM can automatically run the registry hack to skip the Windows 11 TPM\RAM\SecureBoot checks.

1. First update to agFM v1.72 or later version (just over-write files on Partition 2 with the latest download) and also update to latest E2B v2.10 Beta which has the WIN11 folder support (run Make_E2B.exe as Admin and click on the Update E2B button). Download areas for latest Betas

2. Copy your Win11 ISO to the \_ISO\WINDOWS\WIN11 folder.

Download Win 11 ISO from here. Select 'Latest Dev Channel' - Cumulative Update for Windows 11 (10.0.22000.51) (untick 'Integrate updates' option for faster build and download). The fewer Editions you tick the quicker the build - I ticked Home\Core + Pro. The download and build of the ISO may take a few hours or more!

Note: If you only tick one Edition, the Install.wim that is made is non-standard and does not contain an XML file. I suggest you include at least two Editions.

3. Create a .cmd text file which has exactly the same name as the Win11 ISO file and place the following three lines of code in the .cmd file:

reg add "HKLM\SYSTEM\Setup\LabConfig" /v "BypassTPMCheck" /t REG_DWORD /d 1
reg add "HKLM\SYSTEM\Setup\LabConfig" /v "BypassRAMCheck" /t REG_DWORD /d 1
reg add "HKLM\SYSTEM\Setup\LabConfig" /v "BypassSecureBootCheck" /t REG_DWORD /d 1

Tip: If you suspect this cmd file is not being run, add an extra line at the bottom which will wait for you to press ENTER:

pause

4. Copy the \_ISO\WINDOWS\WIN10\Windows 10 Pro (no prompt to repair).xml file to \_ISO\WINDOWS\WIN11 folder (your ISO must include Win11 Pro Edition - if not use a different XML file - e.g. Win10 Home, etc.)

You should now have the following files:

Monday 5 July 2021

Easy2Boot v2.10a Beta available with Win11 support

The new E2B Beta is here.

It adds a \_ISO\WINDOWS\WIN11 folder.

I have also speeded up the loading of the Main Menu if you have lots of files in the \_ISO\WINDOWS\xxxx folders. The Main menu no longer shows you how many payload files are present as they are no longer counted.

I installed a version of Win11 using VBox and E2B legacy and agFM UEFI64 successfully.

To update, just extract the files onto your USB drive.

Bypass the Win11 Compatibility check

To avoid the Win11 'compatibility check' you can install Win11 using WinNTSetup.

If you install to a Virtual Machine, the 'compatibility check' is skipped.

Or you can run these commands as soon as Setup is loaded to skip the checks:

Saturday 3 July 2021

'Ventoy for Easy2Boot' v1.0.46 is now available for download

 I have now made an update for 'Ventoy for Easy2Boot' so it is now v1.0.46.

This is not the Ventoy image files but the modified version which is directly added to Partition 2 and can be booted to without switching in an image.

I had a problem with it where it would not boot Ubuntu ISOs and many other Linux ISOs unless Partition 2 was exactly 32MB in size - this is now fixed.

You can find the .zip file in the Latest Beta folders.

Instructions

1. Download the ventoy-1.0.46-windows.zip file

2. Drag-and-Drop the file onto the \e2b\Update agFM\Add_Ventoy.cmd  windows batch file using Explorer - answer Y to copy the files across.

You should now have the latest version of Ventoy for Easy2Boot

Please report any issues.

I will update the E2B server release version to this version in  a few days if no issues are reported.


Tuesday 29 June 2021

agFM v1.72d Beta now available

 For those of you following my last few blog posts, agFM v1.72d includes the latest version of the Ventoy disk image scheme.

I have tidied it up a bit and renamed some files so that they appear first in the Ventoy menu system.

Also a new .mnu file is added to the \_ISO\MAINMENU folder to allow you to restore the original E2B partitions from a Legacy boot. This is quicker than booting to E2B - then Ventoy - then grubfm_multiarch.iso - then selecting 'Restore agFM Partition 2'. It also does not need to reboot.

So as not to clutter up the MAINMENU, I have not added three menu entries to switch in the Ventoy disk image files from E2B - you can just run agFM from the E2B menu and then switch in one of the Ventoy disk image files from the agFM Legacy menu.

To try it just extract the agFM download files onto Partition 2 (make sure you have the original agFM partition on Partition 2 first - not the Ventoy 32MB partition 2!).

Monday 28 June 2021

Ventoy+Kaspersky Secure Boot bypass now available

agFM v1.73c Beta now makes 3 Ventoy 32MB images when you run the Make_Latest_Ventoy_Partion_Image.cmd script.

1. Ventoy with Secure Boot/MokManager

2. Ventoy (no Secure Boot)

3. Ventoy with Kaspersky shim - can Secure Boot as long as the Kaspersky shim is not blacklisted in the BIOS UEFI DBx blacklist database (same as used by agFM).

Please update to v1.73c if you want to try out this new Kaspersky Secure Boot Bypass version of Ventoy.


Ventoy images are now made with and without Secure Boot

The standard Ventoy image that was made by the Make_Latest_Ventoy_Partion_Image.cmd script contained the Secure Boot enabled EFI boot files.

However, this version does not boot on many systems (such a Lenovo laptops, etc.) - I get a 'Linpus Lite' boot option but it won't Secure Boot or load MokManager.

So I have now modified the script to produce two Ventoy images, one with the Secure Boot (InSecure Boot) files and the other image which does not support Secure Boot. which is much more compatible (but won't work if Secure Boot is enabled in the BIOS).

I also find that MokManager does not work on many Secure BIOSes (crashes/hangs/doesn't load) which is why E2B does not use it.

So you can now you pick which Ventoy image you want (no need for two Ventoy USB drives).


Note: v1.72c now makes 3 images, the last one includes the Kaspersky Secure Boot bypass mechanism so you can Secure Boot to Ventoy without needing MokManager.

Update Instructions

First follow the previous blog article, then...

1. Download the latest agFM v1.72b Beta version

2. Extract it to Partition 2 of your E2B USB drive

3. Run \e2b\Update agFM\Make_Latest_Ventoy_Partion_Image.cmd to make the new Ventoy image files.

You should now have two img files on Partition 2:


The startup_default.cfg file will also be updated, but you will need to change your startup_menu.txt file if you have made your own  agFM startup menu.


if [ -f (${user})/ventoy.disk.img -a -f (${user})/Switch_Ventoy.cfg ] ; then
menuentry "Ventoy image (Secure Boot) [Ptn2=32MB image]" --class=img {
set vdisk=ventoy.disk.img
grubfm_open "(${user})/Switch_Ventoy.cfg"
}
fi
if [ -f (${user})/ventoyNS.disk.img -a -f (${user})/Switch_Ventoy.cfg ] ; then
menuentry "Ventoy image (no Secure Boot) [Ptn2=32MB image]" --class=img {
set vdisk=ventoyNS.disk.img
grubfm_open "(${user})/Switch_Ventoy.cfg"
}
fi

Sunday 27 June 2021

Easy2Boot now supports all Official Ventoy images!

The current 'Ventoy for Easy2Boot' version is a modified version of Ventoy v1.0.35. It is a modified, re-compiled version of the 'official' Ventoy v1.0.35.

The E2B version of Ventoy is exactly the same as the official version but the size check of the 32MB Partition 2 has been removed so that we can have a Partition 2 greater than the paltry 32MB installed by the Ventoy tool.

agFM v1.72a can now switch-in any 'official' Ventoy Partition 2 image file in-place of the agFM partition.

You can make the image file simply by running the Make_Latest_Ventoy_Partition_Image.cmd file:

This will automatically download and extract the latest 32MB ventoy.disk.img file from the Ventoy github folder.

Once switched-in, you now have an 'official' Ventoy USB drive with exactly the same partitions that the Ventoy utility would create. All the Ventoy code is 100% official, unaltered and original.

Update Instructions

This assumes you have E2B v2.09 installed already with agFM and Ventoy.

1. Ensure that your E2B USB drive does not have any .imgPTN partition image already switched in - the easiest way to check this is to run \_ISO\SWITCH_E2B.exe - if the 'Restore E2B Partition(s)' button is NOT greyed-out then click it to restore the original E2B partitions.

2. Download the latest v1.72a Beta zip file of agFM and extract all the files to Partition 2 of your E2B USB drive - this overwrites the existing agFM files.

3. Run \e2b\Update agFM\Make_Latest_Ventoy_Partition_Image.cmd
    from Partition 2 of the USB drive - if prompted to download the grubfm iso file - answer 'Y'.


4. Run \MAKE_THIS_DRIVE_CONTIGUOUS.cmd

If you have used your own \boot\grubfm\startup_menu.txt file for your agFM menu, you will be warned and you will need to add an extra menu entry into your startup_menu.txt file. If you are just using the startup_default.cfg file then this will be updated for you automatically.

The file \ventoy.disk.img on the second partition is the new Ventoy image - do not move this file - it must be located on Partition 2.

If you do not already have ImDisk installed on your Windows system, you can download it from here.

Usage

To switch-in the new Ventoy partition image into Partition 2 we use the agFM menu entry.

To switch back to the original agFM partition 2, we need to first boot to the grubfm iso (which is on the root of the E2B Partition 1) - once booted to grubfm - a special menu is loaded where you can restore the original partitions.

Note: Ventoy does not contain dd and so we cannot use the grub2 dd command to change the disk partition table so we must boot to grubfm which does support dd.

Step 1 - Switch-in the Ventoy Partition image

1. Boot to agFM (either Legacy\MBR boot to the E2B menu and then load agFM or UEFI-boot direct to agFM on Partition 2.

2. Select the new 'Official Ventoy' menu entry - the image file will be switched in and the system will reboot.


You can now Legacy\MBR boot to the new Ventoy image via the E2B Legacy menu or directly UEFI boot to Ventoy.

Note: Do not attempt to switch-in any .imgPTN partition images whilst in this state! Do not attempt to 'fix' the drive if prompted by E2B.

Step 2 - Restore the original agFM

1. First boot to Ventoy and then select the grubfm_multiarch.iso entry:


You should now see a new grubfm menu:
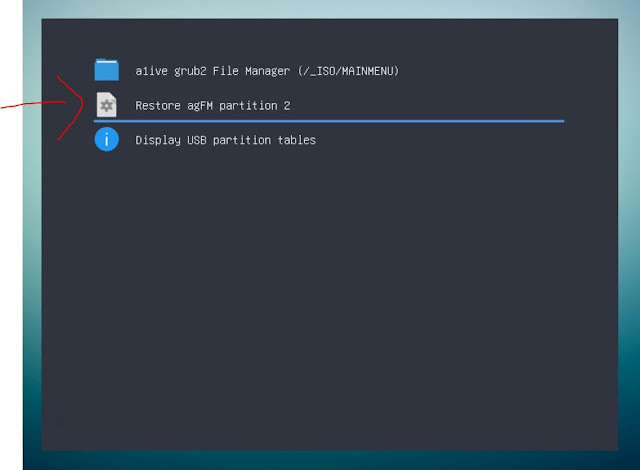
grubfm multiarch will load the user menu in the Ventoy partition.

Note: Do not delete the grubfm multiarch ISO file from the root of the E2B USB drive. You can copy it to a 'normal' menu folder as well, if you find it useful.

2. Select the 'Restore agFM partition 2' menu entry - confirm by pressing 1 and ENTER when prompted. The original partitions will be restored and Partition 2 will contain the agFM (and old Ventoy) files. The system will reboot.

Future Ventoy updates

When a new version of Ventoy is released, simply run the
\e2b\Update agFM\Make_Latest_Ventoy_Partition_Image.cmd script again.

If a later version of grubfm multiarch iso is released by a1ive, you can update the ISO file if you like, it should still work OK.

Please let me know if you find any issues.

Thursday 17 June 2021

eBooks updated

  •  eBook #4 - agFM - now v1.21
  • Getting started with E2B - now v2.20
  • How to make $1000 a month from the internet - now v1.03

To obtain your free update, use the original email that was sent to you on initial purchase.

Purchase eBooks from here. Most are just $5 each and you get a 10% discount on all of them if you buy more than one! Read some reviews to see what others have to say before you buy.

'How To' articles on easy2boot.xyz

 Visit https://easy2boot.xyz/blog/  for new articles as well as the posts in this blog which are listed here.