By using the AOMEI Windows PE Builder (free), we can quickly build a useful 32-bit or 64-bit WinPE ISO in just a few minutes and with just a few clicks.
Note: I recommend building first the 32-bit ISO because the 64-bit version will not contain WoW64 and so will not be able to run 32-bit applications such as PortableApps (but you can add Desktop shortcuts to 32-bit and 64-bit apps in the \AIO folder using PEStartUp).
Also, because the WinPE has no added extra Windows components, some added portable applications (such as Chrome, Opera and Mozilla, etc.) may not run correctly (e.g. 'couldn't load XPCOM' error). The provided QtWeb browser Desktop link does work however.
2. Ensure you have the PortableApps PEStartup AIO folder and the TheOven_Startup.cmd file on your E2B USB drive. See RMPrepUSB Tutorial 143 for more details.
E2B USB drive
\TheOven_Startup.cmd
\AIO (folder)
3. Download the RunPEStartup.cmd file (e.g. to your Windows Desktop)
4. Run AOMIE Windows PE Builder and click Next
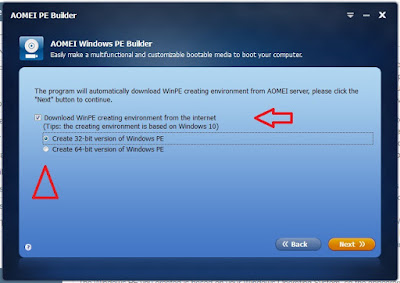
5. Select 'Download WinPE' and the select either 32-bit (recommended for first attempt) or 64-bit.
Note that 32-bit WinPE will only run 32-bit applications and 64-bit WinPE will only run 64-bit applications.
Only the 64-bit version will contain UEFI boot files.
The English (USA) SKU seems to be used.
7. Choose applications from the available options. 64-bit versions will be used if you have picked 64-bit Windows WinPE.

8. Change the Desktop folder name (default = 'My Tools') and add RunPEStartup.cmd by clicking the 'Add File' icon.
Note: The current version has a bug - the Desktop folder is always called 'UserTools'.


9. Now choose the 'Export ISO File' option and click 'Next' to start the download and build your WinPE ISO.

10. Now copy the ampe.iso file to your E2B drive, rename it to something more suitable and boot.
If you want it to be a 64-bit UEFI bootable file, convert it to a FAT32 .imgPTN file first (see below).
11. The WinPE Desktop will contain a 'UserTools' folder shortcut.
Run the RunPEStartup.cmd file inside it and your Desktop will be magically enhanced:


You will now have your chosen Desktop wallpaper and some new Desktop icons.
You can change the new icons and wallpaper using the PEStartup shortcut, there is no need to rebuild the ISO again.
You can run\add more portable apps using PortableApps (32-bit WinPE only).
You can add portable .exe files (32-bit and 64-bit) to the \AIO folder and use PEStartup to create Desktop shortcuts for them. See RMPrepUSB Tutorial 143 for more details.
Note: I recommend building first the 32-bit ISO because the 64-bit version will not contain WoW64 and so will not be able to run 32-bit applications such as PortableApps (but you can add Desktop shortcuts to 32-bit and 64-bit apps in the \AIO folder using PEStartUp).
Also, because the WinPE has no added extra Windows components, some added portable applications (such as Chrome, Opera and Mozilla, etc.) may not run correctly (e.g. 'couldn't load XPCOM' error). The provided QtWeb browser Desktop link does work however.
Quick Instructions
1. Download and install AOMEI Windows PE Builder2. Ensure you have the PortableApps PEStartup AIO folder and the TheOven_Startup.cmd file on your E2B USB drive. See RMPrepUSB Tutorial 143 for more details.
E2B USB drive
\TheOven_Startup.cmd
\AIO (folder)
3. Download the RunPEStartup.cmd file (e.g. to your Windows Desktop)
4. Run AOMIE Windows PE Builder and click Next

5. Select 'Download WinPE' and the select either 32-bit (recommended for first attempt) or 64-bit.
Note that 32-bit WinPE will only run 32-bit applications and 64-bit WinPE will only run 64-bit applications.
Only the 64-bit version will contain UEFI boot files.
The English (USA) SKU seems to be used.
7. Choose applications from the available options. 64-bit versions will be used if you have picked 64-bit Windows WinPE.

Note that the BootIce version is an older 1.3.2 version. The latest\best is 1.3.4.
8. Change the Desktop folder name (default = 'My Tools') and add RunPEStartup.cmd by clicking the 'Add File' icon.
Note: The current version has a bug - the Desktop folder is always called 'UserTools'.


Note that when you boot to WinPE, the WinPE Desktop will contain a folder named 'UserTools' and inside that folder will be the RunPEStartup.cmd file.
You can add in more executables and more folders (which will go under UserTools).
If you have chosen to build a 64-bit WinPE OS, you must only add 64-bit executables.
If you have chosen to build a 32-bit WinPE OS, you must only add 32-bit executables.
You can also add in drivers (load an INF file from a folder containing the drivers). I have not tested this myself though.
9. Now choose the 'Export ISO File' option and click 'Next' to start the download and build your WinPE ISO.

10. Now copy the ampe.iso file to your E2B drive, rename it to something more suitable and boot.
If you want it to be a 64-bit UEFI bootable file, convert it to a FAT32 .imgPTN file first (see below).
11. The WinPE Desktop will contain a 'UserTools' folder shortcut.
Run the RunPEStartup.cmd file inside it and your Desktop will be magically enhanced:


You will now have your chosen Desktop wallpaper and some new Desktop icons.
You can change the new icons and wallpaper using the PEStartup shortcut, there is no need to rebuild the ISO again.
You can run\add more portable apps using PortableApps (32-bit WinPE only).
You can add portable .exe files (32-bit and 64-bit) to the \AIO folder and use PEStartup to create Desktop shortcuts for them. See RMPrepUSB Tutorial 143 for more details.
Tips
- Name the ISO as .isodef if 32-bit or .iso64 if 64-bit.
- Use SHIFT+F10 to open a WinPE command console.
- If you extract the \sources\boot.wim file from the ISO, you can copy it to your E2B drive and boot from it directly - the ISO is not required and it saves about 13MB.
- Some ready-built WinPE ISOs will automatically load \TheOven_Startup.cmd for you.
How to make a .imgPTN file for 64-bit UEFI booting
- Follow the instructions above to make a 64-bit ISO.
- Extract the ISO contents to a new folder on your Desktop
- Copy the \AIO folder from you E2B drive to the new folder
- Because the PortableApps application is 32-bit only, it will not run, so you can delete the \AIO\Tools\PortableApps folder
- Copy the \TheOvenStartup.cmd file from the root of the E2B drive to your new folder
- Now drag-and-drop the new folder onto the .MPI_FAT32 Desktop shortcut to make a UEFI-bootable .imgPTN64 file. Tip: When prompted, increase the default size of the .imgPTN file so that you can add more 64-bit portable apps to the partition, so that you can use PEStartup to create Desktop shortcuts for them.
No comments:
Post a Comment