This method has the advantage that you can check what the auto-generated ComputerName+SerialNumber is going to be before the install is actually started and can then change it if required.
The Sample .mnu file 'WIN10_Prompt_for_PCNAME_and_UNAME.mnu' will allow the user to specify the UserName and ComputerName before the Windows Install ISO is run. It then copies your XML file to a BLANK.XML file and modifies it to use the new User and Computer Names that you have specified.
This is useful because you don't need to choose an XML file or an ISO file as they are already pre-defined in the .mnu file. You just boot, enter in the UserName and ComputerName that you want, and the rest of the build is fully automated. If you are using SDI_CHOCO, it even adds drivers and applications automatically too.
However, if you want the ComputerName to include the System Serial number (for instance), you would have to carefully type it in manually when prompted (assuming you knew what it was!).
I have now made a new version of this .mnu file so that it will automatically modify the XML file's ComputerName field with the System Serial number (e.g. PC-1234546) for you! It works in a very similar way to the WIN10_Prompt_for_PCNAME_and_UNAME.mnu, but two boots are required.
Tip: If you run \_ISO\docs\SysInfo\sysinfo2.hta from the E2B drive under Windows, it will list the DMI values held in the Mainboard of the system.
It works in 2 stages like this:
Phase 1
Boot to E2B on the target system and run GET_biosinfo.cmd.IMA - this is a FreeDos bootable floppy disk image.
This interrogates the BIOS DMI values and writes them to a \BIOSINFO.cmd file on the E2B drive. This only takes a few seconds to run.
The system will reboot when you press a key...
Phase 2
Now reboot to E2B again and pick the 'Install Win10 xxxx' option from the E2B menu system.
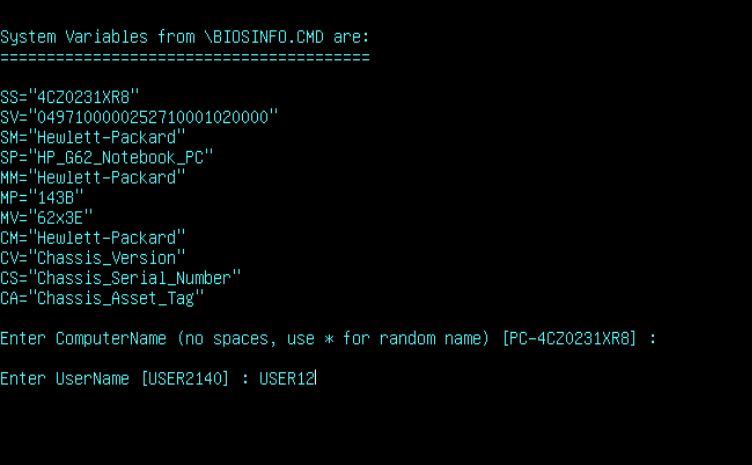
The information from the \BIOSINFO.cmd file will be retrieved by the code in the .mnu and you will just need to put in a UserName and press ENTER to accept the ComputerName. Here is an example screen:

You will need a specially modified XML file (you can use the example at "\_ISO\WINDOWS\WIN10\SAMPLE XML FILES\ZZDANGER_Auto_WipeDisk0_Win10ProUS_UNAME_PCNAME.xml") and also a BLANK.XML file is required. The way to set it up was described in a previous blog post. This new process is exactly the same, you just need to run the FreeDos floppy disk image first to collect the BIOS information before you run the Win10 Install.
Unfortunately, it is not possible to collect the Ethernet MAC address under FreeDOS, so we can only collect BIOS DMI information.
The new .mnu file will also be added to the Sample .mnu Files folder in the next version of E2B.
The FreeDOS floppy image (Get_BIOSINFO.CMD.ima) is downloadable from the E2B Alternate Download Areas.
Full details are in eBook #2.
The Sample .mnu file 'WIN10_Prompt_for_PCNAME_and_UNAME.mnu' will allow the user to specify the UserName and ComputerName before the Windows Install ISO is run. It then copies your XML file to a BLANK.XML file and modifies it to use the new User and Computer Names that you have specified.
This is useful because you don't need to choose an XML file or an ISO file as they are already pre-defined in the .mnu file. You just boot, enter in the UserName and ComputerName that you want, and the rest of the build is fully automated. If you are using SDI_CHOCO, it even adds drivers and applications automatically too.
However, if you want the ComputerName to include the System Serial number (for instance), you would have to carefully type it in manually when prompted (assuming you knew what it was!).
I have now made a new version of this .mnu file so that it will automatically modify the XML file's ComputerName field with the System Serial number (e.g. PC-1234546) for you! It works in a very similar way to the WIN10_Prompt_for_PCNAME_and_UNAME.mnu, but two boots are required.
Tip: If you run \_ISO\docs\SysInfo\sysinfo2.hta from the E2B drive under Windows, it will list the DMI values held in the Mainboard of the system.
It works in 2 stages like this:
Phase 1
Boot to E2B on the target system and run GET_biosinfo.cmd.IMA - this is a FreeDos bootable floppy disk image.
This interrogates the BIOS DMI values and writes them to a \BIOSINFO.cmd file on the E2B drive. This only takes a few seconds to run.
The system will reboot when you press a key...
Phase 2
Now reboot to E2B again and pick the 'Install Win10 xxxx' option from the E2B menu system.
The information from the \BIOSINFO.cmd file will be retrieved by the code in the .mnu and you will just need to put in a UserName and press ENTER to accept the ComputerName. Here is an example screen:
You will need a specially modified XML file (you can use the example at "\_ISO\WINDOWS\WIN10\SAMPLE XML FILES\ZZDANGER_Auto_WipeDisk0_Win10ProUS_UNAME_PCNAME.xml") and also a BLANK.XML file is required. The way to set it up was described in a previous blog post. This new process is exactly the same, you just need to run the FreeDos floppy disk image first to collect the BIOS information before you run the Win10 Install.
Unfortunately, it is not possible to collect the Ethernet MAC address under FreeDOS, so we can only collect BIOS DMI information.
The new .mnu file will also be added to the Sample .mnu Files folder in the next version of E2B.
The FreeDOS floppy image (Get_BIOSINFO.CMD.ima) is downloadable from the E2B Alternate Download Areas.
Full details are in eBook #2.
No comments:
Post a Comment