New: For a much easier method than the one detailed below, use WinToUSB to make a bootable VHD, see this blog post.
The method below has now been deprecated. E2B can directly boot from VHD files now and WinToUSB provides a much easier way to create a bootable VHD.
Another method
The direct boot (NTBOOT) feature added to E2B v1.69 will allow you to copy WindowsToGo 8/10 OS VHDs to any normal menu folder on the E2B drive (e.g. \_ISO\WIN or \_ISO\MAINMENU) and boot from them. You can have as many Virtual Hard Disk (VHD) files as you can fit on your E2B USB drive and they don't need to be contiguous either!
In order to boot to a VHD, we need the boot files to be on an ordinary (non-virtual) partition. These boot files will consist of \bootmgr and a \boot folder containing font files and the BCD. The BCD specifies the location of the VHD so that Windows can mount it as a virtual hard disk and access the Windows system files inside it.
NTBOOT creates a virtual floppy in RAM that contains these boot files. To boot using NTBOOT, the VHD must contain a completed install of the Windows OS. If you try to use NTBOOT to boot a VHD that contains a freshly copied Windows Install/Setup/Sysprep'ed image, the first stage of Windows Setup will fail because Setup will not be able to update the \boot\BCD file at the end of the first stage (as there isn't one on the real boot drive, or if there is it will probably not be the correct one!).
Here are the steps for how to use WinNTSetup to create a VHD on an NTFS E2B USB drive. I used a Windows 8.1 64-bit system to run WinNTSetup on.
First make sure that the USB drive partition is marked as Active (bootable).
1. Delete or rename any existing \boot folder and \bootmgr file on the E2B USB drive. These can be restored later, but for now we need to get rid of them. If you find that Windows won't let you delete them, install 'Take Ownership' which will allow you to delete them after it changes the ownership rights.
2. Download WinNTSetup (I used 380RC2 which worked on Win10 Preview and Win8.1) and extract to an empty folder on your Windows system.
3. Run WinNTSetup.exe and click the VHD >>> button.
Create a VHD on the E2B USB drive - e.g. \_ISO\MAINMENU\Win10Previewx86.VHD.
For the moment you should not move the VHD or rename it once you have created it on the E2B USB drive.

I have only tested Fixed Size (Recommended) VHD's so far...
4. Attach the VHD if it was not already attached in step 3. The VHD is usually mounted as Z: once it is attached, but not always.
5. Find the Windows Install ISO file that you want to use as the source and extract from it the \sources\install.wim file to your hard disk (e.g. C:\temp\install.wim) - I used 7Zip for this.
6. Now set up the WinNTSetup fields as shown below:

H: was my E2B USB drive - do NOT click the F=Format button that is next to it!
You can choose what Edition you want if there is more than one in the install.wim file.
8. Set any Tweaks you wish (if you are using Win10, I suggest you don't add any tweaks until WinNTSetup has been fully tested with Win10).
9. Click on the Setup button...
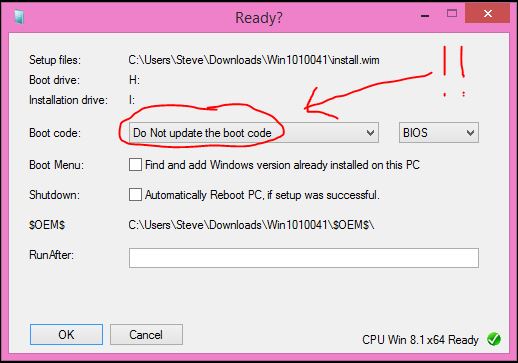
(note that in this screenshot, I: was my mounted VHD drive)
This next bit is VERY IMPORTANT!
Set the Boot code: option to: 'Do Not update the boot code'
This prevents WinNTSetup from overwriting the grub4dos boot code that is on our E2B USB drive!
As we cannot UEFI-boot from an NTFS drive and it is not supported by NTBOOT, we can set the boot option to BIOS rather than ALL. (For UEFI-booting we need to create a .imgPTN file).
Click OK to start the file copy process to the VHD.
10. After the OS installation files have been copied to the VHD and the boot files have been added to the E2B USB drive, Detach the VHD by using the VHD >>> button and select the same .VHD file on the E2B drive as before after you click on Detach.
11. Lastly, we need to copy the \_ISO\docs\Sample mnu files\Boot Windows bootmgr.mnu file to the E2B \_ISO\MAINMENU folder.
Notice that on the E2B USB drive, WinNTSetup should have now written a new \boot folder (with a new BCD file which points to our VHD file) and the \bootmgr file, to the root of the E2B USB drive.
Booting up
1. For the first boot, we MUST use the 'Boot Windows (\bootmgr)' menu entry because Setup will want to update a valid BCD entry on the first boot.
2. Windows Setup should proceed normally and each time it reboots, you should use the same bootmgr menu entry again (although you could use the VHD menu entry after this first boot stage has completed).
3. After answering the usual Windows Setup questions, you should now be able to boot to the VHD by using the VHD menu entry (which should be listed in whatever menu folder you put the VHD file in). You will need to update your E2B USB drive if it contains a version earlier than E2B v1.69.
Note1: For direct booting from VHD using NTBOOT to work, you may need to copy the \bootmgr file to the \_ISO\e2b\grub\DPMS\NTBOOT.MOD folder if it is not present on the E2B drive. If bootmgr cannot be found in the NTBOOT.MOD folder, E2B will try to use \bootmgr instead (if it is present).
Note2: Only certain Windows 7/8/8.1 versions of bootmgr will work, do not use the Windows 10 version of bootmgr as it will give a BSOD.
Bootmgr versions that work are of sizes 398,156; 427,680; 398,356; 404,250; 409,154; 403,390 or 400,517 bytes.NTBOOT works by creating a floppy disk in RAM containing a \boot\BCD file and setting the virtual floppy disk as the current 'root' drive. NTBOOT changes the BCD so that it contains the correct path to the VHD file. It then runs bootmgr which will use the BCD inside the virtual floppy disk to find and load the VHD (or .WIM) file.
Tidying up
1. You now should be able to move the VHD file to another E2B menu folder and it should boot OK using the NTBOOT VHD menu entry (but not the old bootmgr menu entry).2. Once you have confirmed that you can directly boot to the VHD file from E2B using NTBOOT, you can delete the \boot folder and the \bootmgr file (and restore the original ones if any were present before).
3. If you wish, you can remove the bootmgr .mnu file from the MAINMENU folder (though the menu entry will only be displayed if a \bootmgr file is present on the E2B partition).
Using 2 partitions
If your E2B drive is a 'Fixed-Disk' type and has two partitions, you can keep all your VHD files on the second partition. This is useful because they do not have to be contiguous - otherwise running WinContig on your E2B partition may take a while each time you add a large VHD file to it and then add a new ISO file (say)!Copy the PTN2_AUTO.mnu file from the \_ISO\docs\Sample mnu files\E2B Menus folder to an E2B menu folder (e.g. \_ISO\MAINMENU), so that you can select any file in the second partition's \_ISO folder. You can modify the .mnu file so it uses a different folder or make multiple .mnu files (e.g. one for Win8 VHDs, one for Win10 VHDs, etc.).
Adding more VHD files
To add another VHD for Win8/10 just 'rinse and repeat'.
Notes
It is important that the VHD file is located on the E2B USB drive when you run WinNTSetup, because WinNTSetup will specify the VHD file's path in the BCD. Do not to move or rename the VHD file until the Windows install and OOBE has been fully completed.I had problems using BootIce to modify the BCD for a Win10 install (I got BSOD 0xc000000f on first boot! Maybe it was an old version?). By ensuring the VHD is on the E2B USB drive, we should not need to use BootIce to modify the BCD.
I used VBox+DavidB's VMUB utility to test this process. The VM should be set up for the appropriate Windows OS that you are testing (e.g. set the VM for Windows 8.1 64-bit if you are going to create and boot from a VHD with Win8.1 x64 in it). Set the VM to have lots of RAM and over 128MB of graphics memory. You should always boot via VMUB to ensure the VM works correctly as it needs full read/write access to the USB drive.
Some BIOSes are not able to access sectors beyond 137GB on a USB drive (this is a very common bug!). Try to ensure that the E2B and VHD files are within 137GB from the start of the USB drive. If you are using 2 partitions, then partition 2 should end before 137GB (e.g. ptn1=60GB, ptn2=60GB).
You can try loading the grub4dos USB 2.0 driver which will fix this BIOS bug (find it in the Utilities menu) and use a USB 2.0 port for your E2B USB drive. However, many modern USB 2.0 controllers are not supported by the grub4dos driver - but you may be lucky! VBox+VMUB does not have this bug (it treats the E2B USB drive as a hard disk anyway), so test using VBox if you have problems with a real machine.
I have not yet experimented with other types of VHD files (dynamic, VHDX, etc.).
If you get a message similar to the one below during the first boot to Setup, it is probably because Setup does not like something about the \boot\BCD file on the E2B USB drive.
This is usually because the boot partition (in this case the E2B partition) is not Active (marked as Bootable) - Use Windows Disk Management - right-click - Mark partition as Active.
That is why I recommend you delete any old \boot folder before starting the install.

A possible workaround for this problem, is to type SHIFT+F10 at this point to open a Windows command console and then go to the C:\Windows\System32\oobe folder and type MSOOBE and then complete the end user Out-of-Box experience. After it tries to reboot, you may get the same message again. Reboot and repeat the process (run MSOOBE a second time) and again specify a ComputerName and User account name. If the error happens a 3rd time, just click OK to reboot. With luck, the OOBE setup should now complete with no further problems!
Thanks, very helpful ;)
ReplyDeletehi,
ReplyDeleteis the windows a sort of live or can i install software and save file as it is normally installed and keep them after a reboot?
WindowsToGo is full Windows. Just same as if you installed to a hard disk. You can add apps, changes, etc. just like any other Windows. It just runs from a USB stick on a VHD. Win8/10 has USB 3.0 drivers, Win7 only has USB 2.0 drivers so use a USB 2.0 port for Win7.
ReplyDeleteJust make sure your VHD is large enough so you don't run out of space!
very good Steve
ReplyDeletethat is like boot any real windows but from USB
Is there any facility to load this into a virtual partition so we can boot uEFI systems from this? Or is it MBR-only?
ReplyDeleteNTBOOT direct VHD booting is via bootmgr and so is MBR-only.
ReplyDeleteFor UEFI-booting you need a FAT32+NTFS partition arrangement.
FAT32 for UEFI-booting and NTFS to hold the OS.
You can do this with E2B using partition images (.imgPTN files).
It will only work with fixed-disk type of USB drive because Windows will only mount the first partition of a Removable USB drive.
See http://www.easy2boot.com/add-payload-files/wintogo/
thanks - i meant in the sense of 'for removable drives' as the other steps i used previously were MBR-only as well. still, nice to know!
ReplyDeleteTh link I gave does have a solution for Win7 and 8 on Removable drives, but it doesn't work for Win8.1 and has limitations (you must MBR-boot via clover).
ReplyDelete