I have had a few enquiries about automating Windows 7/8/8.1 installs using an XML file recently when using Easy2Boot and an unmodified Windows Install ISO from a USB drive, so I thought I would give a few pointers in this blog.
First you need to decide if you are going to install directly from an ISO or from a .imgPTN file (made from an ISO).
Note: E2B v1.82+ includes a new 'SDI_CHOCO' feature. This allows you to install drivers, applications and Windows Updates automatically.
First you need to decide if you are going to install directly from an ISO or from a .imgPTN file (made from an ISO).
Note: E2B v1.82+ includes a new 'SDI_CHOCO' feature. This allows you to install drivers, applications and Windows Updates automatically.
Update: E2B v2 includes agFM which you can UEFI-boot to and directly run a Windows Install ISO and pick an XML file. This means you do not need to make an .imgPTN file. Also, a removable USB drive is not required, and USB E2B drive should work on most systems.
The following section was written for E2B v1 USB drives
The summary below may help you decide which E2B method you want to use:

The easiest way to do this is to use this very handy online webtool Windows AFG - click here for Win7, or here for Win8 or here for Win8.1 (there is also a Win10 page). You may also find their Tutorial about the XML settings useful here.
Just pick your options and then download the AutoUnattend.xml file (note do NOT replace the 100K AutoUnattend.xml file that is already in the root of the E2B drive - this is needed by E2B!!!).
If you find the Windows AFG saves you hours of work, please consider making a donation.
There are a few additions to make to the Windows AFG generated file, however this can be easily added and configured using the XMLtoE2B Windows utility (see also below).

If the XML file already contains a <component name="Microsoft-Windows-Setup" section, then just add the XML lines between <RunSynchronous... and </RunSynchronous> and change the 'Order' number(s) if required. Look at one of the E2B XML files for an example.
Use LOADISONP.CMD instead of LOADISO.CMD if you don't want the 'Repair Windows' blue console window prompt (NP=NoPrompt).
Rename it and place the XML file in the same folder as the Windows ISO (or the root of the .imgPTN image). If it is added to a .imgPTN file it must be named \AutoUnattend.xml and the E2B drive should be of the Removable type. If using .imgPTN files and your E2B drive is a Fixed\Hard Disk - see this page. If the XML file does not contain a WinPE pass, name the file \Unattend.xml instead of \AutoUnattend.XML.
Note: If you add this RunSynchronous code section to an XML file that is used with a .imgPTN file, it will not cause a problem - you will just see a small blue console flash up and then quickly disappear when it cannot find the LOADISO.CMD file.

You may find that you are still prompted to select one of the various OS's editions contained inside the Install.wim, even if you have included a Product Key. To prevent this screen from appearing, you will need to specify an <InstallFrom> section which goes just under the <OSImage> tag line...


Windows 8.1 Pro = index 1
Windows 8.1 = index 2
Tip: You can also use the XMLtoE2B.exe utility to display the install.wim contents.
The Windows AFG seems to get these right in the ones I have tested so far.
If the language set by the XML file is not supported by the ISO, then it will prompt you to select the country/language. Use the drop-down boxes to see what languages the ISO supports.
Example: If your ISO was an English (UK-only) version, then the ISO may not support other languages (e.g. en-US), so you will need to use en-GB for all settings.


If you get an error during Setup, look at the X:\Windows\Panther\Setupact.log file. Press SHIFT+F10 when you see the Setup error message and then use NotePad to view the file. If the error occurred during partitioning, look at the other .log files in that same folder.
If no X:\Windows\Panther folder exists, it usually means that the XML file was not found, look in X:\Windows\Setupact.log for clues.

Note: E2B v1.82+ includes a new 'SDI_CHOCO' feature. This allows you to install drivers, applications and Windows Updates automatically.
Using the WAFG web page and then my XMLtoE2B utility, makes it very quick and easy to create automatic unattended XML files.
The Windows utility XMLtoE2B.exe will convert the output of the Windows Answer File Generator to the correct format for an automated install. The XML file can be used in E2B or it can be used outside of E2B.
XMLtoE2B will also allow you to add in GPT disk configurations for use with UEFI .imgPTN images (or any other Disk Configuration). XMLtoE2B (without a licence file) is available to download from the Easy2Boot Alternate Download Area. I will send a licence file to anyone who has made a donation of £10 or more, on request.
Note: Top buttons no longer work - go to www.windowsafg.com

.ISO installs
- ISO installs only work if you are using a Removable USB drive (or you also connect a Helper Flash drive - or use a Zalman/IODD with a Helper.RMD file)
- Easy to change/add ISOs and .XML files
- Requires the special E2B RunSynchronous 'LOADISO.CMD' XML portion in the XML file.
- Using an XML file, you can fully automate the install
.imgPTN installs
- Will work from any USB drive (Fixed disk or Removable)
- Supports Secure Boot UEFI-installs
- You need to create a .imgPTN file from each ISO
- XML files must be added to the .imgPTN file
- Does NOT require the special E2B RunSynchronous 'LOADISO.CMD' XML portion to be added
- If your E2B USB drive is a Fixed Disk\Hard Disk type, then you will need to edit the boot.wim file which is 'awkward' (or use the Split_WinISO utility which automates it for you).
In E2B v1.68+ you will find an example XML file for use with .ISO files at \_ISO\WINDOWS\WIN7\Win7Pro_Auto_WipeDisk0.xml. This fully automatically wipes disk 0 and then installs Win7 Pro with USA Central timezone. The only prompt is for the ComputerName near the end of the install.
There is also an English UK Win8.1 Pro Retail automated install XML file in the WIN8 folder - AutoWipeDisk_Win8.1RetailPro_UK.xml. Again this only prompts the user for the ComputerName near the end of the build. Win8 and Win10 have similar ZZDANGER_AutoWipeDisk0_????.XML files.
There is also an English UK Win8.1 Pro Retail automated install XML file in the WIN8 folder - AutoWipeDisk_Win8.1RetailPro_UK.xml. Again this only prompts the user for the ComputerName near the end of the build. Win8 and Win10 have similar ZZDANGER_AutoWipeDisk0_????.XML files.

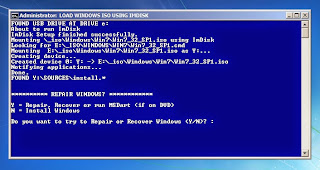
If you are using the .ISO install method, E2B v.1.68+ now contains LOADISONP.CMD ('NP'= No Prompt) - this is the same as LOADISO.CMD except that it does not prompt you to Repair or Recover Windows at the Blue Console window (<< see screenshot) - it just immediately starts the wipe and install with no user prompts. To suppress the 'Repair Y/N' prompt, change all occurrences of LOADISO.CMD to LOADISONP.CMD in the XML file.
Generate an XML file using the Windows Answer File Generator

The Windows AFG web form. Always set SkipMachineOOBE to false.
The easiest way to do this is to use this very handy online webtool Windows AFG - click here for Win7, or here for Win8 or here for Win8.1 (there is also a Win10 page). You may also find their Tutorial about the XML settings useful here.
Just pick your options and then download the AutoUnattend.xml file (note do NOT replace the 100K AutoUnattend.xml file that is already in the root of the E2B drive - this is needed by E2B!!!).
If you find the Windows AFG saves you hours of work, please consider making a donation.
There are a few additions to make to the Windows AFG generated file, however this can be easily added and configured using the XMLtoE2B Windows utility (see also below).
Manual modifications of XML files for E2B
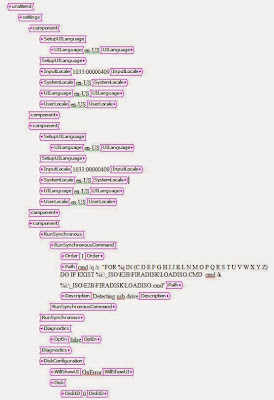
1. Add the RunSychronous 'LOADISO' code
If installing directly from an ISO you will need to add in the RunSychronous 'LOADISO' sections (twice, once for x86 and once for amd64) just below the <component name="Microsoft-Windows-Setup" ... line:
If the XML file already contains a <component name="Microsoft-Windows-Setup" section, then just add the XML lines between <RunSynchronous... and </RunSynchronous> and change the 'Order' number(s) if required. Look at one of the E2B XML files for an example.
Use LOADISONP.CMD instead of LOADISO.CMD if you don't want the 'Repair Windows' blue console window prompt (NP=NoPrompt).
Rename it and place the XML file in the same folder as the Windows ISO (or the root of the .imgPTN image). If it is added to a .imgPTN file it must be named \AutoUnattend.xml and the E2B drive should be of the Removable type. If using .imgPTN files and your E2B drive is a Fixed\Hard Disk - see this page. If the XML file does not contain a WinPE pass, name the file \Unattend.xml instead of \AutoUnattend.XML.
Note: If you add this RunSynchronous code section to an XML file that is used with a .imgPTN file, it will not cause a problem - you will just see a small blue console flash up and then quickly disappear when it cannot find the LOADISO.CMD file.
2. Suppressing the OS Edition selection menu

You may find that you are still prompted to select one of the various OS's editions contained inside the Install.wim, even if you have included a Product Key. To prevent this screen from appearing, you will need to specify an <InstallFrom> section which goes just under the <OSImage> tag line...

To ensure the Value is exactly correct, it should match what is listed in the Editions menu.
e.g. For Windows 8.1 Professional use 'Windows 8.1 Pro' (not 'Windows 8.1 Professional'). Windows 8 Core or Media Center will require a different XML file for this reason a well as needing a different Product Key.
Instead of a NAME key, it is possible to use the Index number of one of the images that is inside the wim file: e.g.
To find the correct Index number or DISPLAYNAME, you must check the [1].xml file inside the \Sources\Install.wim file. Typical Index numbers are:
Windows 7 Starter = 1
Windows 7 Home Basic = 2
Windows 7 Home Premium = 3
Windows 7 Professional = 4
Windows 7 Ultimate = 5
Windows 8 Pro = index 1
Windows 8 = index 2
Windows 8 = index 2
Windows 8.1 Pro = index 1
Windows 8.1 = index 2
Tip: You can also use the XMLtoE2B.exe utility to display the install.wim contents.
3. ComputerName
The ComputerName can be specified in the XML file under the <component name="Microsoft-Windows-Shell-Setup" section - e.g. <ComputerName>MyPC</ComputerName>.
If it is left blank as <ComputerName></ComputerName> then a 'random' name will be generated.
If you want to be able to enter your own computer name near the end of the build then you must remove the <ComputerName></ComputerName> line completely AND ensure that SkipMachineOOBE is set to false.
4. Product Keys
For Win8/8.1 you MUST specify a product key in the XML file.
The Windows AFG site also provides a comprehensive list of install-only Keys here.
Extra Product Key entries are required in the XML file for E2B
For Win8/8.1, the two extra Product Key entries need to go just inside the <UserData> sections just above the <FullName> lines.

So, the same Product Key should appear FOUR TIMES in the one XML file.
Note: The XML format for the product key is different in the lower part of the XML file - there is no <Key></Key> tags (!!) so the last two entries will be in the format of <ProductKey>xxxxx-xxxxx-xxxxx-xxxxx-xxxxx</ProductKey>.
If your ISO does not normally require a Product Key and you cannot find a generic install key that works, simply install from the ISO\DVD in the normal way (e.g. convert to a .imgPTN file or boot from DVD or a VM) and then use NirSoft ProduKey to display the actual generic product key that was used. You can then use the same key in your XML file.
<component name="Microsoft-Windows-International-Core-WinPE" section may need attention. The UserLocale value can be your local language (e.g. en-GB or fr-CA) but the other settings should be in the main 'system' language (e.g. en-US or fr-FR).
The Windows AFG site also provides a comprehensive list of install-only Keys here.
Suitable install-only keys can also be found in the \_ISO\WINDOWS\WIN8\CHOOSE FROM A LIST.key file.
If you use an incorrect Product Key then the install will produce an error! Even if the source you are using does not normally require a Product Key to be entered, the correct one may be required in the XML file.
Extra Product Key entries are required in the XML file for E2B
For Win8/8.1, the two extra Product Key entries need to go just inside the <UserData> sections just above the <FullName> lines.

So, the same Product Key should appear FOUR TIMES in the one XML file.
Note: The XML format for the product key is different in the lower part of the XML file - there is no <Key></Key> tags (!!) so the last two entries will be in the format of <ProductKey>xxxxx-xxxxx-xxxxx-xxxxx-xxxxx</ProductKey>.
If your ISO does not normally require a Product Key and you cannot find a generic install key that works, simply install from the ISO\DVD in the normal way (e.g. convert to a .imgPTN file or boot from DVD or a VM) and then use NirSoft ProduKey to display the actual generic product key that was used. You can then use the same key in your XML file.
5. Language Settings
For some locales, the<component name="Microsoft-Windows-International-Core-WinPE" section may need attention. The UserLocale value can be your local language (e.g. en-GB or fr-CA) but the other settings should be in the main 'system' language (e.g. en-US or fr-FR).
The Windows AFG seems to get these right in the ones I have tested so far.
If the language set by the XML file is not supported by the ISO, then it will prompt you to select the country/language. Use the drop-down boxes to see what languages the ISO supports.
Example: If your ISO was an English (UK-only) version, then the ISO may not support other languages (e.g. en-US), so you will need to use en-GB for all settings.
6. Disk Partitions
You can define the exact size of a disk partition(s) in the XML file. The online generator tool actually defines a System Reserved partition (<size>100</size>) and an OS partition. For the OS partition, it creates a maximum sized partition (<Extend>true</Extend>) to fill the rest of the disk.
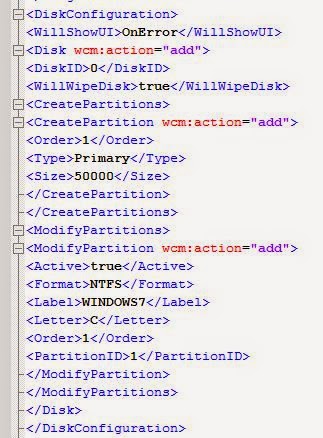
This section just creates a 50GB single partition.
Check also the InstallTo portion of the XML and the PartitionID value if you change the partition arrangement: e.g. for a single-partition drive you will need:
<InstallTo>
<DiskID>0</DiskID>
<PartitionID>1</PartitionID>
</InstallTo>
Troubleshooting
Don't forget that the XML file contains TWO entries for every parameter - one for x86 and one for amd64. If something does not work, check that you have modified both sections (or at least the correct section for your install!).
XML files need to be balanced - every <aaaa> section must end with </aaaa>.
You should not have more than one <component Name=xxx etc.> key of the same Name and Architecture type - the second section may be ignored.
It is advisable to set SkipMachineOOBE to false. If you have filled in all the fields (ComputerName, etc.) it should not pause for user input, even if SkipMachineOOBE is set to false.
If you suspect you may have an XML format problem, delete any comment lines and ensure the very first line starts with <?xml and then you can load the file in Word or some other XML editor:

This is how it should look in Word.

Microsoft Word will tell you where there are format errors when it loads the file.
Just click on the 'Details <<<' button.
If no X:\Windows\Panther folder exists, it usually means that the XML file was not found, look in X:\Windows\Setupact.log for clues.
Note: When using an XML unattend file, the \Sources\EI.cfg and PID.txt files are ignored.
A common mistake is to add a duplicate section of XML. If the same 'pass' or 'component' or other section already exists, then one of the sections may be ignored by setup.
Also, check any lines that use <Order>x</Order> lines - ensure that you do not have duplicate order numbers and that there are not any gaps in the (e.g. order lines of 1,2,3 are correct, 1,1,2 or 1,2,4 may not work).
If you have any problems I am happy to make suggestions which you can try, but because repeated installation testing takes a lot of time, I will not actually produce and test any XML files for you (at least not for free!).
After Installation
You will no doubt need to install drivers. If you do this a lot on the same type of system, read this article on how to semi-automate the driver installation using a batch file.
If possible, obtain the drivers from the system manufacturer's website - avoid downloading drivers from 'dodgy' sites as their downloads are often infected and/or contain adware or pupware.
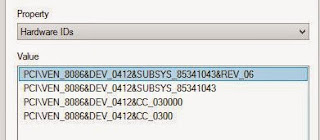
If you are not sure what missing drivers you need, use Device Manager to find the PCI ID of each device, then Google the PCI ID.
If possible, obtain the drivers from the system manufacturer's website - avoid downloading drivers from 'dodgy' sites as their downloads are often infected and/or contain adware or pupware.
If you are not sure what missing drivers you need, use Device Manager to find the PCI ID of each device, then Google the PCI ID.


If you always install the same common packages (e.g. Java, 7Zip, AVG, Avast, VLC, Chrome, etc. etc.) try Ninite to install the latest version (or to update it) in just one go. You can keep the Ninite file and drivers on the E2B drive for convenience.
You can go to the same Windows Answer File Generator website to create and download a features.bat file to enable or disable certain Windows features
AND
You can create and download a power.bat file to set any power settings
AND
You can create and download a services.bat file to enable/disable/configure any Windows services (only for experts).
You can chop out any lines in the batch file you don't want.
See below for how to automatically add these batch files into your install.
See below for how to automatically add these batch files into your install.
Note: E2B v1.82+ includes a new 'SDI_CHOCO' feature. This allows you to install drivers, applications and Windows Updates automatically.
XMLtoE2B
The Windows utility XMLtoE2B.exe will convert the output of the Windows Answer File Generator to the correct format for an automated install. The XML file can be used in E2B or it can be used outside of E2B.
XMLtoE2B will also allow you to add in GPT disk configurations for use with UEFI .imgPTN images (or any other Disk Configuration). XMLtoE2B (without a licence file) is available to download from the Easy2Boot Alternate Download Area. I will send a licence file to anyone who has made a donation of £10 or more, on request.
Note: Top buttons no longer work - go to www.windowsafg.com

Complete steps 1-5 to make a new XML file that will 'just work' with your ISO.
Add this code (for example) to the pass="specialize" section of your XML file:
Example for Windows 10 32-bit Asus EeePC 904HA:
<component name="Microsoft-Windows-Deployment" processorArchitecture="x86" publicKeyToken="31bf3856ad364e35" language="neutral" versionScope="nonSxS" xmlns:wcm="http://schemas.microsoft.com/WMIConfig/2002/State" xmlns:xsi="http://www.w3.org/2001/XMLSchema-instance">
<RunSynchronous>
<RunSynchronousCommand wcm:action="add">
<Order>1</Order>
<Path>cmd /q /c "FOR %i IN (C D E F G H I J K L N M O P Q R S T U V W X Y Z) DO IF EXIST %i:\INSTALLS\904_W1032.CMD cmd /k %i:\INSTALLS\904_W1032.CMD"</Path>
<Description>Run script</Description>
</RunSynchronousCommand>
</RunSynchronous>
</component>
<component name="Microsoft-Windows-Deployment" processorArchitecture="amd64" publicKeyToken="31bf3856ad364e35" language="neutral" versionScope="nonSxS" xmlns:wcm="http://schemas.microsoft.com/WMIConfig/2002/State" xmlns:xsi="http://www.w3.org/2001/XMLSchema-instance">
<RunSynchronous>
<RunSynchronousCommand wcm:action="add">
<Order>1</Order>
<Path>cmd /q /c "FOR %i IN (C D E F G H I J K L N M O P Q R S T U V W X Y Z) DO IF EXIST %i:\INSTALLS\904_W1032.CMD cmd /k %i:\INSTALLS\904_W1032.CMD"</Path>
<Description>Run script</Description>
</RunSynchronousCommand>
</RunSynchronous>
</component>
Ensure that you have a \INSTALLS\904_W1032.CMD file on the E2B drive and that it contains the correct code that you require to copy over any files. You will need to add code to find the USB drive letter and the Windows drive letter (if not known) and then you can copy over any files you wish from the E2B USB drive (see below for an example). You could also add a registry entry to run another script file at a later time (e.g. first user logon, etc.).
INSTALLS\904_W1032.CMD
title %~0
echo %~0 > %SystemDrive%\windep.log
set USB=%~d0
set >> %SystemDrive%\windep.log
echo USB=%USB% >> %SystemDrive%\windep.log
xcopy /herky %USB%\INSTALLS\904HA\WIN1032\*.* %SystemDrive%\DRIVERS\ >> %SystemDrive%\windep.log
xcopy %USB%\INSTALLS\904HA\WIN1032\setupcomplete.cmd %WINDIR%\SETUP\SCRIPTS\ >> %SystemDrive%\windep.log
dir %WINDIR%\SETUP\SCRIPTS\*.* >> %SystemDrive%\windep.log
dir %SystemDrive%\users\*.* >> %SystemDrive%\windep.log
:: open command prompt now (will be visible to user)
echo Type EXIT to quit this shell...
cmd /K
exit
\INSTALLS\904HA\WIN1032\setupcomplete.cmd
title %~0
:: THIS IS INVISIBLE TO USER!
echo setupcomplete > %SystemDrive%\setupcomplete.log
dir %SystemDrive%\ >> %SystemDrive%\setupcomplete.log
dir d:\ >> %SystemDrive%\setupcomplete.log
set >> %SystemDrive%\setupcomplete.log
echo whoami... >> %SystemDrive%\setupcomplete.log
whoami >> %SystemDrive%\setupcomplete.log
net user >> %SystemDrive%\setupcomplete.log
dir %SystemDrive%\Users\*.* >> %SystemDrive%\setupcomplete.log
echo setupcomplete > %SystemDrive%\Windows\setupcomplete.log
:: drivers, etc. should be in C:\DRIVERS folder now...
:: User account folder will exist - e.g. \USERS\USER1 folder
:: do not open cmd console - cannot be accessed! Possible no mouse either!
::cmd /K
:: this console cannot be seen!
::pause
exit
Note that the 'user' will be nt authority/system at this point and the working directory will be \Windows\system32\oobe.
If you find that the C:\Windows\setup\scripts\setupcomplete.cmd file does not automatically run (due to the use of the XML file and OEM product key?), you may need to trigger it to run another way (note that the folder scripts does not exist at this point so use xcopy not copy).
Setupcomplete.cmd runs several minutes after 904_W1032.CMD. Note that the \Users\Public folder exists at this time (and any new user account folder). This runs during the "Getting ready..." message in Win10. During Setupcomplete, %USERNAME% is "SYSTEM". The cmd shell is not visible or accessible. The user logon (if configured) will not proceed until the setupcomplete.cmd has finished executing.
Once the "Hi" and "Setting things up for you..." messages are reached, you can remove the USB drive.
Log files will be at \Windows\Panther\UnattendGC\setupact.log, etc. If anything goes wrong, boot to WinPE and use NotePad to view these log files.
The SDI_CHOCO feature in E2B requires you to add a RunSynchronous section to your XML file.
See the example xxxxx_SDI_CHOCO.XML files included with E2B. If you use XMLtoE2B.exe, you must still add in this section manually (e.g. using NotePad). Make sure the <Order> number is sequential with any other RunSynchronous commands (you cannot have two <order>1</Order> sections inside a <RunSychronous> section.
You can configure a completely automated install with drivers and applications (downloaded or offline).
Let me know if you found this useful by ticking one of the feedback Reactions boxes below.
If you know any tricks or 'Gotchas', please leave a comment.
Thanks
Steve
Adding files\folders to the install
If you have some files which you want to add to the C: drive (e.g. drivers, applications), then you can add a second XML section of code which will call a second cmd script during the specialize stage:Add this code (for example) to the pass="specialize" section of your XML file:
Example for Windows 10 32-bit Asus EeePC 904HA:
<component name="Microsoft-Windows-Deployment" processorArchitecture="x86" publicKeyToken="31bf3856ad364e35" language="neutral" versionScope="nonSxS" xmlns:wcm="http://schemas.microsoft.com/WMIConfig/2002/State" xmlns:xsi="http://www.w3.org/2001/XMLSchema-instance">
<RunSynchronous>
<RunSynchronousCommand wcm:action="add">
<Order>1</Order>
<Path>cmd /q /c "FOR %i IN (C D E F G H I J K L N M O P Q R S T U V W X Y Z) DO IF EXIST %i:\INSTALLS\904_W1032.CMD cmd /k %i:\INSTALLS\904_W1032.CMD"</Path>
<Description>Run script</Description>
</RunSynchronousCommand>
</RunSynchronous>
</component>
<component name="Microsoft-Windows-Deployment" processorArchitecture="amd64" publicKeyToken="31bf3856ad364e35" language="neutral" versionScope="nonSxS" xmlns:wcm="http://schemas.microsoft.com/WMIConfig/2002/State" xmlns:xsi="http://www.w3.org/2001/XMLSchema-instance">
<RunSynchronous>
<RunSynchronousCommand wcm:action="add">
<Order>1</Order>
<Path>cmd /q /c "FOR %i IN (C D E F G H I J K L N M O P Q R S T U V W X Y Z) DO IF EXIST %i:\INSTALLS\904_W1032.CMD cmd /k %i:\INSTALLS\904_W1032.CMD"</Path>
<Description>Run script</Description>
</RunSynchronousCommand>
</RunSynchronous>
</component>
Ensure that you have a \INSTALLS\904_W1032.CMD file on the E2B drive and that it contains the correct code that you require to copy over any files. You will need to add code to find the USB drive letter and the Windows drive letter (if not known) and then you can copy over any files you wish from the E2B USB drive (see below for an example). You could also add a registry entry to run another script file at a later time (e.g. first user logon, etc.).
INSTALLS\904_W1032.CMD
title %~0
echo %~0 > %SystemDrive%\windep.log
set USB=%~d0
set >> %SystemDrive%\windep.log
echo USB=%USB% >> %SystemDrive%\windep.log
xcopy /herky %USB%\INSTALLS\904HA\WIN1032\*.* %SystemDrive%\DRIVERS\ >> %SystemDrive%\windep.log
xcopy %USB%\INSTALLS\904HA\WIN1032\setupcomplete.cmd %WINDIR%\SETUP\SCRIPTS\ >> %SystemDrive%\windep.log
dir %WINDIR%\SETUP\SCRIPTS\*.* >> %SystemDrive%\windep.log
dir %SystemDrive%\users\*.* >> %SystemDrive%\windep.log
:: open command prompt now (will be visible to user)
echo Type EXIT to quit this shell...
cmd /K
exit
\INSTALLS\904HA\WIN1032\setupcomplete.cmd
title %~0
:: THIS IS INVISIBLE TO USER!
echo setupcomplete > %SystemDrive%\setupcomplete.log
dir %SystemDrive%\ >> %SystemDrive%\setupcomplete.log
dir d:\ >> %SystemDrive%\setupcomplete.log
set >> %SystemDrive%\setupcomplete.log
echo whoami... >> %SystemDrive%\setupcomplete.log
whoami >> %SystemDrive%\setupcomplete.log
net user >> %SystemDrive%\setupcomplete.log
dir %SystemDrive%\Users\*.* >> %SystemDrive%\setupcomplete.log
echo setupcomplete > %SystemDrive%\Windows\setupcomplete.log
:: drivers, etc. should be in C:\DRIVERS folder now...
:: User account folder will exist - e.g. \USERS\USER1 folder
:: do not open cmd console - cannot be accessed! Possible no mouse either!
::cmd /K
:: this console cannot be seen!
::pause
exit
Note that the 'user' will be nt authority/system at this point and the working directory will be \Windows\system32\oobe.
If you find that the C:\Windows\setup\scripts\setupcomplete.cmd file does not automatically run (due to the use of the XML file and OEM product key?), you may need to trigger it to run another way (note that the folder scripts does not exist at this point so use xcopy not copy).
Setupcomplete.cmd runs several minutes after 904_W1032.CMD. Note that the \Users\Public folder exists at this time (and any new user account folder). This runs during the "Getting ready..." message in Win10. During Setupcomplete, %USERNAME% is "SYSTEM". The cmd shell is not visible or accessible. The user logon (if configured) will not proceed until the setupcomplete.cmd has finished executing.
Once the "Hi" and "Setting things up for you..." messages are reached, you can remove the USB drive.
Log files will be at \Windows\Panther\UnattendGC\setupact.log, etc. If anything goes wrong, boot to WinPE and use NotePad to view these log files.
SDI_CHOCO
SDI_CHOCO with E2B provides a way to automate Windows installs and automatically add the correct drivers, applications and Windows Updates. You can add multiple machine configurations.
See the example xxxxx_SDI_CHOCO.XML files included with E2B. If you use XMLtoE2B.exe, you must still add in this section manually (e.g. using NotePad). Make sure the <Order> number is sequential with any other RunSynchronous commands (you cannot have two <order>1</Order> sections inside a <RunSychronous> section.
You can configure a completely automated install with drivers and applications (downloaded or offline).
Let me know if you found this useful by ticking one of the feedback Reactions boxes below.
If you know any tricks or 'Gotchas', please leave a comment.
Thanks
Steve
No comments:
Post a Comment