Tuesday 10 December 2019

Evaluation of the UNI-T UTP1306S 32V 6A 'linear' power supply

Due to some recent instability issues with my switched-mode bench PSU when subjected to a high sudden current demand spike, I decided to get a linear bench power supply. Also, by adding it to my existing bench PSU, I could get a +ve/-ve supply or I could get over 60V if I connect them in series (not quite sure how the CC would work though?).

In particular, I wanted a bench PSU with an Output Enable\Disable switch because I find it useful to be able to set a Voltage and Constant Current setting whilst my test circuit is already connected to the PSU terminals. Why all bench PSUs don't have this is totally beyond me!

One of the few suitable small (cheap) linear bench power supplies was the UNI-T UTP1306S (approx. $100 or £60). I looked at the review on YouTube (see below) before deciding to buy one. I figured that even if it failed on me, at least I would have a nice-looking project case for a future home-made bench PSU!

Note: Another popular PSU is the KA3005D (Bangood affiliate link) (or KA3005P programmable) which actually seems to be better as it has internal relays to control on/off voltage spikes and can be calibrated. It seems to have very low output ripple too.

The first thing I did was to take it apart and inspect it carefully, check soldering, earth connections, tightness of fixings, loose components, etc. The transformer seems remarkably small for a 192W linear PSU...


Some notes:

Another issue with the D3806 power module!

If you read my previous blog, you will see that I found that the D3806 power module produced large over-voltage spikes on its output terminals when you switch on the DC supply to it (even if it's output was programmed to be off on power-up). This could send a surge of up to 10V for approx 10 mS into your nice little 3.3V arduino and blow it up! It also sent spikes when you switched it off too!

I had planned to use this device together with an old ATX power supply to make a nice variable, current-limited bench power supply.

So I decided to try to work around this issue and I designed a delay circuit. The idea is that I would connect the +ve output of the D3806 through the contacts of a Normall-Open 10A-rated relay.

When you switch on the ATX power supply (or any power supply) the relay contacts would remain open for approx. 1 second and then (after the D3806 nasty over-voltage spike had finished) it would close the relay contacts and connect the D3806 ouput to the output terminals.

The delay circuit worked great. I also designed it so that it would open the relay contacts on power-off/decay BEFORE the D3806 over-voltage spike ocurred on it's output too.

Thursday 5 December 2019

Have you noticed that Google Chrome Translate has been broken for at least month now?

Have you noticed that you can't just right-click on a page and choose the Translate option any more in Chrome?

Being able to translate web pages is one of the main reasons I use Chrome rather than any other browser, but something is broken!

right-click on the text or page...
Computer says 'No'!
and the fix is...

Friday 29 November 2019

E2B v1.B8c Beta available

Includes latest MemTest86 UEFI v8.3 Free version - here
or from other Alternate Download Areas - Latest Betas.

MemTest86 Pro has many advanced features but is not free.

Is the D3806 Boost/Buck DC-DC power supply any good as a bench power supply? (+D3806 user guide\manual)

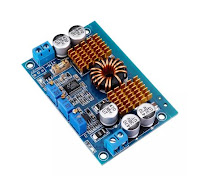
Due to problems I had with LTC3780 boost\buck converter boards and the fact that they are really not designed to be used with adjustable Voltage\Current potentiometers due to the high resistance pots required (the high impedance wires easily pick up stray noise which causes instability), I decided to try the D3806 Boost\Buck converter which has user push-button + LED display. These should be easy to extend to the front panel of a bench PSU as they should be all low-impedance connections.
D3806 - DC-DC boost\buck converter with potential 38V 6A output.
P/N 321510269

The LED+button board is on a separate riser PCB and contains a micro-controller. It is supposed to have reasonable ripple\noise output too (TBD).

But is it any good...?

Tuesday 12 November 2019

E2B v1.B8b Beta available + grub4dos coding tips

Changes from v1.B7 are are:
  1. Improve E2B scripts to allow the user to use a greater number of grub4dos environment variables in the MyE2B.cfg file (grub4dos max is 60).
  2. Add .vhdx file extension (was removed in last few versions).

About grub4dos environment variables

Sunday 10 November 2019

Why everyone is building their bench power supplies incorrectly (fix = cut the thin black wire)!

I ordered some  cheap Volt\Amp meters from Banggood and also a DC-DC buck-boost LTC3780 converter board. Many people have made YouTube videos and written Instructables about how to make a variable PSU from this combination (plus a DC source such as 12V from an ATX power supply) but nearly all of them are WRONG - but the solution is simple!

Usually described as "LTC3780 Automatic lifting pressure constant voltage step up step down 10A 130W"
Digital VA meter (note they seem to only have one decimal place for voltage, not two as shown in this stock picture!)

Note: This type of VA meter has thick Black+Red wire and thin Black+Red+Yellow wires. Do not confuse it with the other types which may have a thick blue wire or a thick yellow wire!

Many people who have built a power supply using these two modules have complained that the over-current pot on the Buck\Boost board did not seem to work. Other people have complained that the Ammeter reading was incorrect. A few have blown up their boards.

The diagram below shows the typical wiring arrangement that is used by most of these designs, but I have added in some extra purple lines to indicate the 0V traces which are already inside the DC-DC Buck\Boost board and already inside the VA meter.

Thursday 7 November 2019

My build of a 30V digitally controlled, current limited bench power supply for £45

Bench power supply for <£50

Note: Some links in this article are affiliate links. This article is not sponsored in any way and all materials used were purchased privately.

I wanted to get an adjustable current-limited bench power supply however good quality retail versions are very expensive and buying a cheap power supply is always risky.

UTP1306S - see blog post

This minileaf is on a flash sale for 2 days at Banggood, only £36 for a 30V 10A <10mV ripple, 5-star rated by 97% of customers) but always comes with the risk that it will stop working and be unrepairable after a while or will arrive in bits.


Due to the problems of returning faulty products when buying from overseas suppliers, if I was going to buy a bench PSU I would buy one from Amazon for £59 as it is easier to return faulty items.

By making my own PSU from modules, it will be easy to repair just by changing the faulty module.

Wednesday 6 November 2019

My fantastic KSGER soldering iron arrived today - but it had some faults...

This article contains affiliate links which I may earn a small commission from. All items discussed were purchased privately.

I have been looking for a new soldering iron for a while because my old Antex 40W iron is just not powerful enough. It can't cope with soldering to large terminals or other large connectors. This can cause heat damage to the components.
T12 soldering bit
Apparently the soldering irons that use the T12 type of soldering iron bits are highly recommended. These bits are fitted internally with a heating element and a temperature sensor. This means the heat can be controlled - only the tip gets hot which is where you need it. What's more, it can get to (say) 300 degrees C in less than 10 seconds because we are not heating a load of iron and copper in the shaft and collar of the bit - it can be left in 'standby' mode at say 150 degrees C whilst you are not using it and it will shake-and-heat to 300 degrees C in 3-4 seconds.

KSGER T12 soldering station

The KSGER station has a digital display and the 'shake-to-wake-from-standby' feature - if you shake the iron as you pick it up, it wakes from standby and heats up quickly. This helps the bits to last longer.

Monday 4 November 2019

E2B v1.B7 released

v1.B7 changes:
  1. Support .isomemgrub file extension (loads iso into memory before running it)
  2. Fix bug with .vhdmem file extension
  3. SWITCH_E2B v1.1.29 (bugfix for 'error 52' issue)
  4. Display date&time function now in new grub4dos
  5. grub4dos help menu entries added to the Adjust_E2B_Menu2.mnu file (also included in PimpMyDrive.cmd)
  6. Latest grub4dos 0.4.6a 20191028 for small bugfix and time+date update new function
  7. "\_ISO\docs\Make_E2B_USB_Drive\Make_E2B_Choose_Size_of_Ptn1 (run as admin).cmd" added if you want to make a USB drive with smaller size Ptn 1.
Early release available in Alternate Download Areas for few days before on main site - please report any issues ASAP.

https://rmprepusb.blogspot.com/p/e2b-alternate-download-areas.html