Thursday, 21 November 2013

Defining fonts in grub4dos

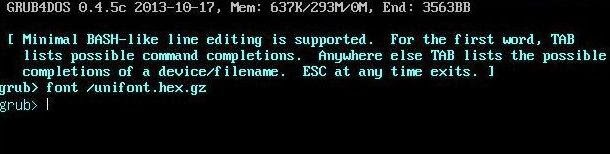
Chenall's grub4dos versions have the ability to load a GNU Unifont hex file using the inbuilt 'font' command. Easy2Boot uses this feature to load the unifont.hex.gz font file.
It seems there are a few bugs with this and chenall is hopefully going to fix this very soon (see issue 160). [Edit] Use grub4dos v0.4.5c 2013-11-30 or later[/Edit].

The normal way to use this is to switch to graphicsmode and load the font file, e.g. a UTF-8 format menu.lst file like this can be used:

graphicsmode -1 800
font /unifont.hex.gz

title reboot (重启)
reboot

However, we can also define hex fonts within a menu. The following menu will work without needing to use the font command or use a unifont file:

# font demonstration

graphicsmode -1 800

title test grub4dos font (GGGgggGGG)\n reload the menu
configfile /menu.lst

title Reset to BIOS font (use left/right cursor keys to select this menu item)
font

title reboot (重启)
reboot

title halt (关机)
halt

# Define specific UTF-8 fonts just by adding them to the end of the menu.lst file

# 4 chinese glyphs
5173:10100810082000003FF8010001000100FFFE010002800280044008203018C006
542F:010000801FFC1004100410041FFC10001000100017FC24042404440487FC0404
673A:100011F011101110FD10111031103910551055109110111211121212120E1400
91CD:001000F83F000100FFFE01001FF011101FF011101FF001003FF80100FFFE0000
# g character - ASCII code 67 hex
0067:0000000000023A44444438203C42423C


Note that the four chinese characters are displayed correctly and also the letter g is in a different font.
Each glyph has a unicode hex index number - you can look them up on a chart here
Standard ASCII characters are in the Basic Latin (ASCII) chart.

The font command will overwrite any existing ASCII font with the font contained in the BIOS, thus selecting the 2nd menu item will cause the g to be displayed in the standard font but the four chinese glyphs will be unaffected (as they are not part of the BIOS font table).

Note: If you try this yourself using an October/early November 2013 version of grub4dos, you will find that the g character will not be changed due to a bug in grub4dos. Hopefully, chenall will release a new version to fix this issue soon.

This feature means that you can define your own special characters if you wish, without needing to use a hex font file. If you only need a few special characters, you can just use the relevant lines taken from the unifont.hex file (extracted from unifont.hex.gz).

For instance, you can redefine the letter g as a series of vertical lines using:

0067:AAAAAAAAAAAAAAAAAAAAAAAAAAAAAAAA

As the hex byte AA is 10101010 in binary, we get 4 vertical lines per characters, like this:


Of course, you can use a different character code such as 0024 for $ rather than 67 for 'g'.

Note: The latest versions of Easy2Boot contain a variety of grub4dos font files for the standard 'Basic Latin' 0x20-0x7E characters.

Wednesday, 20 November 2013

Adding WinBuilder ISO files to Easy2Boot

If you have an ordinary WinPE ISO file on your Easy2Boot USB multiboot drive, you can make it automatically load the ISO file as drive Y: if you rename the file with a .isoPE or .isoPE01 file extension (more info here). However, PE ISOs are only mounted as a virtual drive when wpeinit runs, which for most WinBuilder PE builds is too late! So if you use a .isoPE extension for your WinBuilder PE ISO, you may not see all the Desktop icons (but the ISO will be loaded as drive Y: eventually by E2B).

Many WinBuilder builds have a \Windows\System32\winpeshl.ini file which typically runs some early Desktop initialisation utilities before the Easy2Boot unattend.xml has a chance to run and load the ISO as virtual drive Y: - e.g.

[LaunchApps]
MountPEmedia.exe
"hide /NOCONSOLE /SILENT /WAIT start.cmd"
"Shortcuts.exe -f %SystemDrive%\Windows\System32\Win7PE.cfg"
"PinTool.exe -debug %SystemDrive%\Windows\System32\Win7PE.cfg"
"X:\Program Files\PEShell\PEShell.exe"

Luckily (actually, probably luck had nothing to do with it!) most builds of WinBuilder have a special feature which will load the ISO file automatically as drive Y: on boot, if an .INI file is found.

For example, if you have made a recent WinBuilder Win7PESE ISO, just place a file in the root of the E2B drive called Win7PESE.ini with the path and filename of the ISO - e.g.

[IsoInfo]
IsoName=\_ISO\MAINMENU\Win7PE_x86.ISO


The filename may vary depending of what PE build you are using. The .ini file will cause the WinBuilder PE to load the ISO as drive Y: when MountPEmedia.exe runs. Consult the documentation for the exact INI filename that is required (click the yellow warning triangle that appears on the PE Desktop when drive Y: is not found).

Tuesday, 19 November 2013

System won't boot Easy2Boot from a USB Hard disk?

TGP1994 on reboot.pro wrote that he had a Dell Optiplex 7010. He had made an Easy2Boot (E2B) USB Hard drive and also an E2B USB 'Helper' Flash drive. The problem was that when both USB drives were connected, the Dell insisted on booting from the USB Flash drive and would not boot from the E2B USB Hard disk.

If you are using the E2B Helper+USB HDD combination, it would be useful if you could boot from either of them and still run E2B. To do this, just install grub4dos onto the USB Helper Flash drive and also copy the grldr file onto it (using RMPrepUSB). Then add a new menu.lst file (press F4 in RMPrepUSB) and add these lines:

echo Booting from the Easy2Boot Helper USB Flash drive...
find --set-root /_ISO/e2b/grub/menu.lst
chainloader /grldr
boot

This will allow you to boot from either one of the USB drives and run E2B. However, you will only be able to run Windows Install ISOs. If you use any function which uses the grub4dos partnew command (e.g. booting from a linux .iso file) this will not work because partnew makes a new partition on hd0 (the boot drive) and the ISO file must also be on the same drive. As hd0 will be the helper flash drive and the ISOs are on the USB HDD, partnew will not work. v1.23 and later may fix this issue.

Friday, 15 November 2013

Easy2Boot v1.17 with support for DOS .ISO files

Ashwani emailed me today to ask how he could get his Partition Magic ISO to boot correctly.
It turns out that this ISO boots via MS-DOS Floppy Disk emulation, it then loads the MSCDEX CD-ROM driver to give access to the files on the CD as drive S:.
This type of ISO is difficult to boot from successfully without modification, because there is no 'CD' for the CD-ROM driver to find when booting it as an ISO file from a USB drive. As a workaround, I have added support for the special .isoDOS file extension to E2B v1.17. This will copy the contents of the CD part of the ISO to a virtual floppy drive so that all the files are easily accessible from DOS.

In the case of this particular ISO, what Ashwani needs to do is install E2B v1.17 and then copy his DOS-based Partition Magic.iso file to the \_ISO\MAINMENU folder and change the file extension to .isoDOS.

What will happen when you pick this entry from the E2B menu, is that E2B will create a large FAT16 virtual floppy disk (fd0) in memory and then copy the files from the ISO to the virtual floppy.
When grub4dos boots, it does so via floppy emulation and so the virtual fd0 is shifted by the BIOS to fd1,  and fd0 becomes the floppy boot image which was on the ISO file boot sectors. Thus when DOS boots from the emulated floppy image on the ISO, it will be drive A: and the CD files will be found on drive B:.
When Autoexec.bat runs (or Config.sys), no CD will be found and there will be no drive letter assigned to the 'CD' and thus the ISO will probably fail to run any program automatically from a batch file.
However, if we look at the contents of the A:\autoexec.bat we can see that it runs MSCDEX to assign drive S: as the CDROM drive letter, changes to the S: drive and then runs either 'ghost.exe -nousb' or 'pqmagic.exe'.


So all we need to do is type:

B:
ghost.exe -nousb

to run ghost, or

B:
pqmagic.exe

to run partition magic.

The new E2B version can be found at the very bottom of the page of Tutorial 72a (as usual).

The .isoDOS file extension may prove useful for a variety of DOS-emulation based ISO files. If you want to, you can edit the startup files in the ISO to remove any cdrom drivers and use the drive letter B: instead for the 'CD' volume (instead of S: or whatever was used), then it will boot automatically directly from the ISO under E2B.

v1.17 also now has an option to suppress the checkaccess BIOS bug check on startup and also has modified code around the finding of the \autounattend.xml file (which hopefully has not broken Windows installs!).

Wednesday, 13 November 2013

Add Hirens 9.5 to Easy2Boot

I have added a new Tutorial so that you can add old DOS-based Hirens ISOs to Easy2Boot (or any grub4dos USB drive) here.

The Get_Boot_Files.cmd batch file is useful because it extracts the DOS boot image from any ISO and makes a 1.44Mb .bin file from it, which can be read by WinImage or ImDisk, etc as a floppy disk image. It also extracts the files from the ISO boot image for you, into a new folder.

The Tutorial is based on an original article I found here.

Monday, 11 November 2013

Easy2Boot - changing the font

Note: grub4dos has now been fixed and E2B v1.22 and later now contains dozens of different fonts which can be used by E2B simply by specifying the font file in your MyE2B.cfg file! This article is therefore now (2014) outdated.

Easy2Boot loads the unifont font file so that non-Roman characters can be displayed.
You may have noticed that the when this occurs during booting, the text changes from relatively bold characters to thin characters:


However, when a grub4dos menu is loaded using configfile, grub4dos changes the text back to bold.

It would be nice to have different fonts selectable in E2B and maybe also be able to select italic or bold fonts for the menus too. I am working on this, but for now, if you want to try using the thin font in your menus, you can try this workaround:

At the bottom of your \_ISO\MyE2B.cfg file  (which should start with !BAT on the first line), add these

two lines:

set gg=;;
set pwd=easy2boot %^gg% font /%grub%/unifont.hex.gz


This will cause all menus to be displayed in the thin font (except the Windows Install menu).

Let me know if you want to have this type of thin font as an option for all your menus.

P.S. You can change the line width and separate each individual menu entry by changing the lnspace variable value in \_ISO\MyE2B.cfg. The spacing between letters can also be changed using the wdspace variable. Here is what you get using a MyE2B.cfg file of:

!BAT
set gg=;;
set pwd=fred %^gg% font /%grub%/unifont.hex.gz
set wdspace=2
set lnspace=4
set topstart=2
set rstart=3
set noitems=18
set menuw=42
set bdwidth=1
set tophelp=20

Note that because the word spacing has been changed, it affects the menuwidth (menuw) setting because less characters will fit across the screen. The number of menu items is also affected if you increase the lnspace setting.


I would not recommend changing the wdspace value (keep it at 0) as this affects the menu title spacing at the top of each menu.


Sunday, 3 November 2013

Listen to Amateur Radio Hams using the internet!

When I was sixteen (many years ago now - I would have to print the year in Roman numerals to tell you what year it was!), I took the UK Amateur Radio Exam (RAE) after joining the Harwell Amateur Radio Club for a year or so and taking part in a 24hr Ham Radio contest stuck on the top of the cold and windy Chiltern Hills all night trying to keep awake! Unfortunately, I failed the exam by just 1 grade (I was in the middle of revising for and taking 10 GCSE O-levels at the same time, so I sort of had an excuse... and the RAE wasn't multiple choice like it is today!). If I had passed the RAE, I believe I would have been the youngest person to have become a licensed Ham in the UK (at that time). Shortly after that, my family moved from the Berkshire countryside into the middle of Oxford City and so I waved goodbye to my hand-made 102' aerial on it's 30' mast strung up to my bedroom window and attached via coax to my Trio ham radio receiver and self-built valve notch pre-amplifier... and never went back to Ham Radio ever again (sigh...).

Have you ever wanted to listen to Amateur Radio (aka Ham Radio) but didn't want the expense and bother of buying the equipment and erecting an aerial, etc? Well why not listen to it over the web?

You may have heard of SDR (Software Defined Radio).
A basic SDR system may consist of a personal computer equipped with a sound card, or other analog-to-digital converter, preceded by some form of RF front end. Significant amounts of signal processing are handed over to the general-purpose processor, rather than being done in special-purpose hardware. Such a design produces a radio which can receive and transmit widely different radio protocols (sometimes referred to as waveforms) based solely on the software used.


Well, if you connect an SDR PC to t'internet, you get a highly tunable radio that can be controlled by anyone on the web. The University of Twente in the Netherlands have made just such a thing available for us all here.
Twente - Wide-band WebSDR

1. Click here to go to the website - if you get a Security Warning, don't worry, it needs to run an app. -  so enable it to run.

2. Next scroll down the page until you see the cyan box for HTML5 and click the 'Click for test of the HTML5 audio' button - if it works then enable HTML5 for both Waterfall and Sound. This gives a better and more controllable display.

2. Next, type in your name or nickname in the log-in cookie box (optional).

3. You should see a moving waterfall display. The frequencies are shown along the X-axis. There is an Amateur band shown in green at 20m, so click on the dark green 20m text. This should move the yellow pointer to that position.
4. Now we need to zoom in for better control, so click on the 'Waterfall view - zoom in' button just below the waterfall graph until you have the whole 20m band in view. If necessary, click and drag the waterfall display across, so that the 20m band is in the correct position. If you zoom in enough, you will see some known station id markers appear - see below:
5. Now find a station in the green 20m band - start with one of the strong white ones and either drag the cursor to that position or use the Frequency adjust buttons (---, --, -, +, ++, +++) to move the frequency cursor. Make sure the AM button is clicked to start with.

6. When you start to hear a channel that sounds like a voice (but it may sound like mickey-mouse or Johnny Cash if a side-band is being used), then use the same Frequency buttons to fine tune for the strongest signal by looking at the signal strength bar:


7. Now we need to find out what type of transmission it is. If the voice sounds like it has been pitch-shifted, try clicking one of the LSB (Lower Side Band), USB (Upper Side Band) or other similar buttons to get the most intelligible sound. If you can hear more than one voice or have other interference, try narrowing the bandwidth using the 'narrower' button. If the signal is weak, try the 'wider' button to try to get as much of the signal as possible (without picking up other broadcasts). Amateur transmissions are not normally FM (Frequency Modulated), so you shouldn't need this unless you are listening to BBC Radio 3!

8. You can now try the squelch and autonotch check-boxes to see if it improves things.

9. Once you have found something and it is nice and clear, use the store button to save that frequency and all other settings. You can also record it using the 'Recording - Start' button.

Have fun!
Steve

P.S. OK, so it is nothing to do with USB, but you can get USB SDR receivers and with special software, hack them to make your own SDR - search for SDR on YouTube if you are interested or click here for a Hak5 video by 'Snubs' using a $20 dongle.

If you know of any other web SDRs or have anything to add, please add a comment.


Saturday, 2 November 2013

Add the CAINE ISO to your E2B drive

C.A.IN.E (Computer Aided INvestigative Environment) is a linux live distro. I downloaded the Caine4 for netbooks ISO after it was suggested to me by Paul M, as I had not seen it before. It's intended purpose is for Forensics and disk volumes are not mounted automatically and you can use the systemtray 'mounter' to mount volumes as read-only.
The netbook ISO downloaded was pretty large (1.8GB) and after copying it to the \_ISO\MAINMENU folder on my Easy2Boot 2TB WD Passport USB hard disk, it booted up fine on my Asus EeePC netbook (Intel Atom 32-bit CPU).
CAINE Boot Menu
Main CAINE Desktop

I haven't actually started to use it yet and investigate it's capabilities but it looks promising.

Tuesday, 29 October 2013

Easy2Boot v1.16 + DPMS2 now available

E2B v1.16 is the same code as 1.15e. Just an extra demo theme added for 'beep' and keeping the background displayed has been added to the \_ISO\docs folder.
I have also updated the link in Tutorial 72a for E2Bv1.16+DPMS2 mass storage drivers.
If you already have v1.15e there is no need to update.

Saturday, 26 October 2013

How to make your USB drive Write-protected under Windows

Many of you may be aware that recent versions of Diskpart (after WinXP) have the ability to set 'Read-Only' attributes on a disk or volume. I decided to investigate this feature a bit more thoroughly and this is what I have found. If you already know about this feature then don't stop reading, what I discovered may surprise you!

First, we have to distinguish between the two types that Windows separates 'disks' into - namely 'Removable' and 'Fixed'.

Now in the case of USB Flash Drives (UFDs), most of these are classed as 'Removable'. In the case of USB Hard Disks (UHDs) these are all (??) classed as 'Fixed' (or 'Local' in Explorer). RMPrepUSB will indicate which type of disk it is when you select it. Diskpart will list the types if you use the 'LIST VOLUME' command - you will see either 'Removable' or 'Partition'...

DISKPART> list volume

  Volume ###  Ltr  Label        Fs     Type        Size     Status     Info
  ----------  ---  -----------  -----  ----------  -------  ---------  --------
  Volume 0     E                       DVD-ROM         0 B  No Media
  Volume 1     I                       DVD-ROM         0 B  No Media
  Volume 2     G                       DVD-ROM         0 B  No Media
  Volume 3     D   HDD DRIVE_D  NTFS   Partition     10 GB  Healthy
  Volume 4     C   HDD DRIVE_C  NTFS   Partition    222 GB  Healthy    System
  Volume 5     Z   HDD1_500GB   NTFS   Partition    465 GB  Healthy    Pagefile
  Volume 6     F   SSD HARD DI  NTFS   Partition    111 GB  Healthy    Pagefile
  Volume 7     H   LEXAR JD     FAT    Partition     15 MB  Healthy
  Volume 8     J   USBPEN       FAT32  Removable   1992 MB  Healthy


We can list disks in Diskpart using;
LIST DISK
We can list volumes in Diskpart using:
LIST VOL
We can select a disk or volume using:
SEL VOL 8   or    SEL VOL J   or
SEL DISK 3
We can see what the RO status is using
DETAIL DISK or DETAIL VOL

Current Read-only State : Yes
Read-only  : Yes

Note that the Current Read-only State signifies the current state in Windows and not the state of the disk - for instance, if there is a physical write-protect switch on the USB drive which is set to 'Lock', then the Current Read-only State may be Yes, even if the actual disk state is write-enabled (Read-only : No).

Once we have selected a disk or volume, we can set or clear the Readonly attribute.

Attribute disk set readonly
Attribute disk clear readonly
Attribute vol set readonly
Attribute vol clear readonly

So under Diskpart we have two options when setting 'ReadOnly' status and we have two types of 'disk'.

Here is what happens in each of these 4 cases:

1. Type=Removable, Set Disk=RO
Diskpart makes a change to the Windows Registry - no change is made to any sectors on the disk.

2. Type=Removable, Set Volume=RO
N/A - Diskpart will refuse to run as the disk is removable.

3. Type=Fixed, Set Disk=RO
Diskpart makes a change to the Windows Registry - no change is made to any sectors on the disk.

4. Type=Fixed, Set Volume=RO
Diskpart makes a change to the Windows Registry AND changes the disk contents.
If the drive is an MBR type (not GPT) then all volumes are marked as write-protected.
The MBR and all sectors up to the Partition Boot Record are not protected by Windows however.
If you connect the USB drive to a different Windows system (even a WinXP system), you will not be able to copy files to any volume on the drive. This also applies to UFDs that appear as 'Fixed' disks to Windows.

Now you may be already aware of this behaviour. However, I decided to investigate what disk contents were changed in Scenario 4 above. This was quite easy using RMPrepUSB. I simply made a single 20MB FAT16 partition on a Lexar Jumpdrive UFD that had it's Removable Media bit flipped using the Lexar BooIt.exe utility so that appeared as a Fixed Disk, and then used the RMPrepUSB - Drive->File button to save an image of all sectors up to the end of the partition. I then used Diskpart to set the Volume to Read-only and saved another image and then compared the two images.

The results were rather surprising. Diskpart had completely overwritten the contents of LBA2 (the 3rd sector) of the UFD! It had written 24 bytes of data followed by 488 bytes of 0's to fill the sector. Even if you have boot manager code in this sector, it is overwritten by Diskpart! Luckily this does not seem to stop grub4dos from booting if it was already installed to the MBR and pre-PBR disk sectors.

The bytes that were written were: 
0000 A2 A0 D0 EB E5 B9 33 44 - 87 C0 68 B6 B7 26 99 C7  ¢ Ðëå¹3D ‡Àh¶·&™Ç
0010 00 00 00 00 00 00 00 10 - 00 00 00 00 00 00 00 00  ....... ........
0's etc. etc.

These bytes don't seem to vary, even when Diskpart sets Volume RO status on a 2TB NTFS multi-partition UHD.

However, I found that if you write-protected a 'Fixed' disk Lexar UFD in this way and then 'flipped' the Removable Media Bit to make it a 'Removable' drive again, Windows XP-Win8 no longer treats the volume as write-protected. So this special read-only marker sector only works on 'Fixed' disks and not on 'Removable' disks. :-(

So what if we format a 'Fixed Disk' UFD with RMPrepUSB, install grub4dos to the MBR, and then 'blat' LBA2 with the 'write-protect' sector data... Yep - works fine! The volume is write protected and we cannot copy files to it. If you try to format it in Windows then it won't format it:


However, as the MBR and early sectors are not protected by Windows, we get a strange result if you try to re-partition it using RMPrepUSB. RMPrepUSB erases the early sectors, but then Windows prevents it from erasing the Partition Boot Record and RMPrepUSB returns an error. The volume, PBR and all files are still present. However, if you unplug the USB drive and re-connect it, because LBA2 is now wiped by RMPrepUSB, the USB drive is no longer 'Read-only' and so we can partition and format it using any utility.
You get similar strange results in Disk Manager, which can seem to unformat the partition and return it to 'RAW' status, but not re-format it until the Read-only status has been removed using Diskpart!

So it seems we cannot use this Diskpart Attribute feature to write-protect Removable UFDs... what a pity! If however, you have a UFD that is of the 'Fixed' disk type or you 'flip-the-RMB-bit' using a utility like BootIt (which only works on some Lexar and Netac UFDs and a few other types), then you can have a protected volume using this feature.

P.S. If you have a 'Removable' USB drive, you can hide a partition containing your files by making a drive with two Primary partitions using Easeus Partition Master and then use the RMPrepUSB - Ctrl-O feature to swap Windows access between the two partitions. This does not stop someone from re-partitioning it however and modern Win10 systems can now access all partitions on a Removable drive anyway.

You can write-protect some SD cards and Flash drives if you use the correct special factory utility to reprogram it. This process is not without risk however, and you could end up 'bricking' your flash drive or SD card. You must always use the correct tool. See here.

File Permissions (NTFS)

To protect all files from alteration under Windows, you can change the Windows file permissions on all files on a USB drive.

First select the USB drive in Windows Explorer - right-click and select Properties and then the Security tab. Now click the Edit button and untick the Full Control, Modify and Write boxes - then click on OK. All files on the drive will have their permissions changed. Windows can still add new files but cannot modify or delete any of the existing files. Unfortunately, these permissions are ignored by (most?) linux distros and grub4dos.


Note: If you have a USB HDD with multiple partitions, you can hide any of them from Windows (not linux) by using BootIce - Manage Part - select partition - Hide. When you next connect the USB drive the partition will be hidden. if you unhide it with BootIce, it will immediately be unhidden.

Further reading: 'How to fix Write-protected Read-only drives and SD cards'


Write-Protect NTFS drives

NTFS Drive Protection is  small Windows executable that can change the NTFS permissions on an NTFS volume. You can use this to write-protect a USB drive, but it also allows for some folders on the drive to be read/write whilst all others are read-only.


Keep this on yout USB drive and run it just before you connect the USB drive to an infected system.